
|
|
|||||||
| Custom Terrain & Obstacles For Custom terrain, buildings, and other misc. obstacles |
|
|
Thread Tools | Search this Thread | Display Modes |
|
#1
 August 27th, 2007, 03:59 PM
|
||||
|
||||
|
Annerios' Custom Terrain: Sci-fi -Industrial- Vydar Terrain
This is my first foray into custom HS terrain, so don't throw too many tomatoes!
I love the way the official HS terrain is customizable, so for my first terrain project I wanted to do something that featured a similar customizable nature instead of a pretty, but "fixed" piece. I had a Hexagon building set I had built that looked nice, but was not getting much use, so I took it apart and designed a way to make the asphalt terrain look like metal flooring. Here is my Vydar/Industrial/Sci-fi terrain expansion set for classic HS or Marvel HS:  The grid pieces that are not attached to the terrain can be used to place over pools of liquid, etc and are handy.  The tiles are really meant to place on top of the asphalt or other HS terrain, but because of how they are cut you can build on them.   The bridge railings just sit in the groove between the tiles to make them more versatile and useful.  There are line of sight blockers. 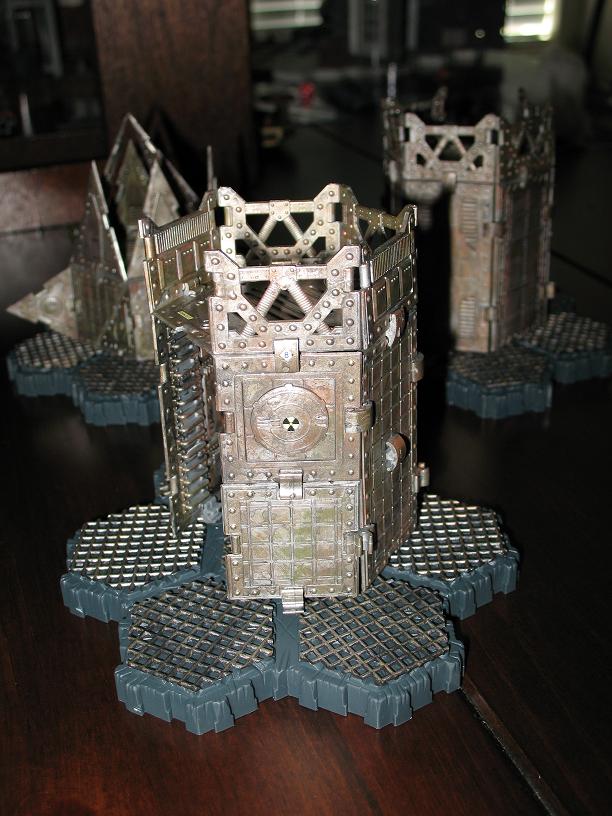 The towers have small labels with numbers that indicate the height or the base tower and the rail, so there is no question during the game. They also have 3 tabs on the bottom so they fit into the terrain and are not just sitting on the surface of the tiles. That helps to prevent them from being knocked over or moved accidentally.  One side is left open for either excellent protection from ranged attacks or for the ladder placement.    The clips from the kit can be used to slide into the ladder pieces and then attach them straight to the towers. Hasbro's ladder design is fantastic, so I wanted to use the existing ladders if at all possible.   By removing the tabs from the bottom of the towers, you can move them around a bit and do some interesting things like these two towers with walkway between them. This uses the old clip under the tile trick to keep the span in place, but it works really well. Since the tower is hexagonal, it fits right over the terrain framework I created.    The best part is that the pieces come apart, so you can re-arrange or replace the railings as needed.  The pieces can even be stacked. So, what can this terrain be used for? For all sorts of scenarios!   Alpha Prime Soulborg Gladiator Pits!  Grungy Star Wars terrain!   Modern sci-fi or horror scenarios!  Marvel!     And, of course, Aliens vs Predator! Did you think I'd leave them out? As for rules, right now, much like the roads, if all of your movement is on the metal tiles you add +2 to your movement. The grid pieces over lava or the Marro swamp pieces that can be used as toxic waste give you a -1 to defense if you are standing on them. You can walk over it, but the heat and fumes coming from underneath interfere with vision and electronics. This project took 4 hours or so to create, but cost less than $20!  The grated flooring is made from a needlepoint plastic mesh that can be found in the Wal Mart craft department. It only costs around .74 cents for a large sheet. The only problem is that for some reason Texas' Wal Marts don't carry it in black like they did in Miami. I recommend using the black mesh, so if some of the paint rubs off over time, seeing the black underneath will look fine. White looks bad, so you will have to spray paint it. If you are going to do that, then you are probably better off spray painting it a gun metal instead. I found the black mesh online very cheap on e-Bay.  I used to use this stuff to make Sci-fi terrain for other games I played years ago. You can't find easier or more durable ready made flooring for the price.  Painting two full sheets of the black mesh only took around 20 minutes. First I drybrushed it with gun metal. Then, I used a mixture of gun metal and orange paint to create a nasty rusted color. It then got a drybrush with that, followed by a light touch up of silver. Once it dries, you can use one of your glyphs as the template to cut out the hex pieces from the painted sheet. The material is very easy to cut and work with. So, it is tiresome, but not difficult work. It took around an hour and a half to cut as many hexes as I could from 1 sheet. For the large 7 hexes, I used 7 water tiles as a guide.  When I first worked on the project I used a fiberglass mesh that is often used for car repairs as the material for the hexes (on the far left). It is very lightweight and easy to cut. I often used it on sci-fi miniature bases. However, I could not locate a large enough quantity of it at a decent price. Also, the larger gap between the gratings of the needlepoint mesh looks more interesting and dramatic than the fiberglass mesh.  The Hexagon set comprises the other part of this project. You can often find these sets online for as low as $9.00. Basically, this set is a snap together model kit. http://www.thewarstore.com/IMEXPlatformerHexagon.html The worst part about it is cutting the pieces off the sprues. It can take a couple of hours. I painted mine after if was cut from the sprues, but you can paint the pieces right on there to make it faster, then worry about the cutting and snap together assembly. The Hexagon set is already metallic in color, so I grunged it up with a black wash, some rust and a mix of military greens and browns for that weathered effect. The plain metal look is fine though and probably more like what we would get from Hasbro if (when?) they make a set like this. The hardest part of the design was the bridges. They were made through trial and error and are made from railing pieces flipped upside down and long pieces that I cut from some of the pieces in the set to make the middle supports. I screwed them up a bunch of times, until they worked correctly. They are glued together unlike most of the other snap together pieces. I used plastic model kit glue initially, but it turned out to be a bit brittle after using the pieces for a while. I then switched to a 2-part epoxy meant for joining plastic by Loctite. It takes around 7 minutes to set, but is very strong once it is fully dry. Well, that is about it, if anyone has any specific questions, let me know. 
|
|
|||||||
|
|


 Threaded Mode