
|
|
|||||||
| Custom Units & Army Cards Fan-created HS army cards for units, glyphs, and equipment |
 |
|
|
Thread Tools | Search this Thread | Display Modes |
|
|
|
#1
 April 26th, 2008, 09:25 AM
|
||||
|
||||
|
whitestuff's Photoshop Tutorials
I was helping out in the Marvel Customs area and thought that there might be some people interested in this as well.
If this is useful to anyone else then good. I'm no Photoshop savant but if you have any particular Photoshop tutorial requests, feel free to ask. If I can help, I will. Tutorial Number 1 LOS/Targeting Silhouette Image  1. Find the image you're planning on using for your figure. If it is a Heroclix figure then go to the wizkids site and search in their galleries for the picture of your character. Here is the figure that I'll be working on. 2. Open the image into Photoshop (PS)  3. When you open a picture in PS, it's layer is locked by default  so you'll need to click on the layer (keep your mouse button pressed) and drag it to the 'new layer' button on the bottom of the left-hand side of the program. so you'll need to click on the layer (keep your mouse button pressed) and drag it to the 'new layer' button on the bottom of the left-hand side of the program. 4. When you are above the 'new layer' button, release the mouse button. You should now see 2 layers. 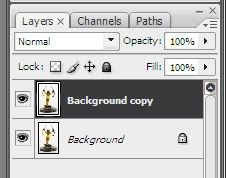 5. Click on the 'eye' symbol of your original layer so that it is no longer visible. 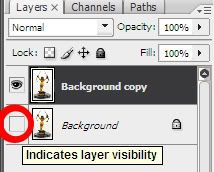 6. Select the 'Magic Wand Tool' from the tools on the right-hand side.  7. Making sure that the newly copied layer is selected, click on the background. You should see the 'marching ants' indicating the areas that you've selected. 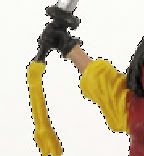 8. With the background area selected, hit the delete button to make the background magically disappear. Notice that you now see a checkerboard background which represents invisible pixels. 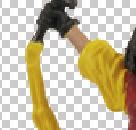 9. Tidy up any missed areas with the eraser tool. You don't have to be too precious about this as it will be coloured over anyway 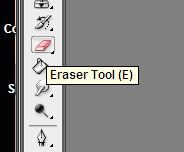 10. When using the eraser tool you can right click on the image to get a dialog box in which you can change the size and shape of your eraser tool. 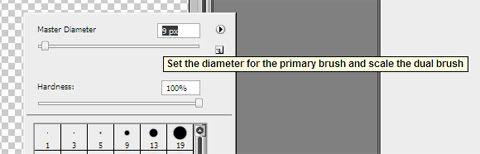 11. You should now have an image with no background.  12. Make a copy of this new layer.  13. Make sure the newest layer is selected. 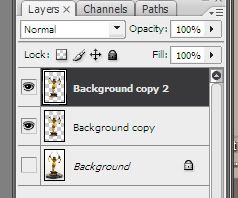 14. Notice the 'Opacity' slider?  Drag the opacity down to about 50%. 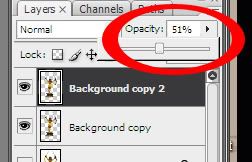 15. Select the "Magic Wand Tool' and click on the checkboard background. (If you hold down 'shift' and click you can add to you selection. If you hold down 'alt' and click you can subtract from your selection.) 16. If you where to try and draw on you image, nothing would happen as we have selected the background and not the image, so from the menu options on the top of the screen, choose 'Select' and then 'Inverse'. 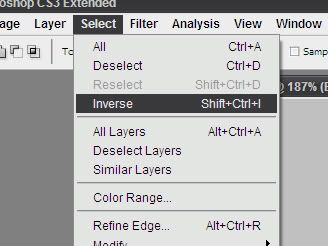 17. With the image now selected, we can now start colouring (and it will all be within the lines 18. Choose the 'Brush' tool. 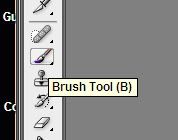 19. Notice the two coloured squares at the bottom of the tools on the left-hand side? Click on the full box to change the foreground colour.  20. Choose the appropriate red and click 'OK'.  21. Paint over all of the parts of the figure that someone could target.  Notice that you can still see the image underneath the coloured part. (Don't worry, it is meant to look that way.) 22. Once finished, change the foreground colour to the grey used to show parts that cannot be targetted and click 'OK'. Colour them in. 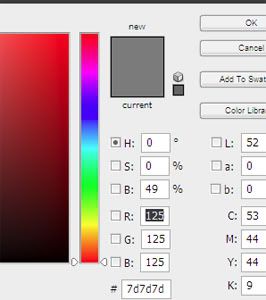 23. Change your foreground colour to the green used for the sighting spot and click 'OK'.  24. Zoom right in, choose an appropriate size for the circle and click once, right between the eyes. 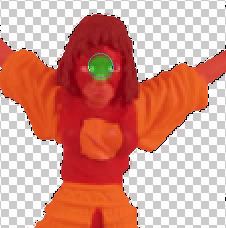 25. Deselect the image be using the menus across the top. 'Select' -> 'Deselect'  26. While the newly coloured layer is still selected, slide the 'opacity' back up to 100% and marvel at your finished image. 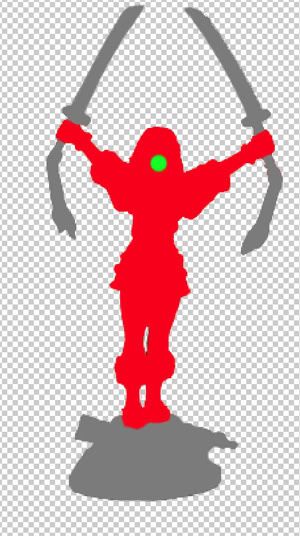 There you go. Am I missing any parts? Any bit not explained clearly? Let me know. Last edited by whitestuff; April 26th, 2008 at 09:34 AM. 
|
|
#2
April 28th, 2008, 12:22 AM
|
||||
|
||||
|
Re: whitestuff's Photoshop Tutorials
This seems easier than the way I have been doing mine for years... Thanks!
"Just let the dirt shower over you" - Brennan Huff "Do Good, Avoid Evil" - Charles N. Mahlman Check out my Custom Cards Check out my blog: http://docsavagetales.blogspot.com/
|
|
#4
December 12th, 2010, 05:25 AM
|
||||
|
||||
|
Re: whitestuff's Photoshop Tutorials
I haven't been in here for a while...
Quote:
|
|
|
|||||||
|
|
 Similar Threads
|
||||
| Thread | Thread Starter | Forum | Replies | Last Post |
| whitestuff's customs **updated 9 april** now with TF2scape | whitestuff | Custom Units & Army Cards | 77 | September 17th, 2012 11:33 PM |
| whitestuff's forays in cartography | whitestuff | Maps & Scenarios | 28 | September 25th, 2011 02:30 AM |
| whitestuff's advanced gimpshop tutorial | whitestuff | Custom Units & Army Cards | 161 | May 19th, 2011 11:09 AM |
| whitestuff's supers - updated Aug 30 | whitestuff | Comic Hero Custom Creations | 225 | October 2nd, 2009 05:16 PM |
| gimp tutorials | Dad_Scaper | Software | 1 | January 17th, 2007 11:16 AM |


 Hybrid Mode