
|
|
|||||||
| Custom Terrain & Obstacles For Custom terrain, buildings, and other misc. obstacles |
| Search Forums |
| Advanced Search |
| Search Downloads |
| Advanced Search |
| Search Gallery |
| Advanced Search |
| Search Blogs |
| Advanced Search |
| Go to Page... |
 |
|
|
Thread Tools | Search this Thread | Display Modes |
|
#1
 April 15th, 2012, 11:45 PM
|
||||
|
||||
|
Heroscape Navy - Empress ship, 2 hour project
Creating a Heroscape fleet.. one Popsicle stick at a time.
Intro
Spoiler Alert!
Recently I stumbled upon some pictures of converted mega blok ships turned into 28 MM warships and I was hooked! Couldn't wait to give it a shot. I have been searching multiple forums and reading everything online I could find about converting toy ships into 28mm gaming "platforms" or terrain. I have saved over 50 odd links and around 200 pictures, and have a word document of about 15 pages of saved tips, advice and suggestions I have found interesting and helpful. I will try and summarize it here and make a tutorial of the ships I plan on converting. I have not done this before so I know it will be slow and huge learning process, so bear with me this is WIP so I will be updating this guide and filling the blanks as I learn new stuff. Pre made ship kits are much more detailed and easy to find although very expensive, for the purpose of this guide I will only be talking about toys and play-sets. Ships
Spoiler Alert!
In this section I will include several of the recommended toys and playsets used by others to convert into 28mm ships. From what I have read, Mega Bloks are the best ones to use but require the most modification. On average I have seen them from $10 on Craigslist to around $35ish on ebay including shipping. Of course there are those who want to sell them to you for $150 but you only need a used hull with most of its big pieces, as you will be replacing most of the details any way. Mega Bloks
Spoiler Alert!
Mega Bloks Pirates of the Caribbean Captain Davy Jones 1012 Captain Davy Jones released in 2006. Can be used to make a 2-3 hexed rowboat  The Black Pearl 1017 The Black Pearl set released in 2006. 1066 Black Pearl released in 2007. – This version had torn sails.  The Flying Dutchman 1029 Flying Dutchman released in 2006 1067 Flying Dutchman released in 2006.  Empress 1065 Empress released in 2006.  Mega Bloks Pyrates 3660 Dread Eye's Phantom released in 2005 – Hull lights up an eerie blue when prisoners are “Fed” to the ship. 95524 Dread Eye's Phantom released in 2011 - The differences between this and the earlier set are that the sails are now black rather than white, and The Skeleton Crew insignia has gone. The throne has been removed, and the hull no longer lights up when 'fed'. Dread Eye's Phantom pirate ship that looks like it was carved from the skeleton of a massive whale.  3619 Admiral Scathe's Predator released 2006. – Lion figurehead  3620 Captain Cutlass' Stormstalker released 2006 – Shark Figurehead 95523 Captain Cutlass' Stormstalker released 2011 - The differences between this and the earlier set are that the ship now uses the same red sails and hull as the Black Pearl from the Pirates of the Carribean series, making it appear more of a galleon than a schooner. The new hull means that this set has now lost the Vault of Transformation. 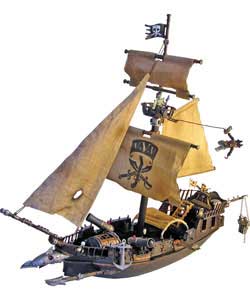  Mega Bloks Legends King Arthur 96129 Attack Action Warship released 2008 Cool longboat perfect for Vikings, theres 2 of them Tan with double headed eagle figurehead and a dark brown one with monster figurehead  Mega Bloks Legend 9604 Viking Ship released ?? 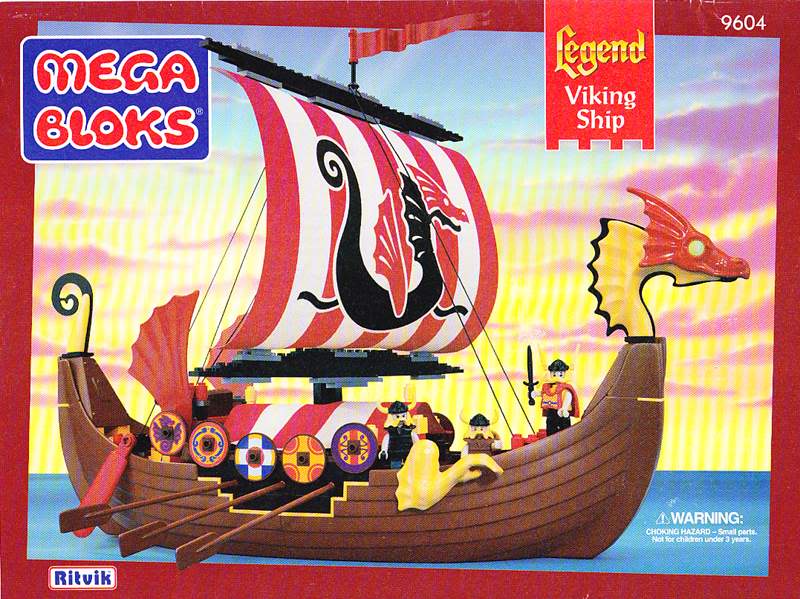 Mega Bloks Dragons 9545 Fyreskiff Warship released ??? Same hull as the Stormstalker and predator, just in red 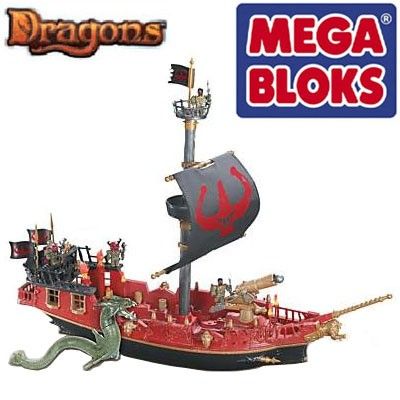 9834 Fyren Sea Phoenix Warship released 2004 - The Sea Phoenix has a crystal powered bowspirit that electrionially lights up. Same hull as the Man O War  9895 Man O' War released in 2003  9879 Vorgan Ice Fang released in 2004 Half-finished boat being pulled by a dragon  Disney
Spoiler Alert!
There are 3 ships I have seen from disney, a Queen Anne playset, I do not know how good that is, some really small 15mm pirate ships, and a really nice Black Pearl RC ship that has been used quiet often in conversions ending up in amazing ships. Black pearl Remote Control ship  Queen Ane playset - Fun looking ship, bought one, terrible for heroscape conversion, ended up just giving it away. All the sizes where just wrong.  Playmobile
Spoiler Alert!
Playmobil I have never seen these ships before so I copied a bunch of information from other threads, it’s a little long but has a lot of interesting information, this is the short version. By Warrenbruhn over at lead-adventure There are five main types of Playmobil pirate ships that I'm aware of; 1. The dinghy . It's got deck room for about 20 to 25 figures depending on basing. It's deck is not level, but is molded as planks, so there really isn't much needed conversion other than replacing the oversized tiller. 2. The single masted sloop. This is a great ship that has been around for many years. It keeps getting rereleased in different colors. 3. The recent two masted ship. This new one sits a little lower in the water than the previous two masted ship. It has a skull for a figurehead, which could stand to be replaced. It generally has a good shape, although there is a wierd feature, cannon decks forward that recess to hide the cannons. 4. Slightly older two masted ship. This one is a big beast, with hull taller than the Flying Dutchman by Mega Bloks. This ship has a really great hull shape, and the decks are expansive, probably able to hold 55 to 60 men on deck. 5. Much older two masted ship. This one has been around for many years, even decades. It has enough deck space for perhaps 40 to 50 figures. It's the least pleasing of the lot in terms of realistic hull and stern castle shape. Most of the problem is that the stern castle is too high. The hull typs I described above numbered 1, 2, & 4 are some of the most pleasing pirate ships I've seen. And.. Some playmobil ships have rather high railings, and you would need to raise the deck a little to make this ship work for 28mm figures. Decks are molded as planks. Lego ship
Spoiler Alert!
We dont talk about over priced legos........ Materials
Spoiler Alert!
For each section of the ship you wish to change you will need materials to do so. Most obvious is after you chop off the pegs is replacing the deck. Decking materials - This is the biggest change you will do to your ship to convert it from a toy into a cool looking 28mm Wargaming / Heroscape terrain ship. First the easy but more expensive options; Plasticard Planking - Works great but super expensive around $6-$8 per sheet, and you need anywhere from 1-4 sheets per ship. Choose the one with the planks about 1/4th an inch wide. I have not had a chance to see it up close but by the pictures alone it is not very impressive.  Wills plastic sheeting - specifically SSMP201 'Planking' about $7 per pack of 4 sheets. I have only found it on UK sellers and it took close to a month to arrive. I thought the sheets would be the size of normal paper sheets like the plasticard but they are actualy quiet small, like the size of an envelope. Looks great and has really defined texture. This is what most people online I have seen use, its quick, looks great and really expensive as you need around 3-4 sheets per ship. Also not as expensive you can use; V grooved sheets The plastic is slightly cheaper, and can be given some grain and texture by scrapping it a bit with a piece of sandpaper. ( choose the size that is 1/4th inch wide). Sinewgrab[/URL] over at http://www.lead-adventure.de was really helpfull and recommended " .040 thick styrene plasticard available from one of my local hobby shops' http://www.evergreenscalemodels.com/Sheets.htm#V-Groove Siding" He used the sheets with .25" spacing off the .040 list on this webpage.  Or you can use real wood' Another option is to buy sheets of thin and fragile balsa wood and cut it into really thin strips to make your planking. It is a little more work ( although less than the popsickle sticks / coffee stirers). But the wood finish looks amazing. In this picture brown ink was used to give it the finished effect. This example is from a really cool guy over at http://argad.forumculture.net, his user handle is Capt Frakass and he is teaching me how to imitate a few of his techniques. Also a very friendly and helpfull guy. This is his Balsawood and brown Ink WIP. 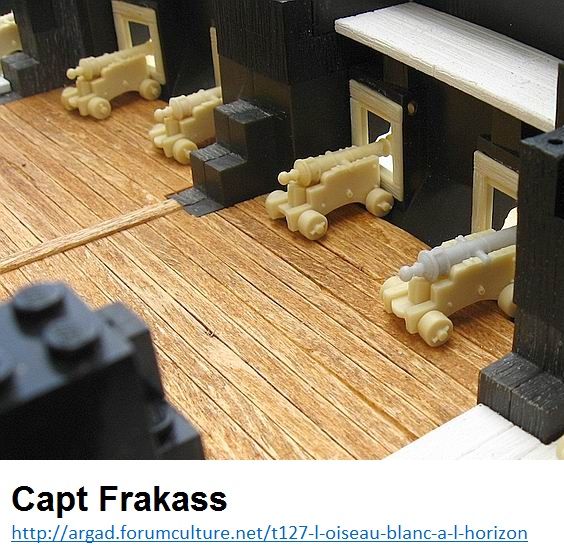 Balsa Wood It is very soft, whitish in colour, porous and just a very fragile wood. It also does not hold nails very well.  Basswood An excellent all-around wood, readily available in hobby shops. White and very fine-grained. Easy to work with and bends freely, but too soft to turn. 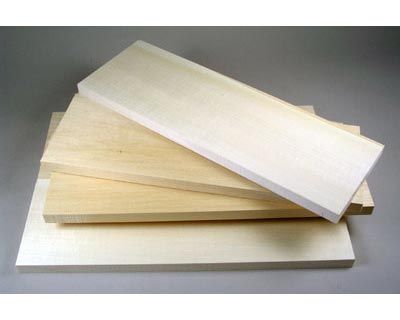 You can either buy or make a small device to help you cut precise strips of carboard or balsa. Here is the video on how to make your own DIY device; http://www.youtube.com/watch?v=bWo2B...eature=related Or you can buy one for $12 plus shipping http://www.micromark.com/WOOD-STRIP-CUTTER,6625.html It also has a 30 second tutorial and I am thinking of buying one to test it out. But what I recommend for you to use initialy is Popsickle sticks!! or rather coffee stirrers. 7.5" or 5.5" Coffee stirrers.  Free at your local Starbucks but a whole box of them of about 10k will cost you $15 ( if your fiance wont let you keep raiding the local Starbucks that is...) Popsickle sticks can be used for alot of other parts of the ship, like support under the deck and trimmings and decorations but the thinner coffee stirrers give a better scale for the planks under the 28mm figures. I also have a bunch of much wider Tongue depressors, also very cheap ( especialy when your a paramedic) that I use mostly to create supports under the deck with. The trick when using these are not to get glue smeared on the top as it wont hold the paint as well and shows up very easily. I have not tried yet to paint with wood varnish but I will soon to see how it looks. Here is an unpainted deck 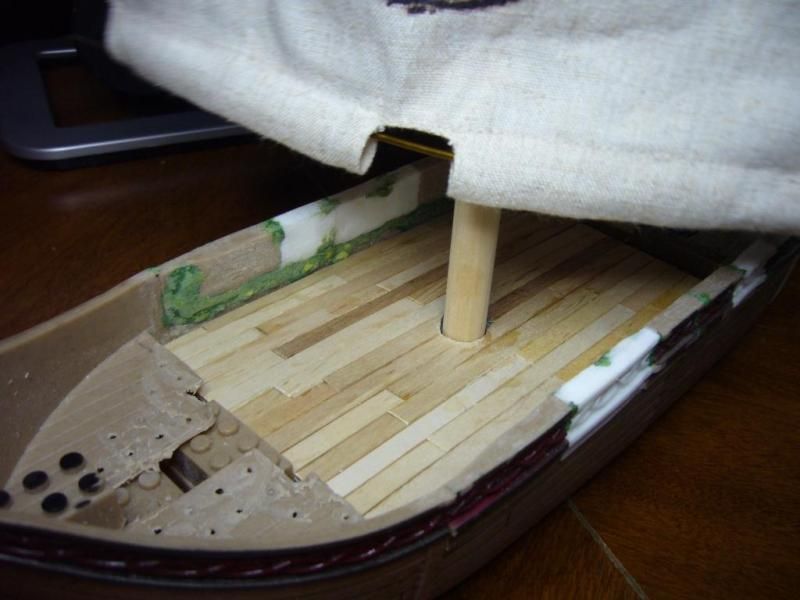 This is coffee stirrers laid out in 2 layers, first was a solid deck and second was an attemp to make the hexes stand out. This has been painted with light brown basecoat, brown ink wash and very light brown drybrush. 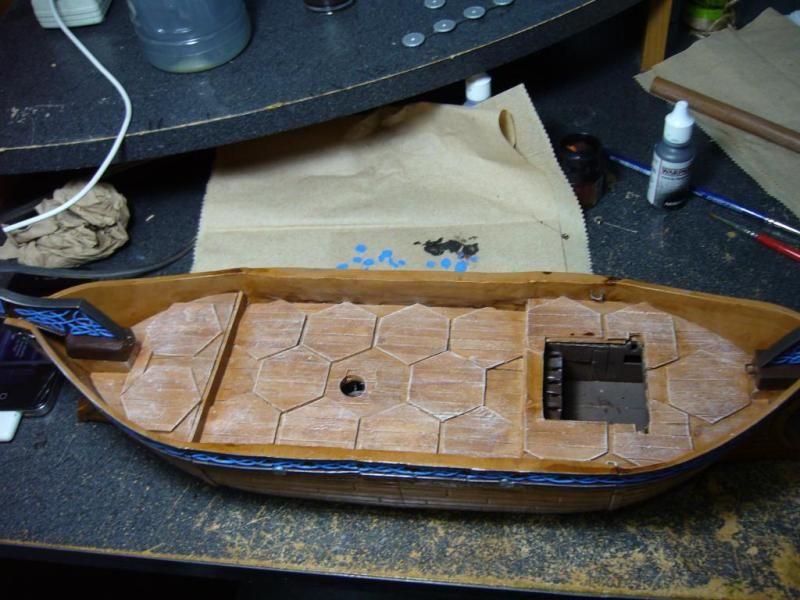 Also note; Foam board is also used to fill out the space underneath the deck and heavy plasticard ( or substitutes) are used to give the deck firmness. Plasticard - For building walls, decks, patching holes, building fore / stern castles Plasticard are expensive sheets of plastic that come in different thickness. You will use a bunch of this stuff depending on how much customization you plan on doing on your ship. From building new rooms, installing walls, building a fore castle, patching holes in the deck to installing a first solid layer for your deck and then gluing on your planking or decking material to get a nice even look. You will need a couple of peices per ship but Plasticard is really expensive and you can find a lot of alternatives for a fraction of the price. Plasticard can run you around $5 -$9 for just 3 sheets, and that will be used up pretty quick. You can go to any hardware store and buy a few signs for $1-$3 each. I suggest a few thin signs like the indoor EXIT signs and at least a couple larger really thick outdoor signs like HOUSE FOR SALE. Make sure you grab a few thick ones as you will use these sturdy sheets for your deck. Also, gift cards, and any plastic cards are usefull for odds and ends. 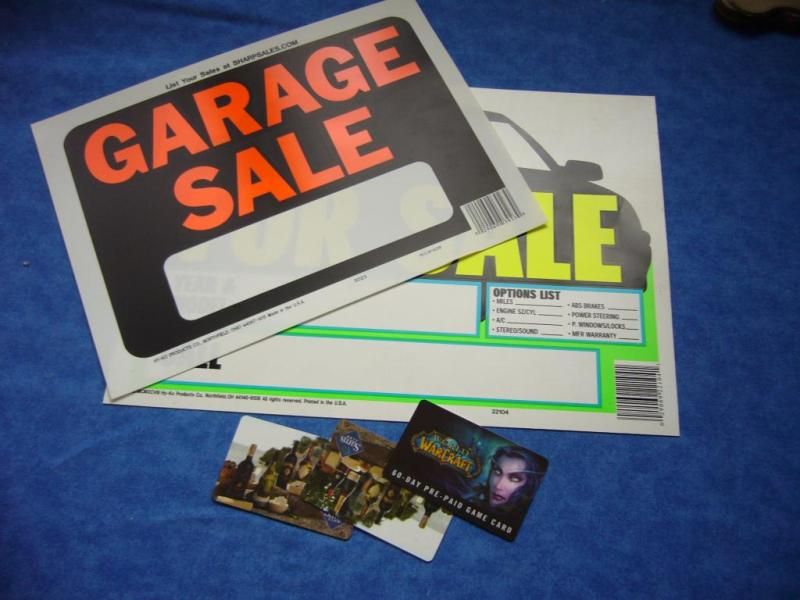 Rigging and Decorations - Optional Rigging isn't really necessary but looks good on certain ships.It probably isn't the best idea for a ship used in wargaming as it might get in the way. But a few ropes here and there can really bring a ship to life and add amazing detail with minimal work ( but a ton of knots!) It's not easy to find a perfect thickness in string / cord to look the right size on your ship but you can play around with some cheap alternatives untill you find one you are happy with. I found this string in walmart, it was priced at $2.50 but underneath the sticker said it was originaly only $1. 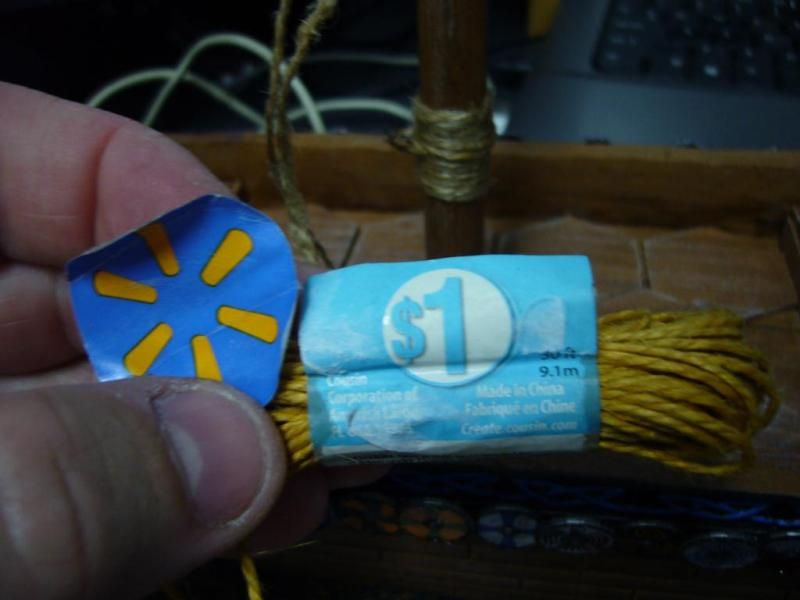 Also make sure you check Crotchet cotton threads as these come in a lot of different thickness and colors. I found this good advice over at modelshipworld.com when some one asked about what thread or string to use on a ship.  Just remember, before you use any string or thread, tie a section to something heavy and let it hang overnight to stretch it out. If not, once you install your "rigging" on your ship it might start to sag over time forcing you to take it apart and tighten it up again. I thought twine might work, the colors looked great but it was just too thick. Here is a comparison between twine and that cheap walmart cotton thread use for Crochet.  To get rid of the threads sticking out from the string at first I was using a lighter to burn them off , really bringing my viking ship close to becoming a funeral ship before it was done, but then I read on Modelshipworld.com that normal people just rub some beeswax lightly over the line to smooth out the threads. ( Im guessing its the stuff people use to wax their surfboards, skate boards or make dreadlocks? I honestly dont know, just guessing here) Here is the twine I used ( and later replaced) before and after burning, should have used the bee'swax I use for my dreadlocks instead. 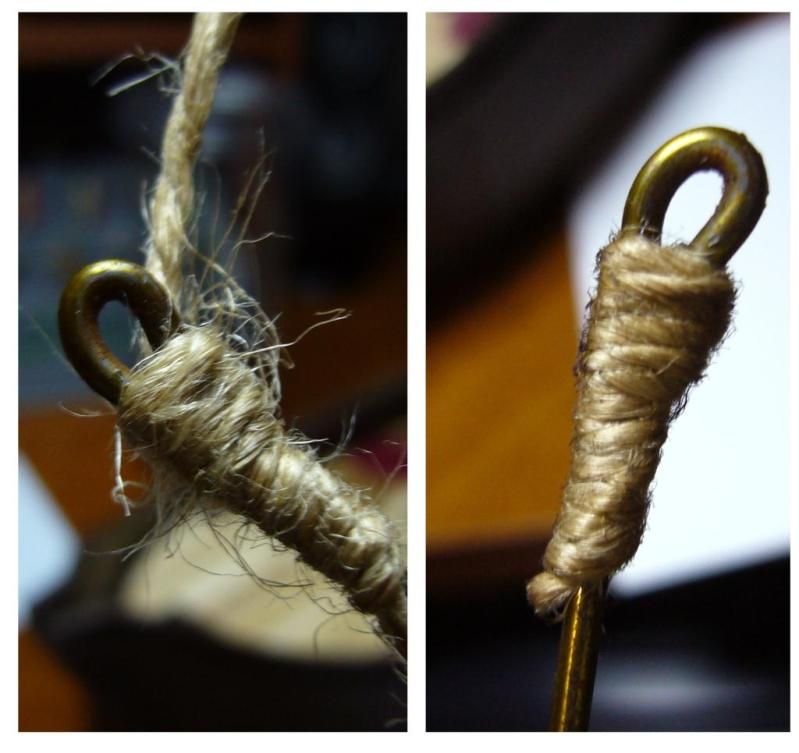 Mast , Bowsprites and yards If your lucky and you buy a ship that has all its parts then you might not have to worry about replacing the mast or other parts on your ship. If you wish to change the layout of the mast or wish to add more to it, dowels are the way to go. You can buy a bag of assorted sizes for around $4 at walmart or you can buy a larger set for around $9 in a hobby store. 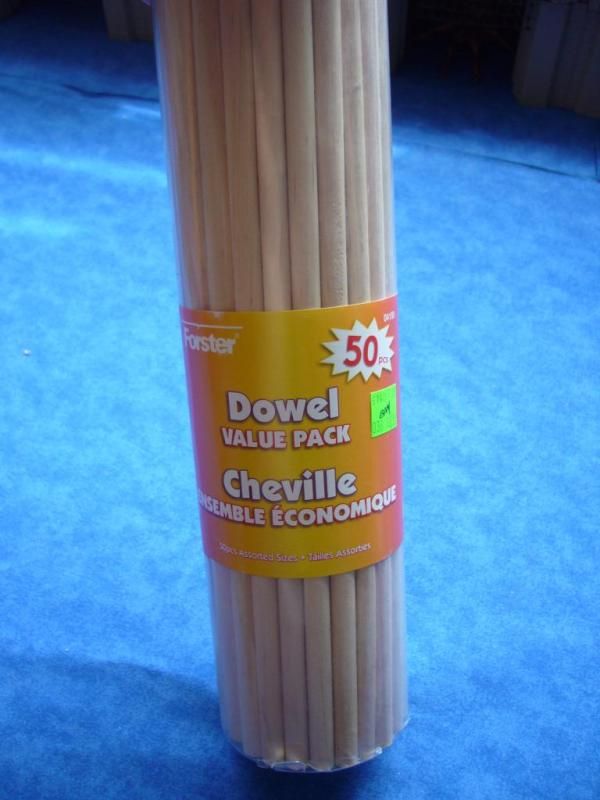 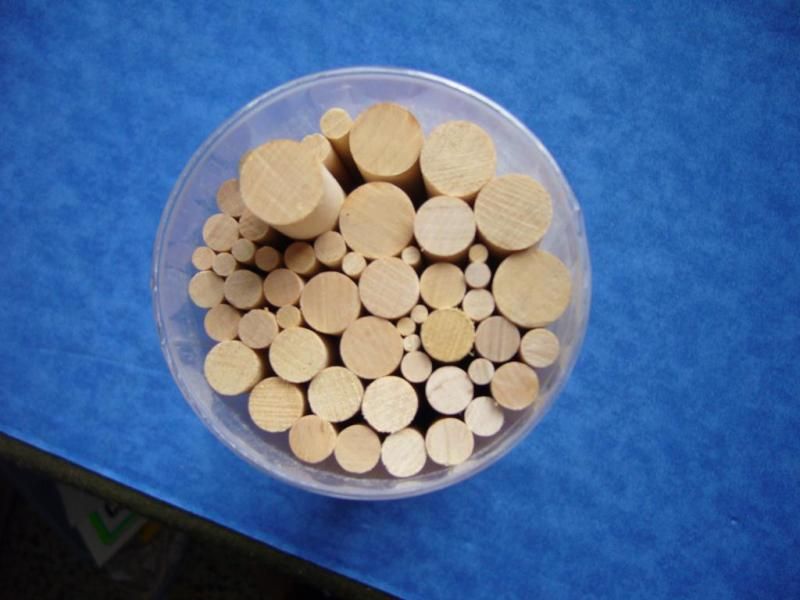 When using dowels to replace mast and yards I wanted to give them texture so I just slid the blade of my hacksaw across them several times, at first I was timid with it then I found out the deeper you carved the lines in the better. ( Also the better the chances of causing some nice bodily harm, since when is a hobby supposed to be so dangerous???) 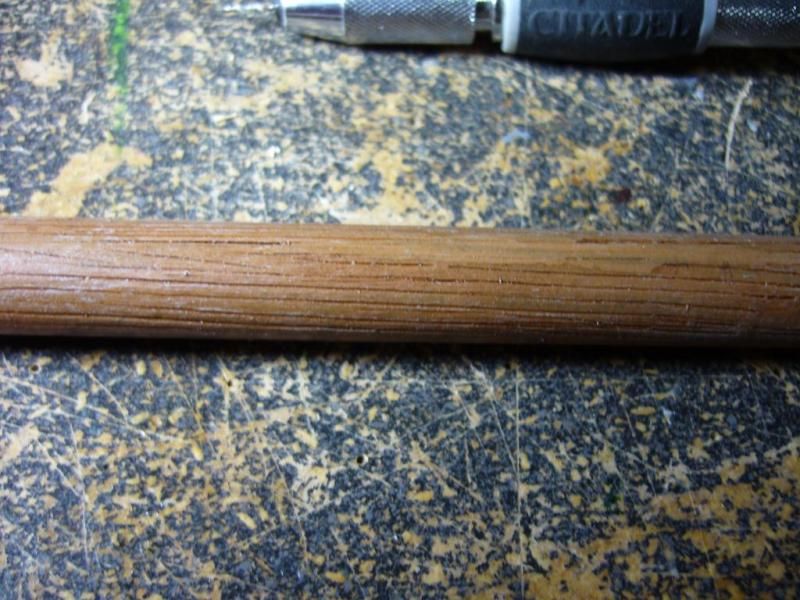 I had to sand the dowel rod with some very light sandpaper to get rid of the slivers of wood from gauging the dowel, but after priming , base coat and a wash, I liked the effect, it was very easy to do. Sails Cheap Linnen cloth in various brown shades are perfect for making replacement sails or making a whole new set. Most of these toy ships already come with sails but if you purchase them used, they might come with an incomplete set, or you might want to change the sail layout. In the case of the Black Pearl from Megabloks, you might just not like the plain limp sails that come with the ship and wish to give it a more traditional brown canvas look. Its actualy not that hard to make a set of sails if you have one as an example. A few yards of cloth for making sails might cost you a full $3, and thats enough to make a few ships worth. You can also find the really thin nearly transparent cloth that comes with the "ghost " ships like Dread eye's phantom and Flying Dutchman pretty easy. Just take one with you so you can compare them while your at the store ( Walmart, or any store that sells cloth). You will find it at the far back near the curtain section. And as a added boost, this is a great manly excuse to go look at fabrics. (Just make sure to use the word Fabulous often while searching) Miscellaneous Sand paper is usefull for smoothing out your deck if you make it from balsawood strips or from coffee stirrers. Also it is key for sanding down the dowels that you might use for mast and yards if you give them some texture like I suggested above. I know I have read that some people use a really thick sandpaper to give texture to some of the wood but I have not tried it, I have used sandpaper to smooth out my peices but It was the only one I found in my garage but worked great. 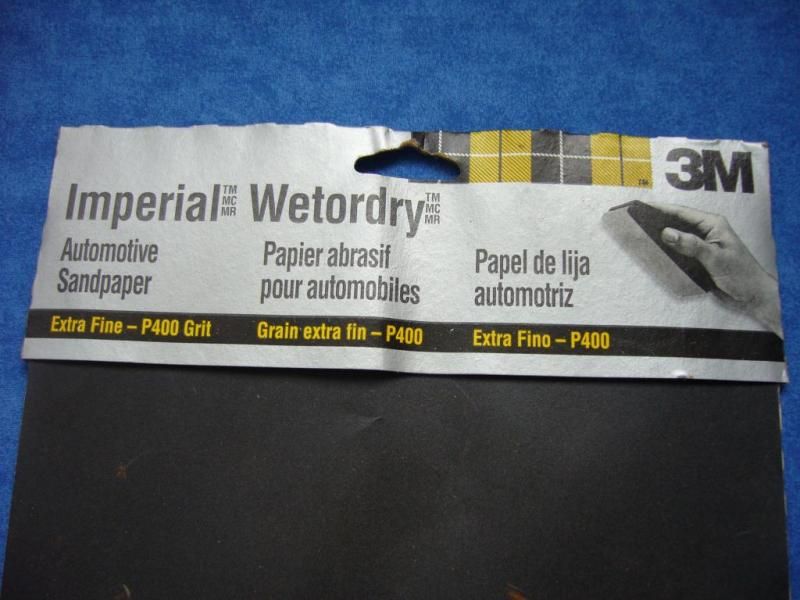 Accessories Granny Grating ( The stuff used for stiching, looks like a plastic mesh) Used to create the bars and hatch covers in the middle of the ship. Ships wheel - Will update soon with links and cost Doors and windows - Will update soon with links and cost Cannons - Lots and lots of cannons!! - Will update soon with links and cost Modding / Converting
Spoiler Alert!
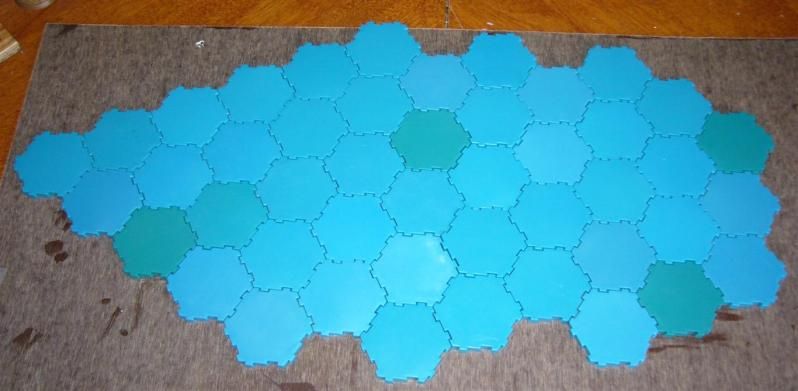
Decking Some people layed out the deck one "board" at a time directly on the ship, I first made a template, then glued on the planking material on this template, trimmed as needed then glued on the ship when I was done painting both deck and ship. I might consider making a second deck, and have them removable, one for a normal 28mm wargame and one that is marked with hexes for Heroscape. Knots When tying your "ropes" to your mast or hards, this is a really easy knot to do and looks good once you figure it out, its actualy used for tying the ends of ropes to keep them from fraying but looks great on a mast. 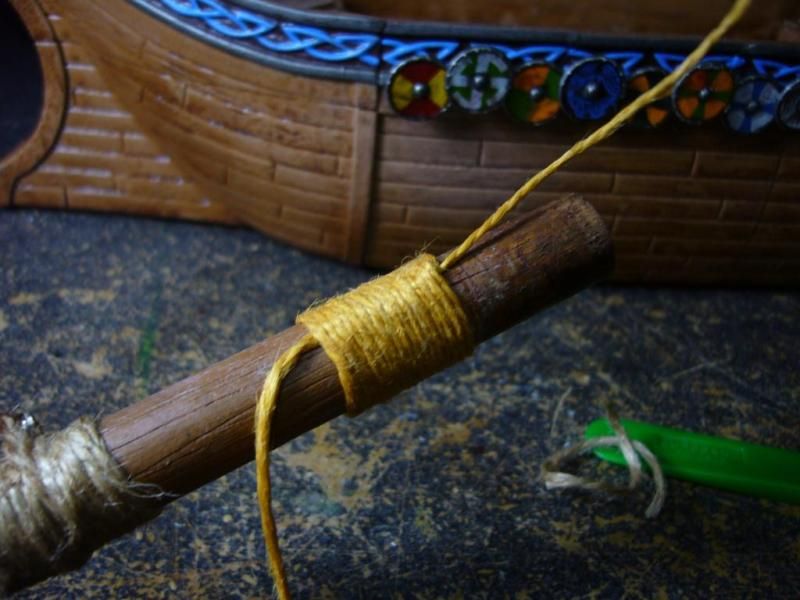 And here is how its done.  My Ships 3Am Docks
Spoiler Alert!
Page 3 has the full story, here is just the pictures of my dock while I work on my fleet. 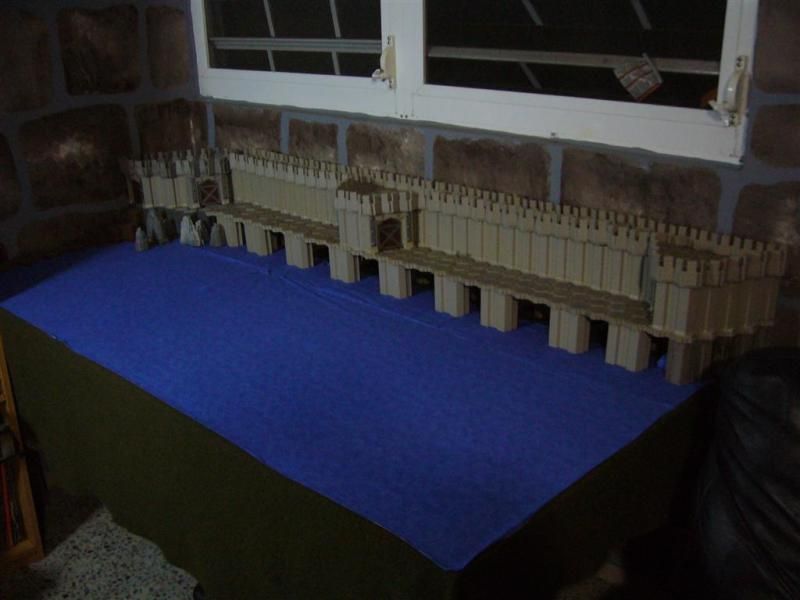 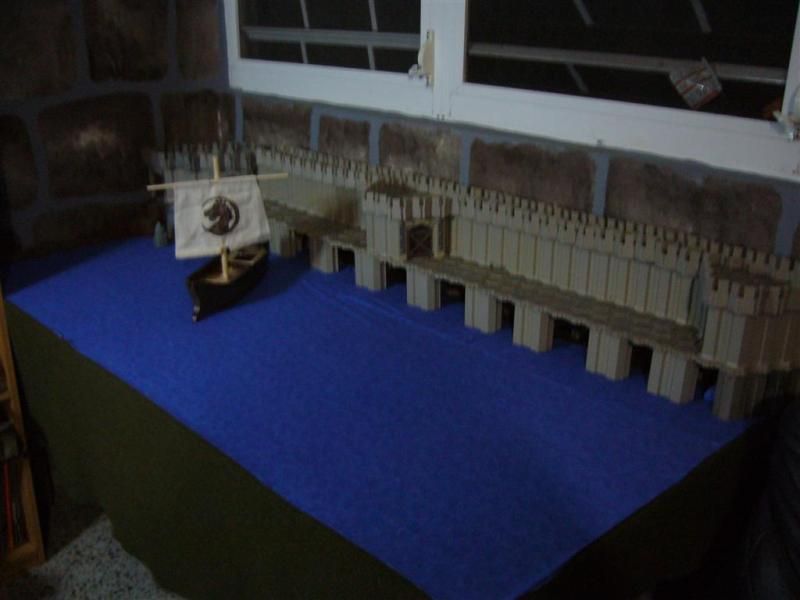 South Guard house 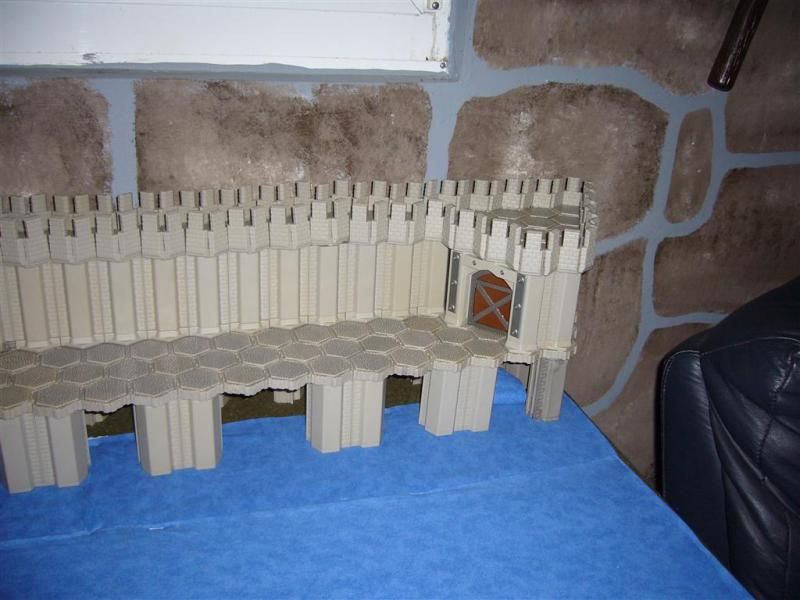 Middle Guard house 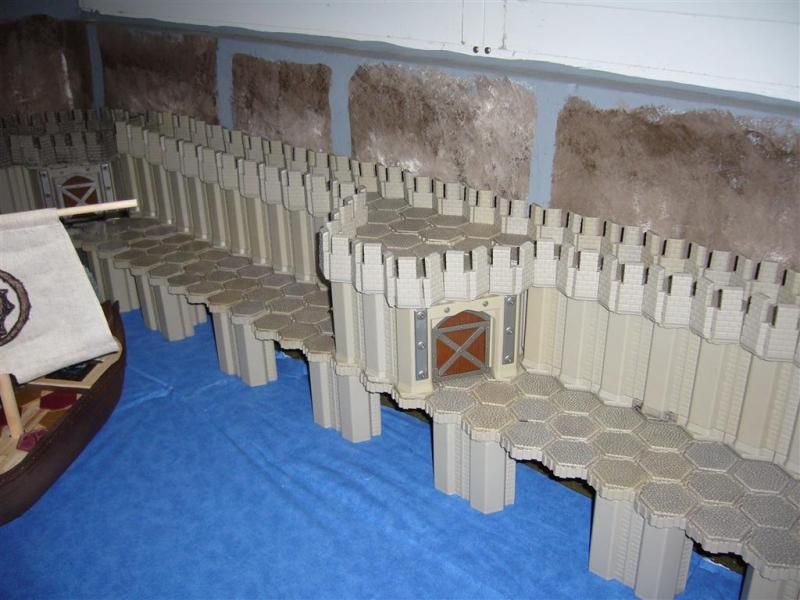 Might make a light house on top of it North guard house and smaller pier, needed something lower to the water for smaller skiffs, rowboats and smaller craft, so made a kind of rock outcropping 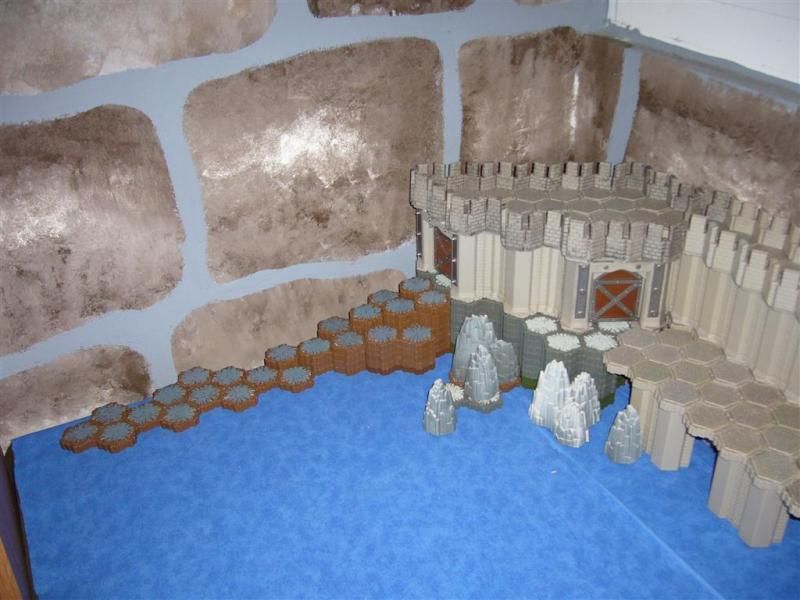 One of the two boxes that arrived today had my Ebay Weapons and Warriors Pirate battles. Brings 2 ships and 2 boats, they can be turned into skiffs and rowboats. 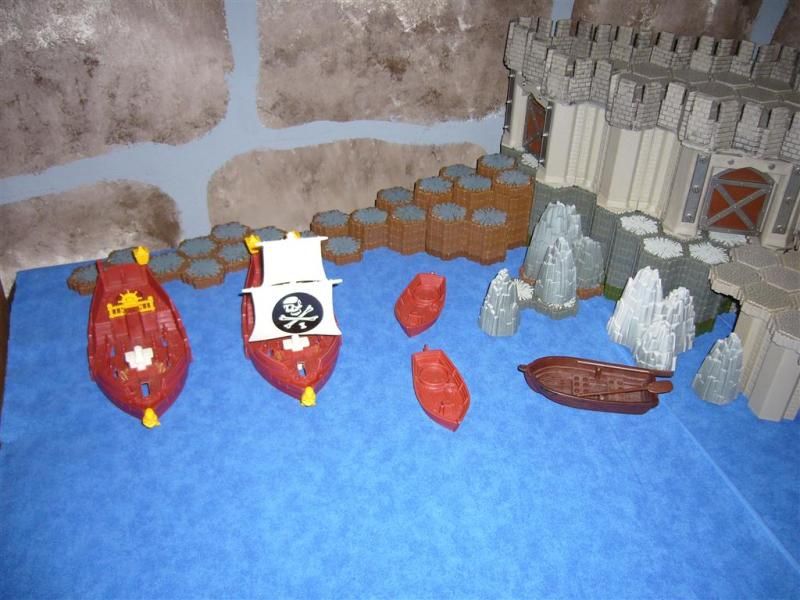 Dread Eye's Phantom showed up today, looked like a hurricane had hit her bad, was missing second top half of the mast and rear deck is missing the corner. And missing 3 of her sails. Sails are really thin material and move and wave with the fan so it looks creepy! 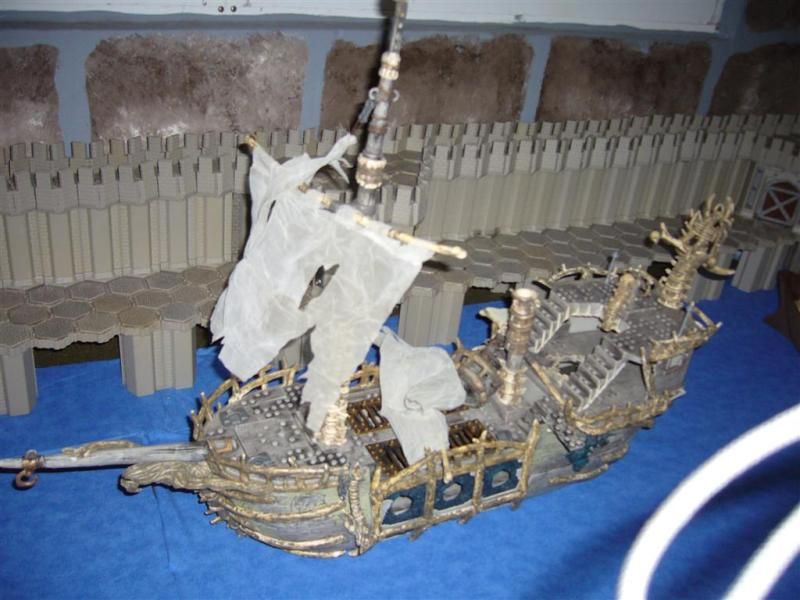 Shes a big ship, took up most of the table / dock 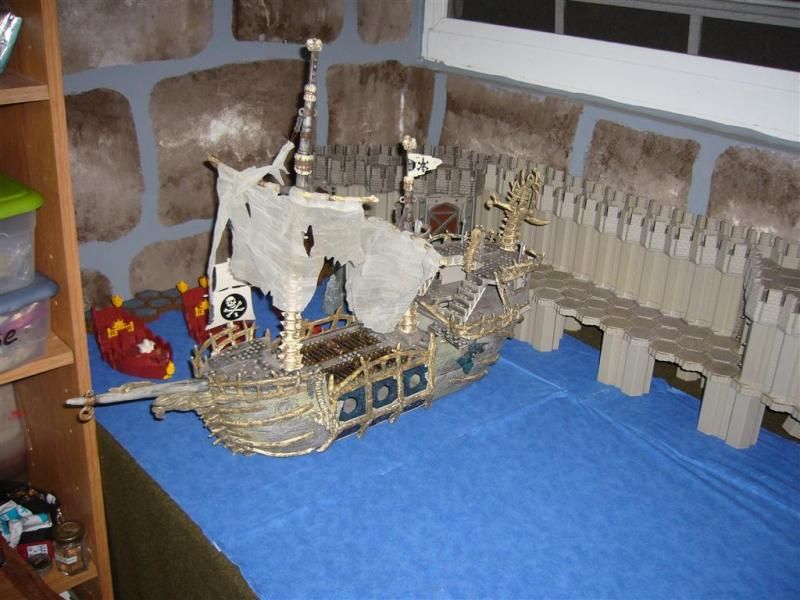 Captian Cutlass's Stormrunner, a beautiful ship, she will take a lot of work to turn her into a 28mm ship. But she looks great as is right now. She had some broken mast, missing second top mast, missing sail and a few tiny bits. Nothing major as I was planning on replacing the mast and possible the sails too any how. The Captain cutlass stormrunner, has the same hull as Redbeards Predator, and the Fireskiff. Taller but lower in the water than the Dread Eye's Phantom. 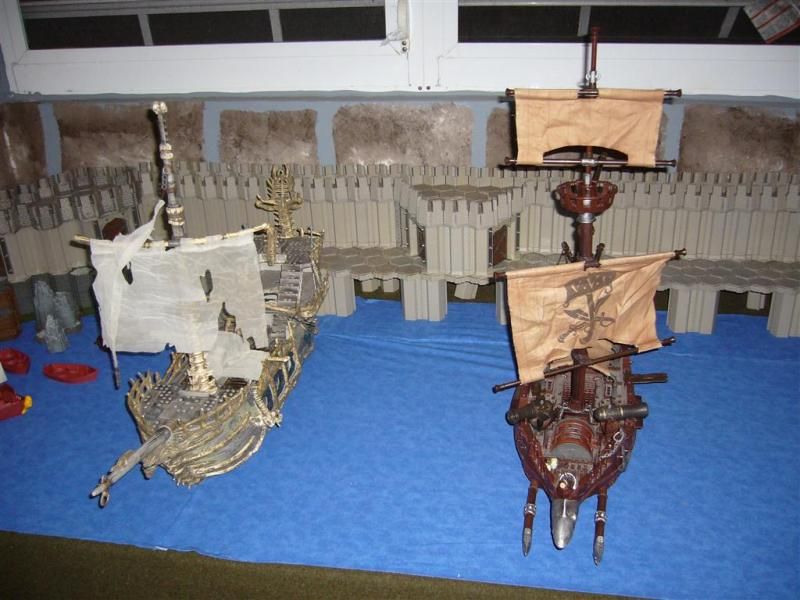 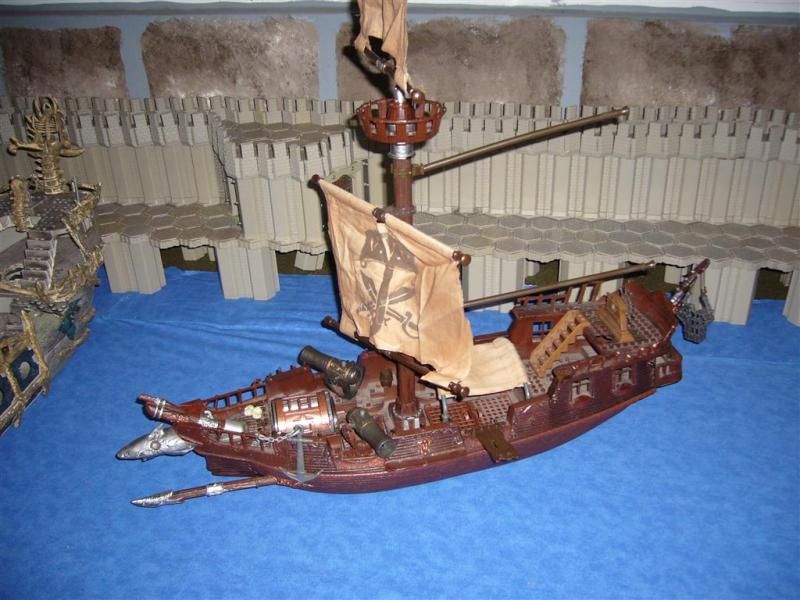 And my incomplete but almost there Viking wanna be , think I will name her Odin's spear or something. Not sure yet, she looks TINY now compared to the other 2 monsters that arrived. 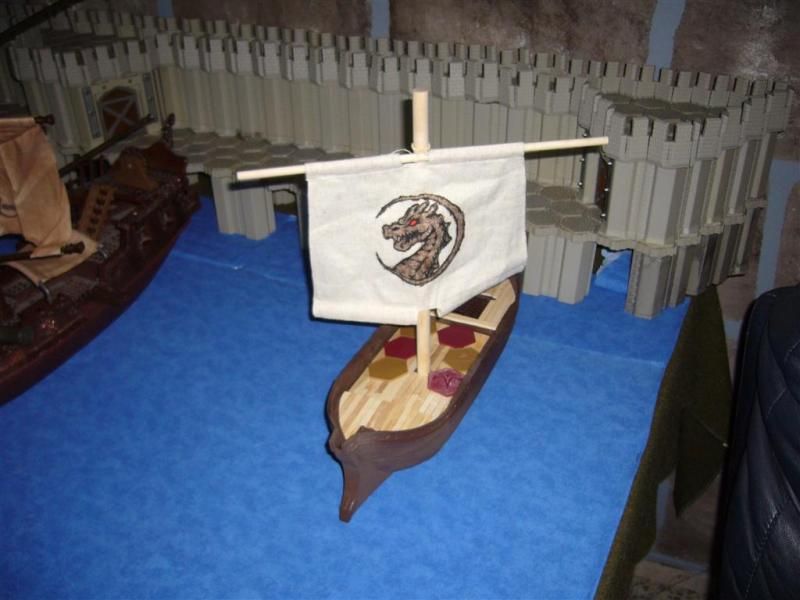 And here are the ships at the dock / peir ( seriously I need to learn which is which).  Still missing the peirs between the ships and populating the docks per-se not sure if will use fantasy or historical troops. Different ships and their Hulls Viking Longboat - No name yet -Stuck on rigging
Spoiler Alert!
Part one I found a Mega Bloks Legends of King Arther Attack Action Warship ( the name is longer than the toy!! ) This one arrived with just the hull and nothing more. I paid $18.52 for it. 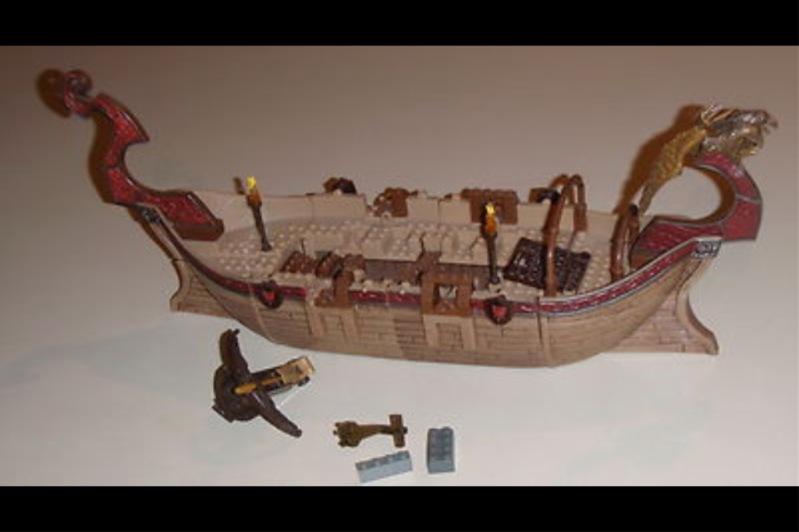 It showed up as a pile of pieces so I had to download the manual to figure out how to assemble it to see what was missing. 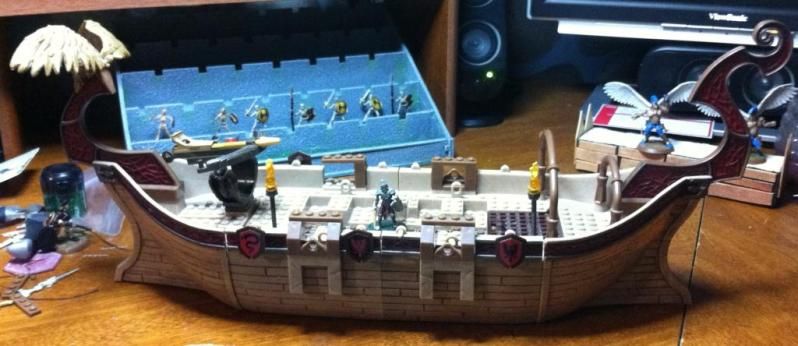 It was actually pretty complete except for the sails, the oars, the figures, the mast and a few tiny odds and ends but nothing that wasnt going to be replaced any way. I had not seen this ship converted before so I was not sure what I would do with it. I loved how it had a figure head and tail that looked like a viking long-ship even though it was the mother of all long-ships because it looked to be 2 decks high and much wider. It even had the motor that worked for rowing 4 oars. I knew I would try make some sort of viking -warship hybrid. I know this will be a perfect ship for the Tarn Vikings, all 3 of them.. in a ship that sits 15... all 3 of them and their 2 heroes... sooo 5 people in a huge boat... Ok Maybe it will go to the Elves, not sure yet. Now to figure out the deck, It had 3 levels, 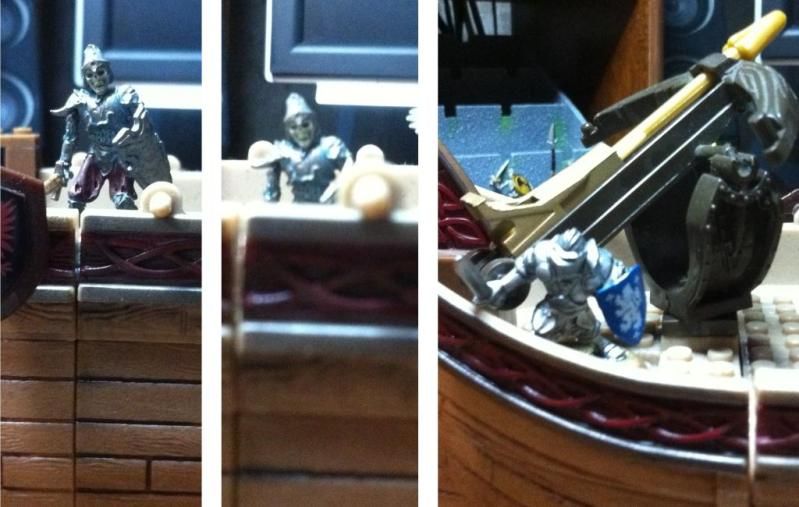 First one was too high, the side ( railing?) was about knee high, the middle deck was up to mid chest and the last one was pretty much covering the whole mini I used as a test. I decided to keep the mid-chest level for the center and for the bow and stern of the ship I would leave it knee high. I loved the ballista or crossbow looking thing on the ship but it was huge for 28mm and looked like a siege engine or something to hunt dragons with. The figure head looked too big and kinda goofy so I decided to replace it with a mega blok dragon head from a dragon I should receive in the mail in a few weeks. 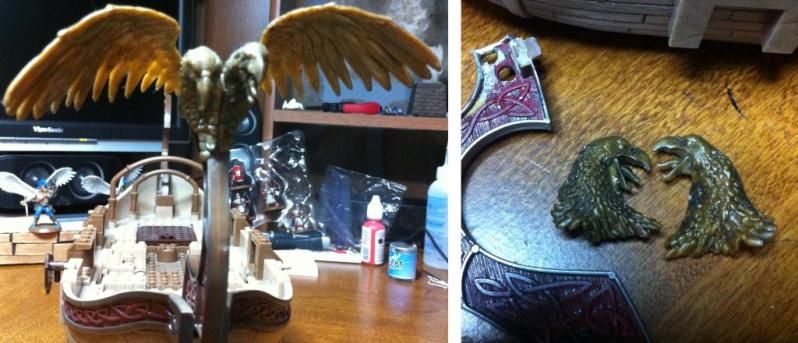 The two halves of the eagles heads did look like something that could be salvaged to decorate a bigger ship, maybe a Black Pearl. I had to figure out how I would mark the hexes on the deck after the ship was done. I first wanted to see how many hexes I could fit on to the deck. 15 hexes if I cut off half of the base that connected the figurehead. Also I wanted to keep the cage to hide an item to use in a scenario during a game. So I painted red everything I would cut and black for everything that would stay the same height. 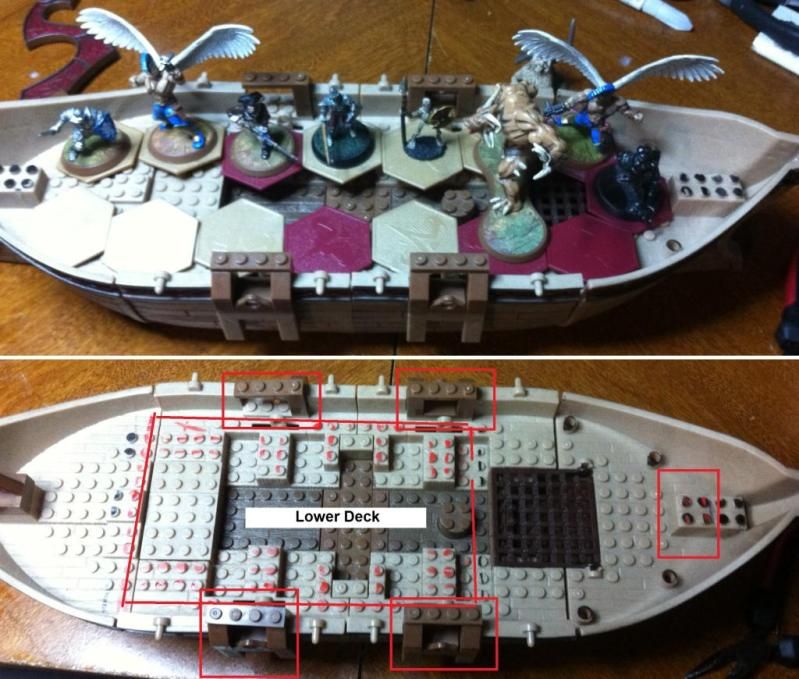 As soon as I tore apart the motor and removed the batteries I regretted it, I could have left it alone and made 4 new oars and had a "magic" viking boat that rowed it self, didn't know if it would look cool or goofy on a game board but it was too late since I had already ripped off the pieces and the button. I was using my dremel to cut off all the pegs and cut off everything that I had marked red to create the 2 decks. I spent at least 2 hours cutting and grinding and made a huge mess in my room, I should have done this outside. 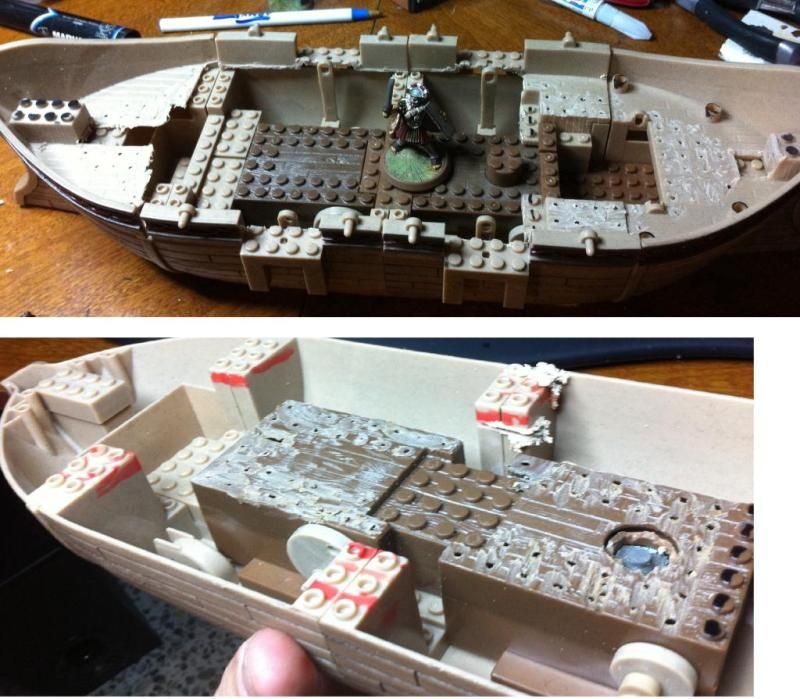 I knew I wanted to fill in the holes in the railing where the oars had been on the original toy, so I made some quick molds using instant mold and cast a few pieces using Aluminite casting plastic. They came our more or less decent but it wouldn't matter I thought because I would cover them with a line of shields to make it look like viking type long-ship. 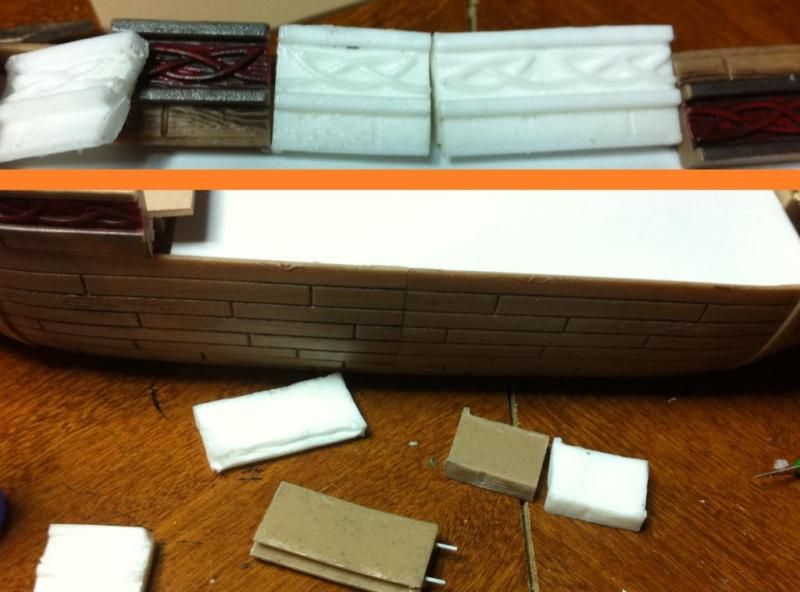 I finished gluing on the railing , now I need to greenstuff all the spaces between and then sand them down to make them look like one solid piece instead of a jigsaw. I spent a while with the dremmel sanding sharp corners and all the pegs to try to leave 2 flat surfaces for when the plasticard planking arrived. I made a template of the decks first to have them ready for the plasticard. Also I double checked to make sure the 15 tiles would fit. 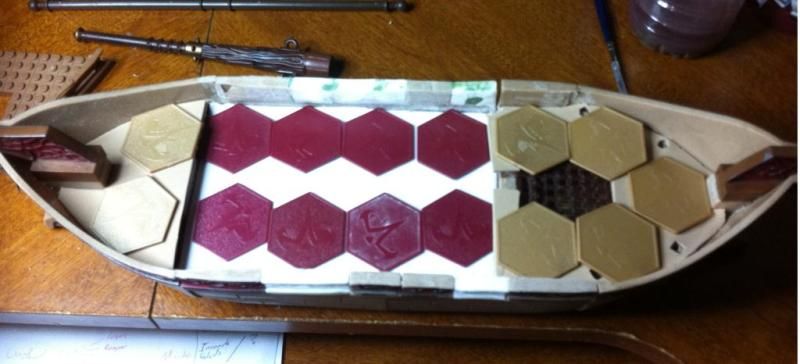 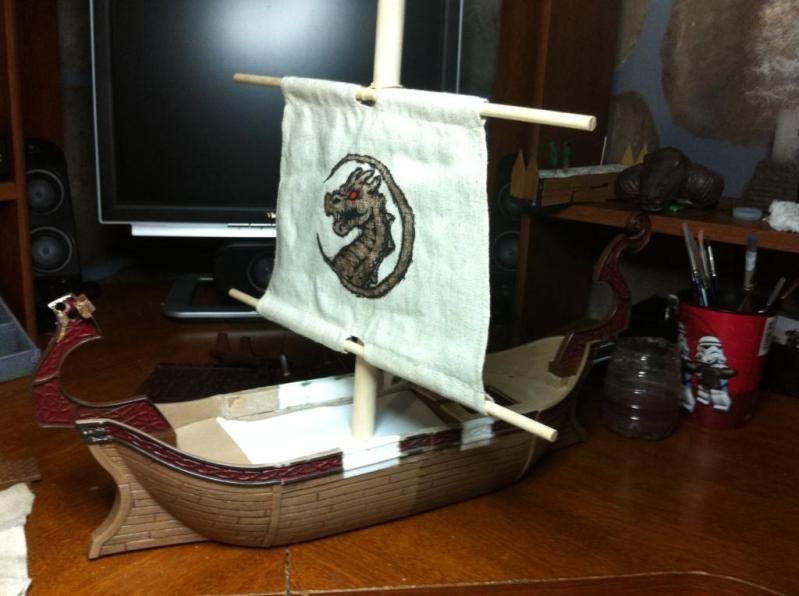 I imagine a boat this size should have more that one sail, but all the viking ship pictures I have found online all show a single mast and sail. In fact the bottom bar on the sail might be removed just leaving the top bar and the main mast. I forgot the sizes of the dowels I used as I was lucky to find a $10 tube filled with 6 dowels of each size, I am not sure yet how I will secure it to the hull, either cutting a hole into the toy motor and placing a magnet on the mast and hull, or making a fitting for it. Not sure yet. Also I was able to find some shields on ebay for under $10 shipped for 32 of them.  I plan on running a line from the base of the figurehead to the top of the mast and both corners of the sail to the rear of the ship. Also I plan on making a tiln I think its called? a type of rudder.  Been a few days since had a chance to update. I have recieved a few other ships but I plan on finishing this viking ship first so I can figure out the best way to customize the other ships. I used a dremmel to grind off the pegs, or cut them with a cutting disk, but after I spent a while finishing this ship, I found out it was much easier to use clippers to remove the pegs then just sand down the rest. I spent about an hour and a half doing this with the dremmel but with clippers it might have taken me like 20 minutes. 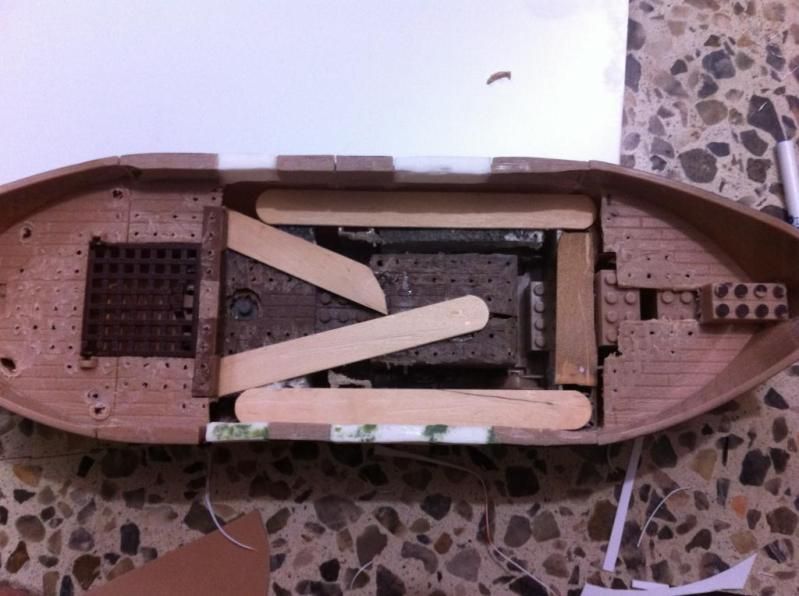 I coated the ship with a dark brown, wasnt sure how I was going to repaint it, but I decided to do the same color as it was originaly, a dusty tan, or kind of the same color as the popsickle sticks 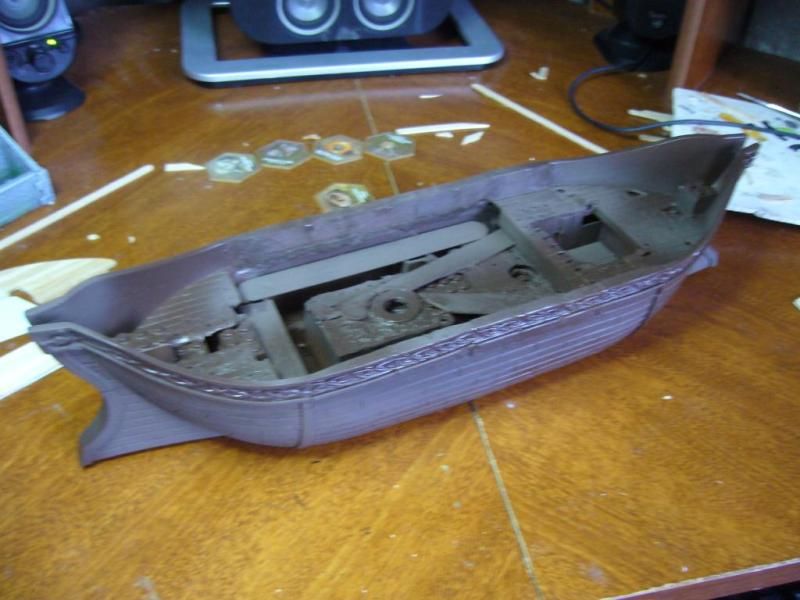 I could see the edges and all the imperfections now that it was a dark color from the peices I had cast. I filled up any holes with greenstuff and didnt worry to much about the outside as I knew I wanted to make a row of shields on the outside like the original viking funeral ship that has been used as a model for most viking ships in movies. 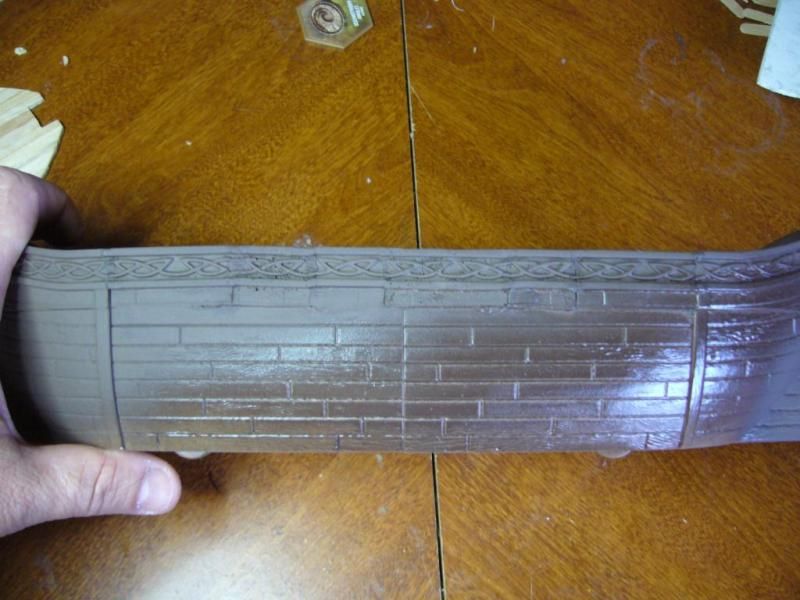 When it comes to materials, I bought the for sale signs instead of plasticard and a few peices of balsa strips for making door ways, ledges and windows. On the viking ship I pretty much just used 2 signs, the really thick one ( House for sale $2.50) to make the deck and the very thing one ( Office $.79) To glue the coffee stirrers and make removable floors. 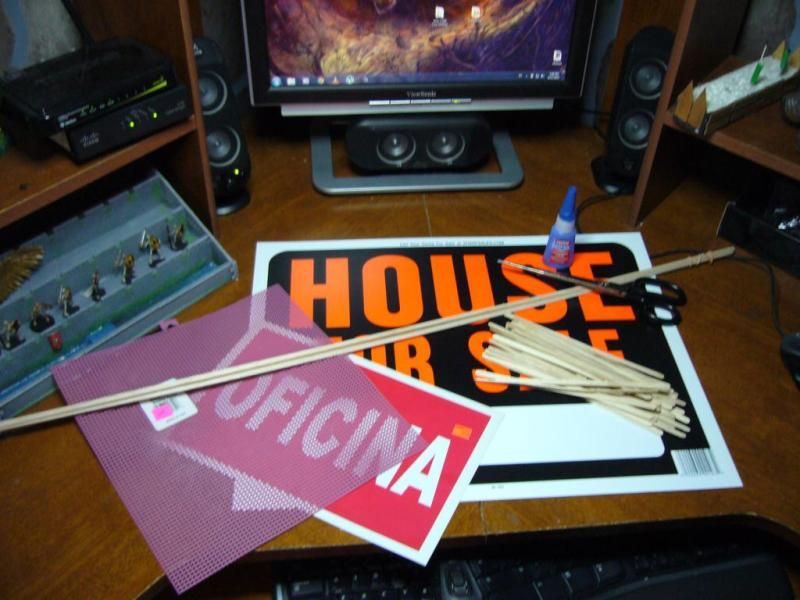 First, I did it the hard way I used crazy glue and kept glueing my finger tips. Also I had not first sorted out the bent sticks. Now I know in the future, to use very tiny amounts of crazy glue , or better yet use UHU, it gives you more time to adjust the sticks, you can use a very tiny amount and it doesnt keep gluing your finger prints off. So I cut up a bunch of sticks about 3 inches, and when I glued them on my templates I made sure to stack them. 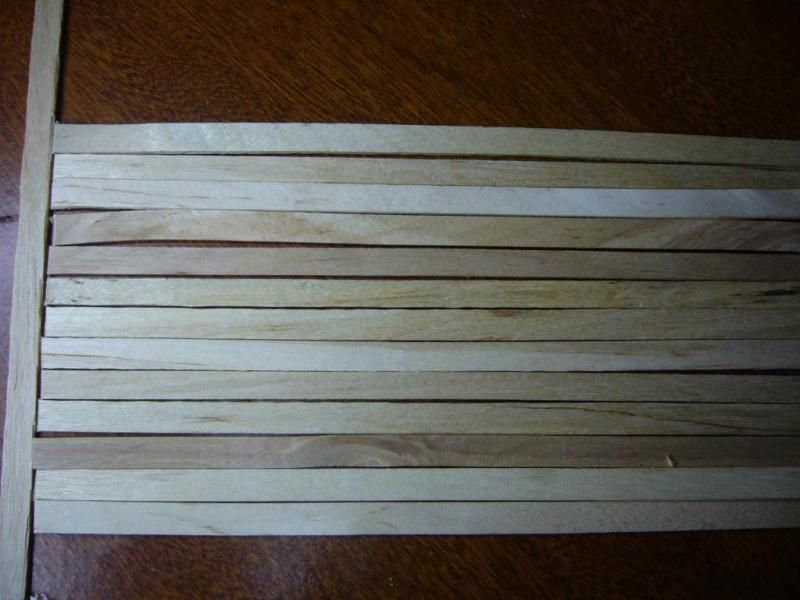 I made 2 templats one that I would glue the sticks too and another to save just in case I ever do another one of these ships again. I started in the middle and worked my way out. 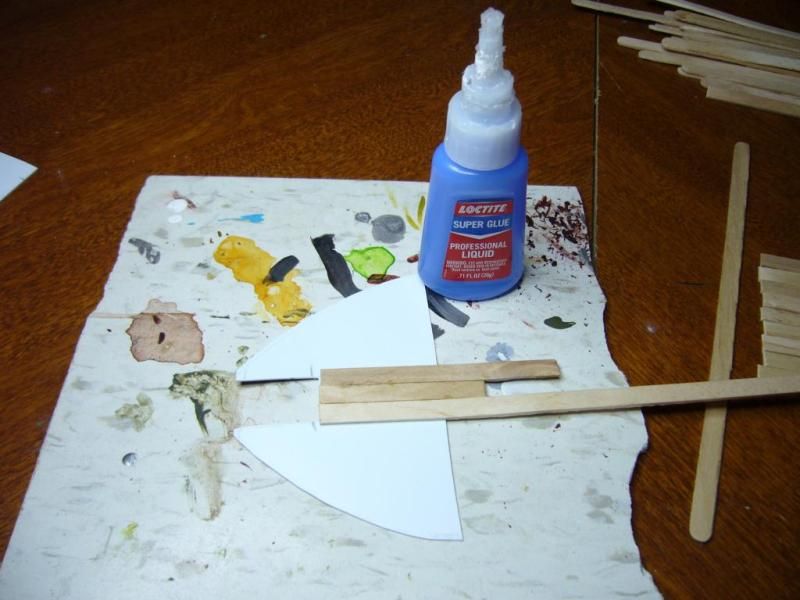 Once I had finished covering my entire template, I just trimmed the excess off with scissors, and test fit on the ship. This was a pretty easy step to do. 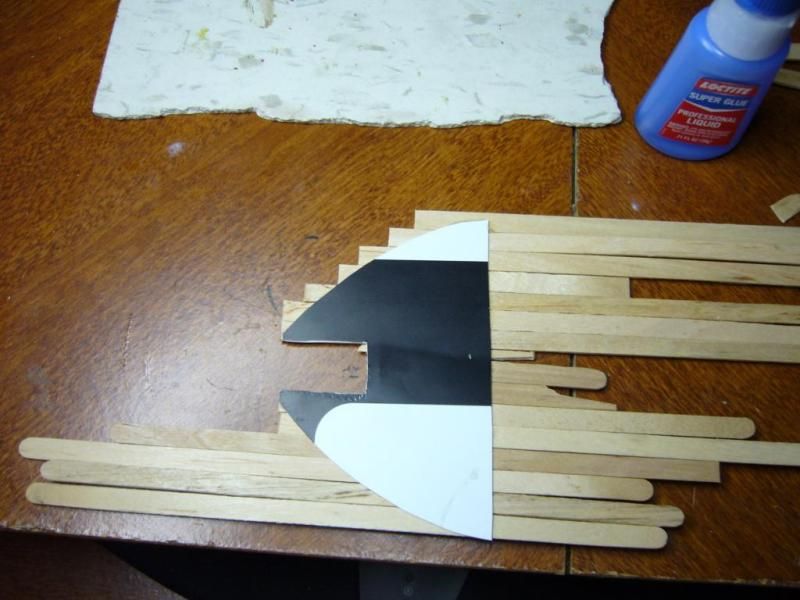 Using an hobby knife I just trimmed any corner or edges I needed to make a decent fit on the ship. 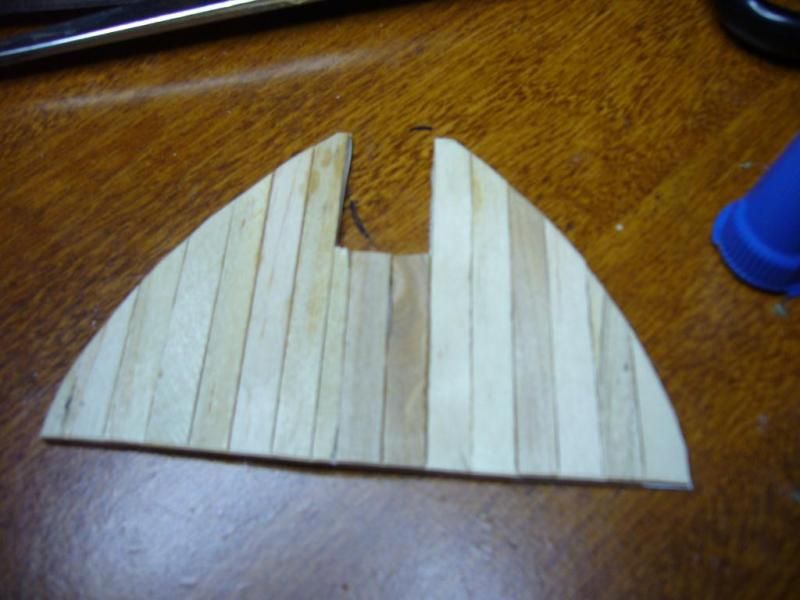 I made sure to keep a spare set and place directions on them its easy to mix them up and turn them over. I liked the look of the popstickle stick pattern, its kind of messy and not as pretty as plasticard wood plank sheets, but this cost me about $1 and the sheets each cost me around $7 each, thats why I have not used them yet. I could have sanded down these popstickle stick deck to make it smoother but it did not occur to me untill I drybrushed them and saw how irregular they where. Also another mistake was I thought I could keep the wood grain look by just painting with dark brown wash, I tried several times and ended up just painting over the deck and using dark brown, light tan, then very light almost white tan. 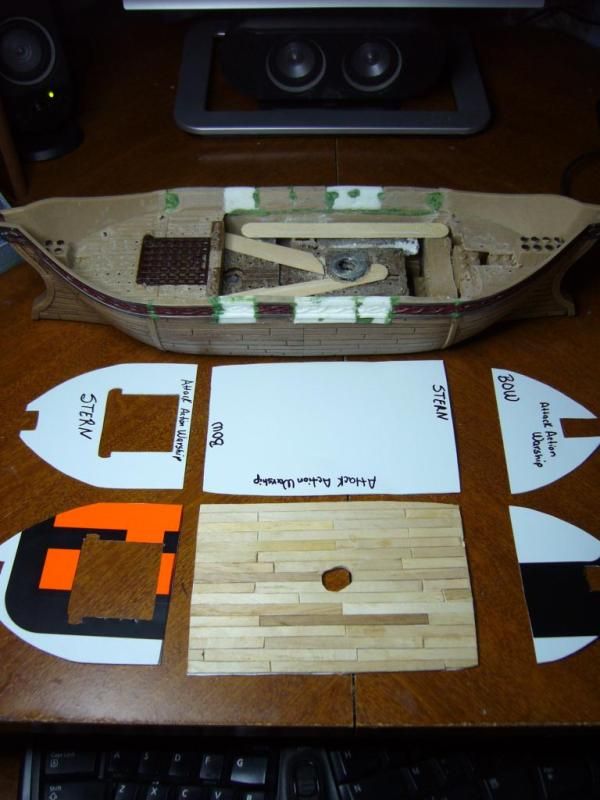 I test fit the decks a few times to see if they where flush. I have seen a few threads by other people who decked their ships straight to the ship, but that seems like way to much work, this way I could just overlap the sticks, and trim off the excess, if I would have done it right on the boat I would have had to make a ton of precise cuts. I didn't take a picture of it but first the ship was decked with the thick plastic from the outdoor FOR SALE sign. Then I cut out templates ( exactly the same as from the thick plastic ) But with a very thin plastic sign ( OFFICE) and once the sticks where glued on them I just glued it on top of the plastic deck once I was done working on the inside. 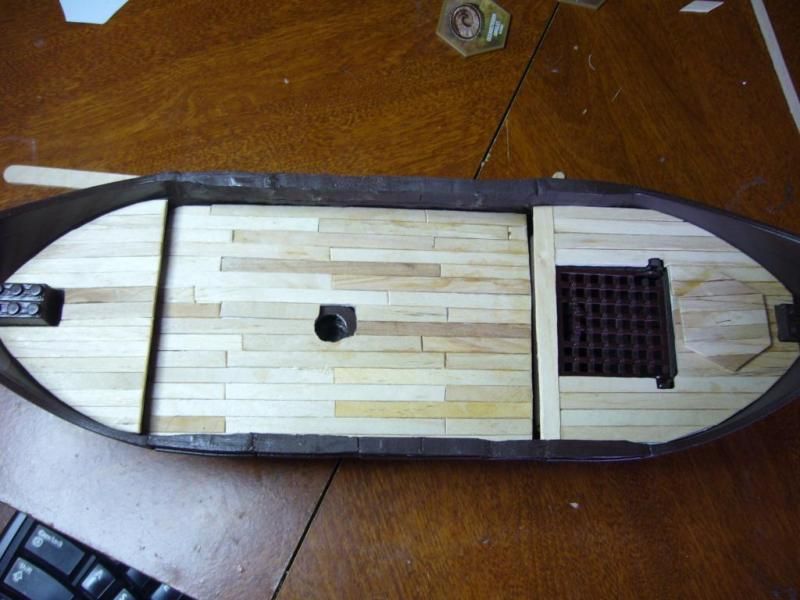 Once the deck was done, I know this would have looked tons better as a simple wood deck but since Heroscape uses hex movement, I decided to add the hexes. Kind of kills the boat to be used in other games but next time I might do a second removable deck, or maybe paint the hexes on the main deck. This time I wanted an elevated hex base. So first I tried to fit as many figures as I could on the deck. 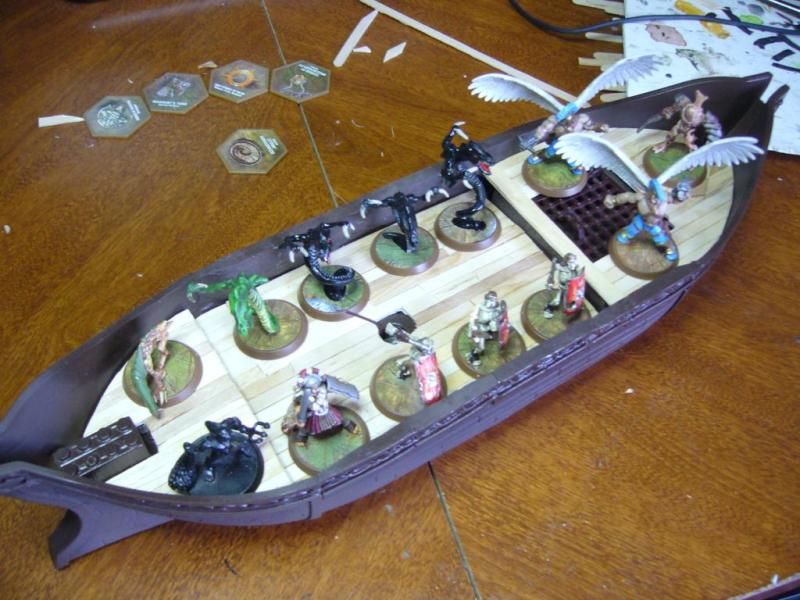 I enjoy using magnets so I wanted to try and use them here. I cut some of the thin metal strips of metal you find in file folders in half and measured it the length of the middle of the ship. I glued 2 small magnets on the hull so I could glue the row of shields on the sides and be able to remove them when I stored the ship to avoid them being ripped off. Shields on the original funeral ship are a straight line and overlap, but since this boat is so big in comparison and the 28mm shields are tiny, I was going to do 2 rows to help cover up the patchjob on the gunwhale. I spaced out the shields on the thin metal strip. Later when I finish painting them I will glue on the second row. Plus I plan on making a set of oars sticking out, also pin them to a thin metal bar and place them under the shields and I can remove them when I dont want them in game. I made half an oar with a tiny dowel and popsickle stick. I used a tongue depressor to make the rudder. I looked for tons of examples online and more or less came up with this imitation. Also I attached it to the ship with a magnent, they are pretty strong and helps store the accessories. 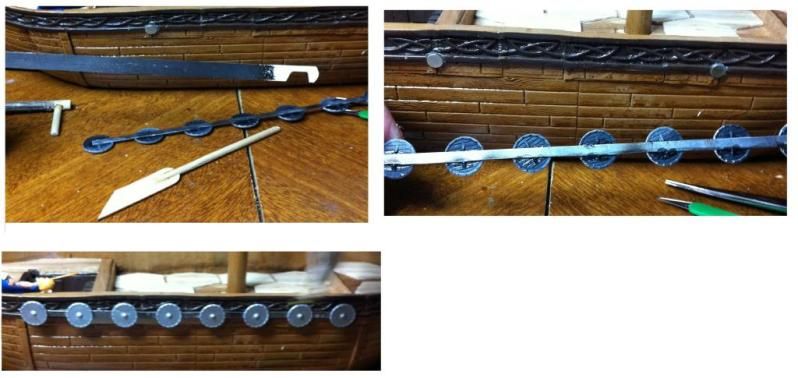 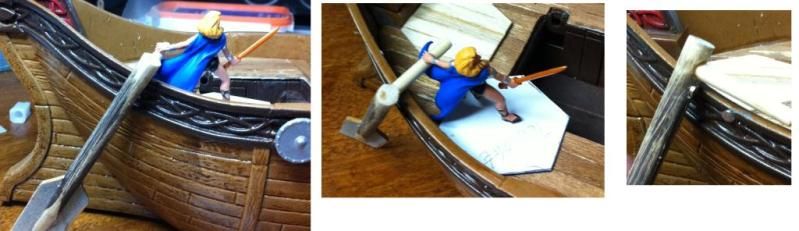 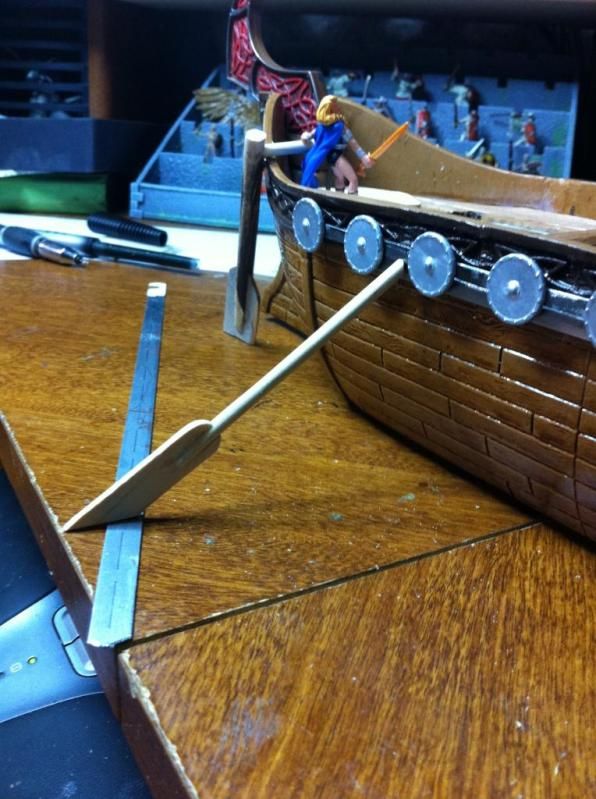 I wanted a mast that didnt wobble. I didnt have the base that came with the original mast so I installed 2 items into the motor of this toy before I glued on the deck. First a bolt on the bottom so that the mast would sit snugly inside ( Plus an over kill, wasnt not needed but I glued a magnent to both the dowel and one to the nut. ) It was tight enough that the magnets made no difference. Also just under the deck, there is a washer that lines up the * mast* with its seat on the bottom. They are very cheap and fit the dowel perfectly. The mast slides in and out of the hull very snug and does not wobble at all. First try so kind of an over kill. 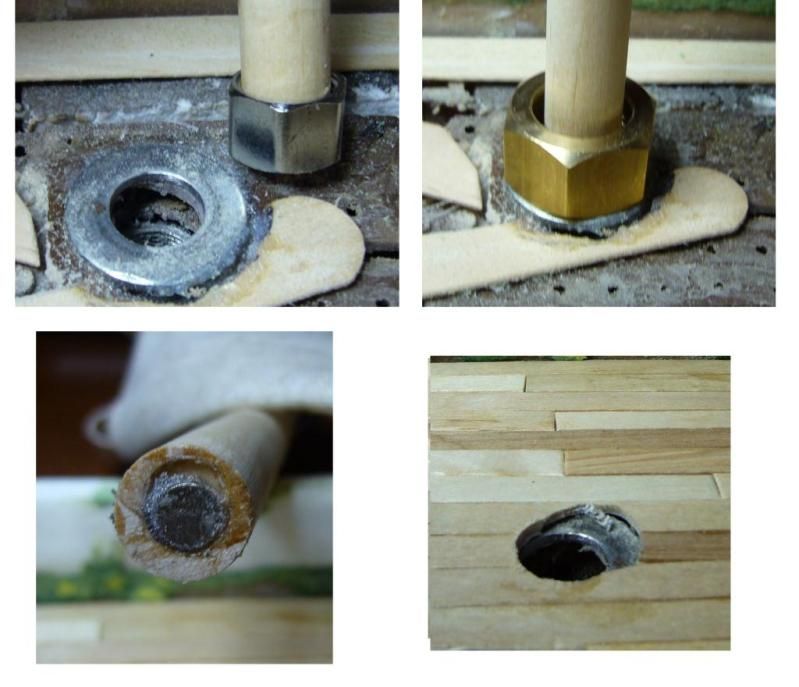 I greenstuffed all the corners, next time though I will not waste this much greenstuff. Tons of glue, or superglue or GOOP. Sand it down then either order online some magic sculpt, fix it sculpt or apoxie sculpt or ANYthing other then sticky expensive greenstuff. ( worked great on the outside for connecting the celtic looking knots). 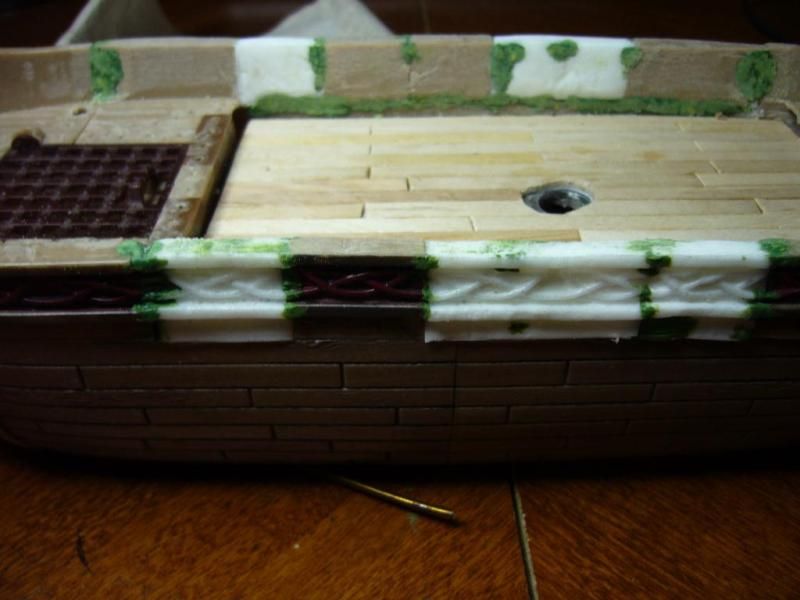 When I was drilling the middle of the toy motor to install the mast it cought on something metal inside and shot my drill to the side where it went right though the boat. Im glad it didnt destroy the side wall ( Oh and that it didnt go through my leg too) 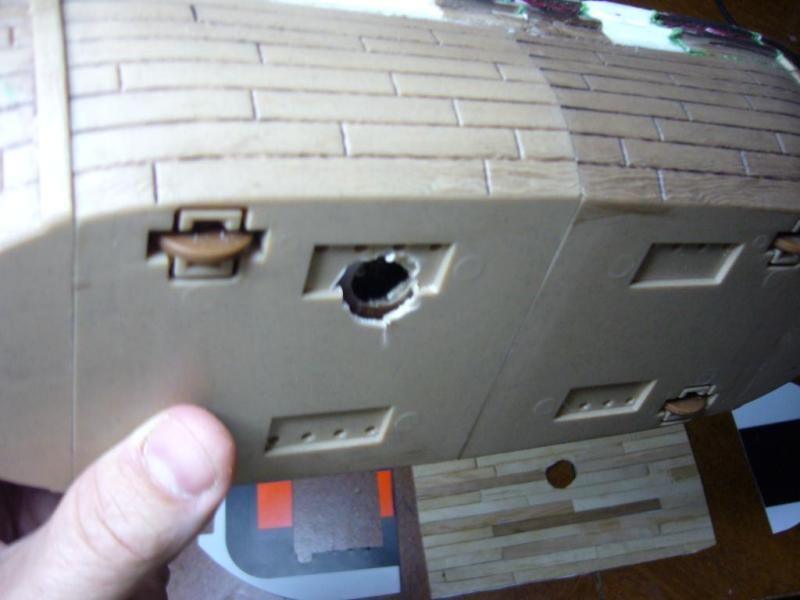 I could have sworn I did a good patch job, untill I primed it to look for imperfections. Wow... just wow. why did I even try? I am sure this wasnt the best fix but I used WOOD filler , and just rubbed it in with my finger to give it a pretty flat surface. Painted it again after it dried to double check the finished effect. 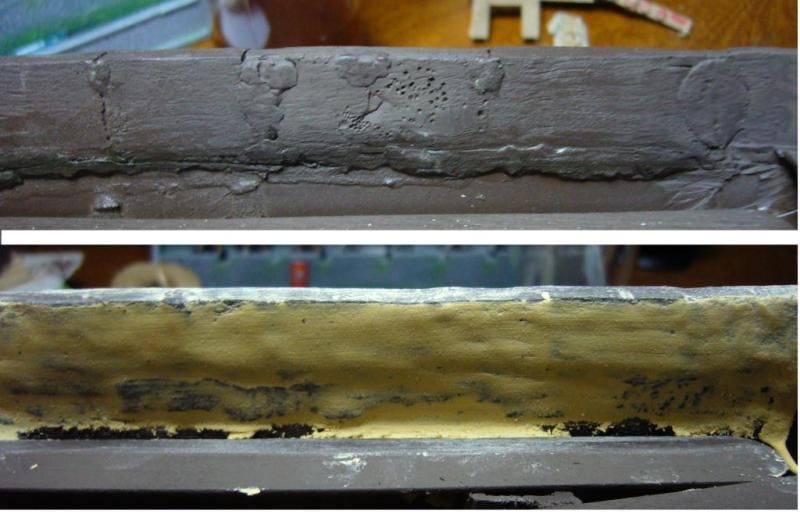 I plan on making a bar with the oars each so I can remove all 6-8 oars per side, just like the shields depending on how I want the ship to look, I decided againts drilling holes into the side of this ship. Once that was done, and I was satisfied it didnt look like a frankenstien ship, I decided to try and start painting Also I am dying for the mail to arrive to see if I got my megablok dragons so I can rip a head off and make my replacement figurehead!! I wanted a dark color for the trim, so that what ever color I used would stand out. I did a few coats of tan on the rest of the body and lots and lots of brown washes to try and get the original toy's sandy color ( and to look like the popsickles all over it ). I know I will mod a few more ships and I wanted those to be really dark so I want this one to be light and stand out from the others. ( Plus shes my first ship!!) 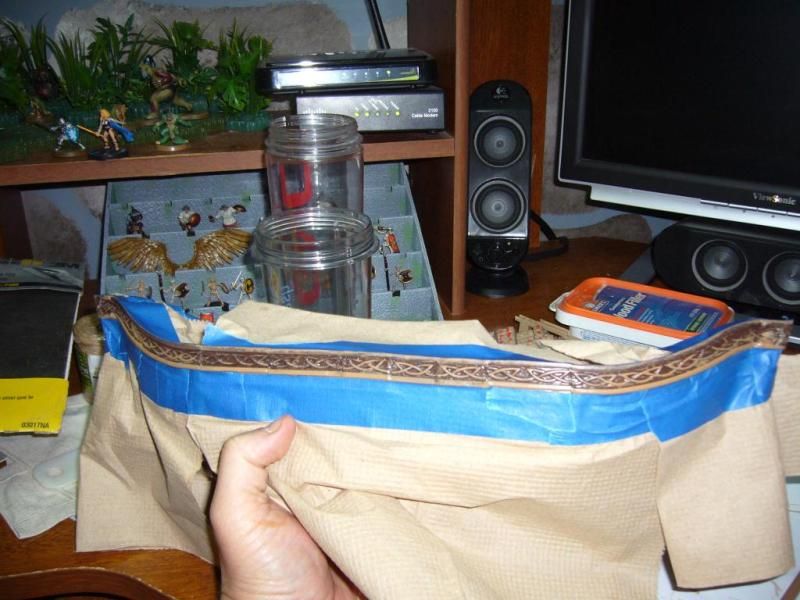 Before and after picture, and testing out the mast. What I really want to do is get a toy I can destroy for a figurehead AND start playing with the rigging. I cant do the rigging untill I finish painting so that I can give it a clear coat, and If I start adding the rigging the clear coat will ruin it. 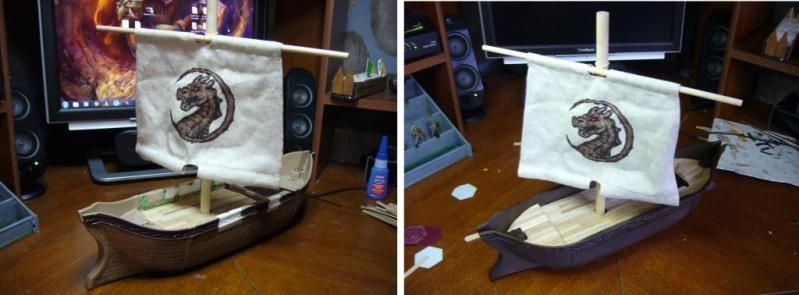 I want this ship to belong to Jandars, so his main color is blue, with the very dark background I chose a very bright blue to stand out. I first started doing this via drybrush and it was working great, but the background had a lot of blueish dusting and it didnt look sharp, so after an thirty minutes of painting, I gave up and re-primed it dark brown and this time decided to try it the old fashion one. One line at a time. 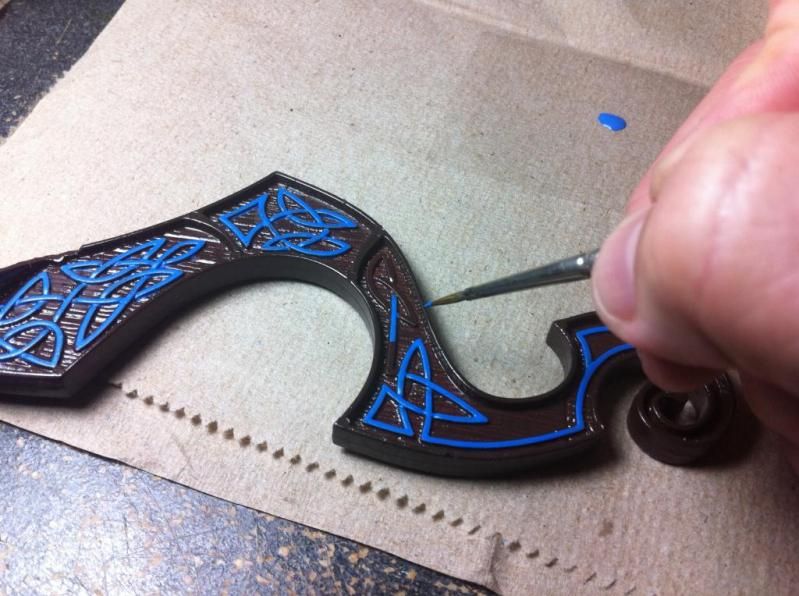 I liked how it looked so much better, doing all the lines took me just under an hour but the effect turned out pretty cool. I really like how the blue stood out. Also while I was at it, I gave the finished hexes and deck a light tan coat, a dark brown ink wash then a very very light drybrush. I guess vikings didnt holystone their decks and there wasnt a need to make it lighter, but I wanted to really make the hexes stand out. Not sure if I will keep it this light or darken it later. Like I said this is really my testing ground so playing around with several ideas so when I start modding the other ships I wont waste so much time. So far in this ship I think I have put well over 10 hours so far, 8 of it was wasted time , or if you prefer, my learning curve ( still wasted time but fun wasted time) I liked how the front and back looked ( bow and stern?) Cant wait to get that figurehead dragon! I used boltgun metal for the trim, I might make it look faded with a black ink wash later. I read some viking ship models that people did tin bitz for their metal parts but I didnt because I cant find my tin bitz paint  Sorry for the crappy shots but some of these where taken from my phone and I am working under a desklamp 80 watt daylight bulb here at work. 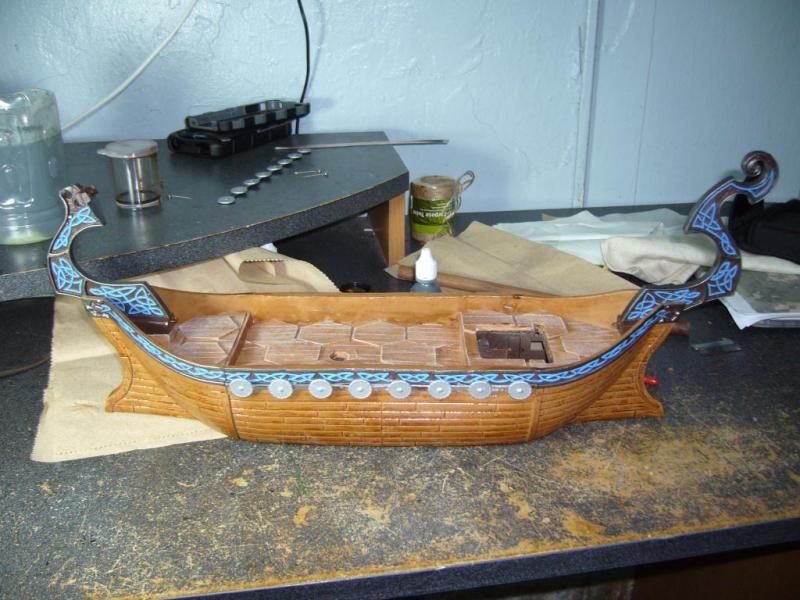 I tried those cheap $1 craft store magnets and I will never use them again, instead I will keep using my ebay magnets , although not too cheap they can be used for almost anything. I needed space for one more hext so I cut down the base for the tail by half, it only had 4 pegs to hold it and it kept falling out, so I trimmed 2 pegs off, glued a tiny plate from the metal strip from the file folder and added a magnet. Now it sticks on very well and is easy to remove. 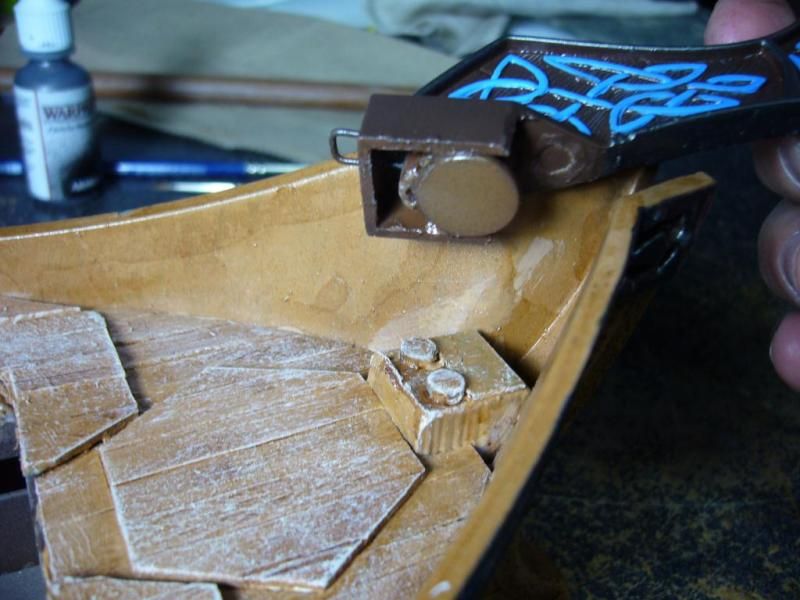 The front I left as is, since it had the whole section and felt pretty secure, if it ever becomes loose, I am not sure what I might try here :P 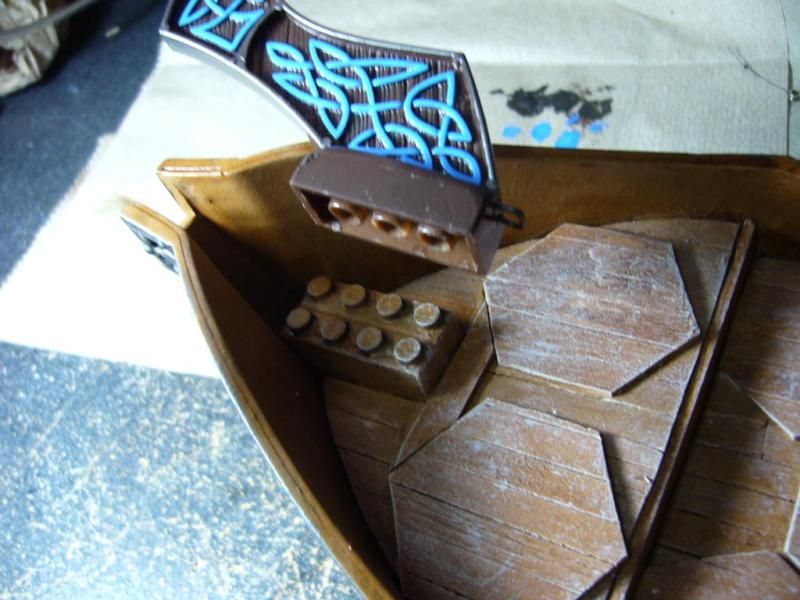 This is a cool trick I found out. I am replacing mast with dowel rods. I wanted to give them texture so I just slid the blade of my hacksaw across them several times, at first I was timid with it then I found out the deeper you carved the lines in the better. ( Also the better the chances of causing some nice bodily harm, since when is a hobby supposed to be so dangerous???) I had to sand the dowel rod with some very light sandpaper to get rid of the slivers of wood from gauging the dowel, but after priming , base coat and a wash, I liked the effect, it was very easy to do. I know there must be a lot of threads that can be bought from model kit online stores, but I wanted to try this twine to give it a very rustic rope look. I cant wait to start working on rigging so I just did a test set up first. This mast has already been clearcoated and I used the little circles you find at the very end of the guitar strings to make a little pully so I could have a main mast that I could raise and lower. I placed a * pully* on the top and bottom of the mast. Also I will wrape them up with a section of twine to hide the shiney metal bits. 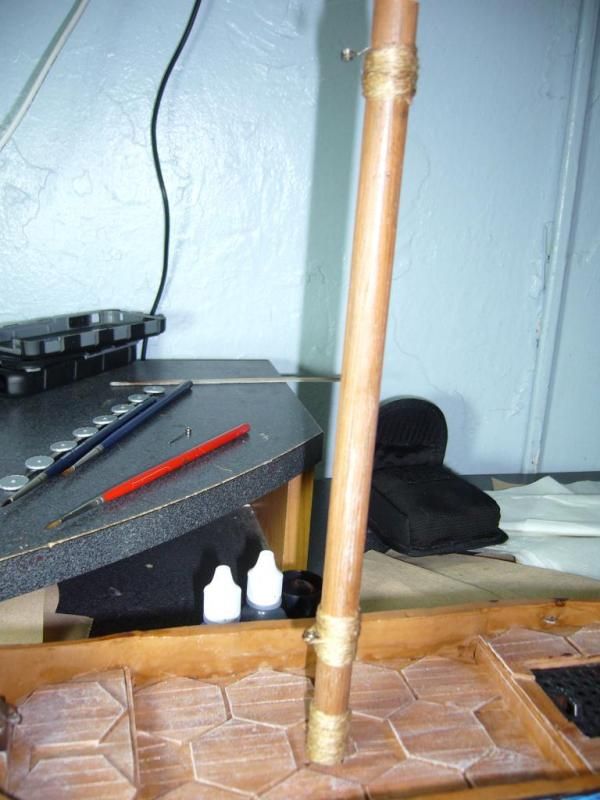 Here the guitar string loop has not been hidden yet, I'll wait untill I get home where I have hidden some black dental floss i will use to wrap some of the rigging sections with to break the same twine colors. 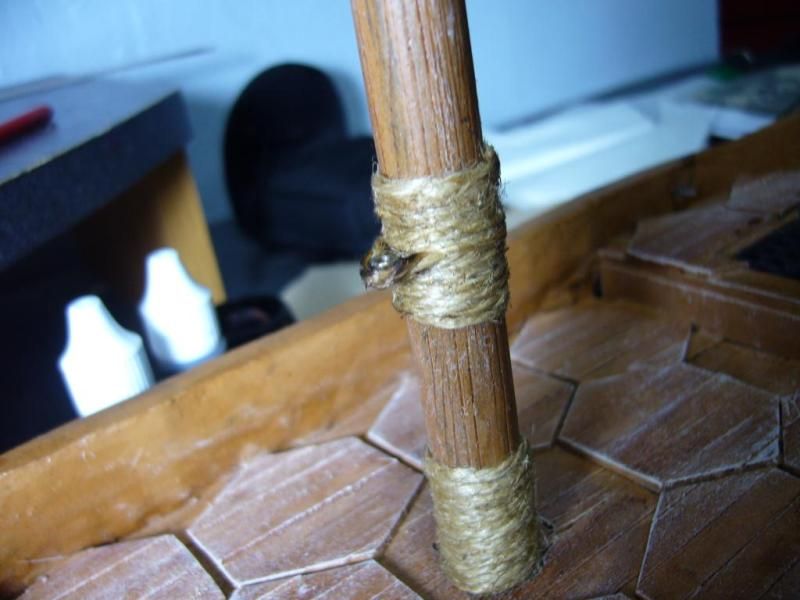 The bar that runs across the top of the sail is called a Yard ( I think) and the one on the bottom is also a yard or a boom ( not sure if boom is for a different type of sail) Either way on all the viking ships I saw on google, none had a bottom yard, the sail was always being blown in the wind and had ropes keeping them back. I got rid of my bottom yard and replaced it with a peice of wire to give the sail a curved look, like if it was being blown. And on the page are the sizes of the dowels used for the yard and mast. One thing about the multi-purpose twine, after you wrap it around what you want, you need to burn it very quickly to get rid of the stray threads. 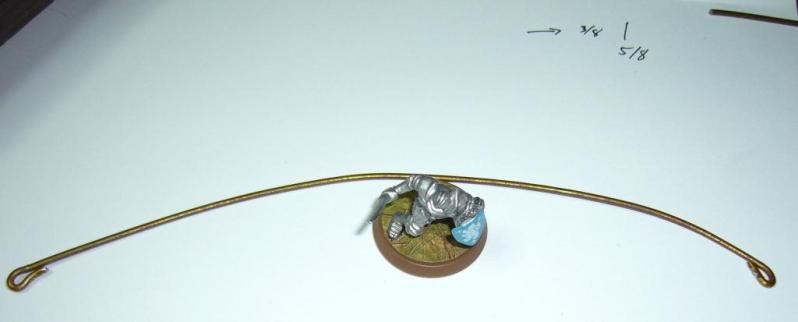 Here is my first mock up. The rigging is temporary. I want it to run in such a way it doesnt keep figures from fitting on the hexes. Also the Sail can come up or down depending what the scenario is. Also I saw every single viking ship on google had a stay? ( the rope going from the top of the mast to the front of the ship, or bow) I added a fore stay and a aft stay in addition to a rope to bring up the sails, another rope going across the top of the sail, and both ending up to where the rudder is and two more on the bottom of the sails to pull them back. I opted not to place 2 more ropes on the side of the mast as that would have just been to much in the way of moving the miniatures durring a game. 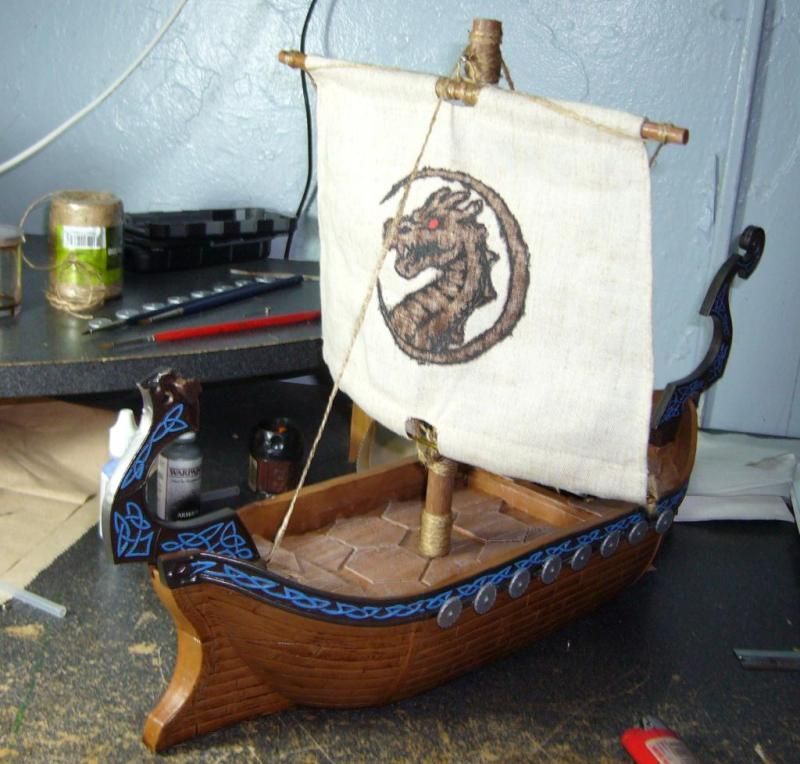 This ship is still missing alot, oars, painted shields, second row of shields, A FIGURE HEAD, and of course a decent looking rigging. I need to work with a better quick release system for the rigging for when I want to remove the ropes and remove the mast, I am thinking of using hooks, I have loops right now but I have to thread the rope through it, I think a hook will allow me to have pre-tighted but adjustable rigging I can just hook up and remove quickly with no fuss. 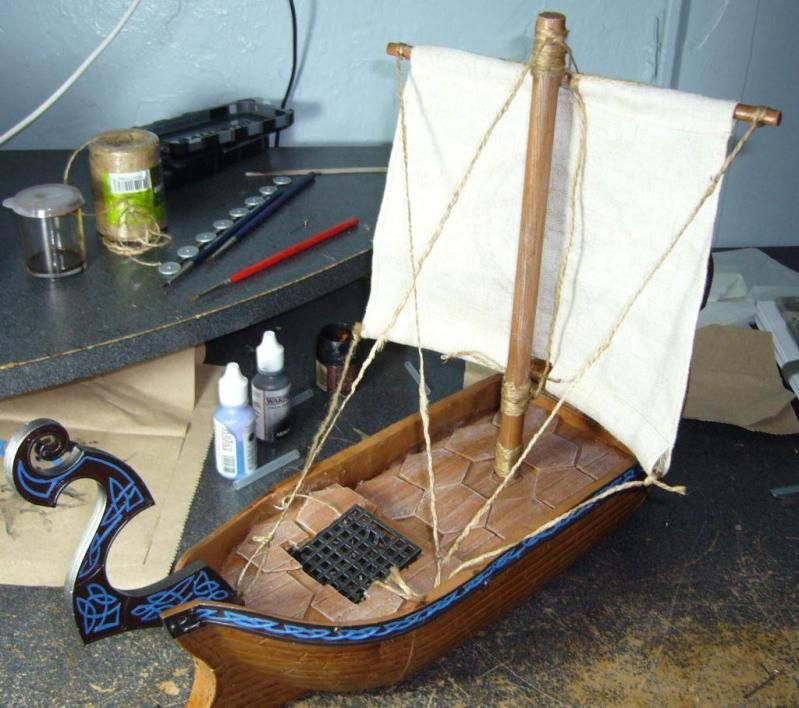 Looks messy but thats because the ends are not tied down, will use black dental floss to make the rigging stand out, and make the ropes adjustable. Here is a picture of the mast down, all I did was release the ropes from their loops, folded all the ropes ( that are still attached to the sail) In the middle and roll it up, I like how this looks and I migth use this when I deply the oars. 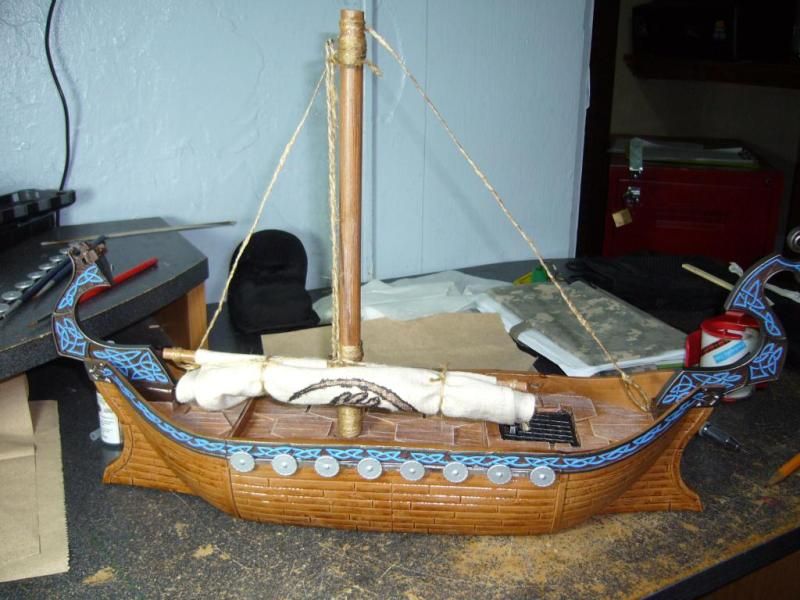 And the key feature is that this ship fit into a toolbox or something similiar for when I need to pack it up and not worry about it breaking apart. Still have alot to go on this ship but its starting to take shape 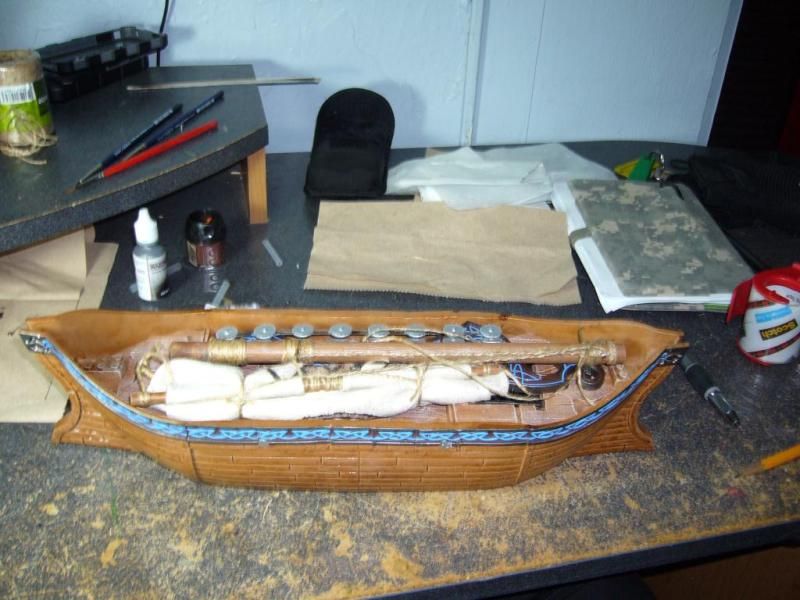 Next step, the rigging and standing by the mail box waiting for my dragon victims for a figurehead!!!! Update !! ( May 2012) I recently ordered some decals for the shields, I think its Flagship games, they look amazing and are already weathered and stained. Easy to use and very durable. You need to base the shields white first for the colors to stand out. Although they where worth every penny ( british pound?) They where expensive. I paid 11 pounds plus shipping for a total of about $19 for these decals. Next time I will paint the shields some simple designs instead, the decals alone cost the same as the original ship cost me. Wasn't a smart purchase. They are pretty though.. I keep telling my self that...  Next the Longship Figurehead- During a trade with Fi Skirata he sent me a ton of Mega Bloks dragons, some really cool looking ones. 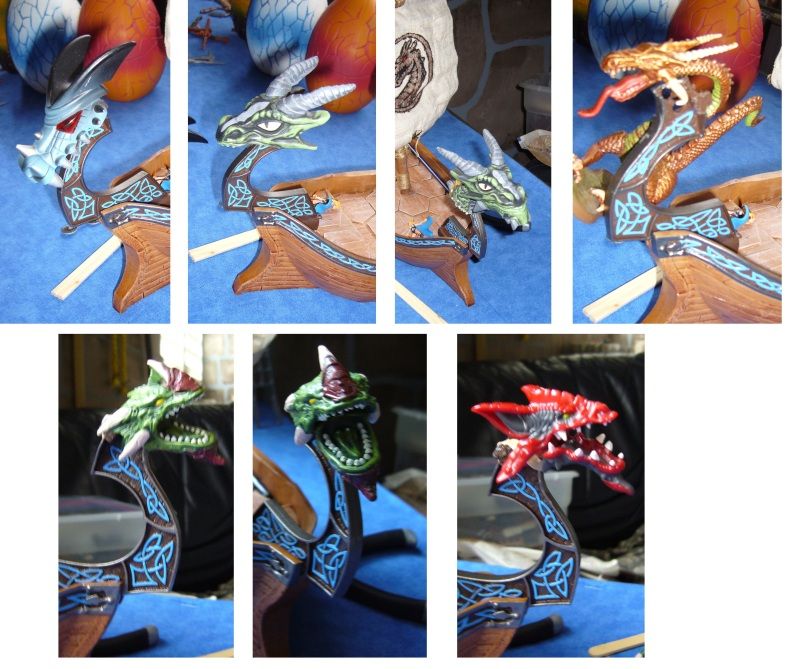 From all of them this was the one I liked best, but I didnt want to ruin the dragon by leaving it headless so I decided to make a copy using the Aluminite plastic casting kit from Auggies. 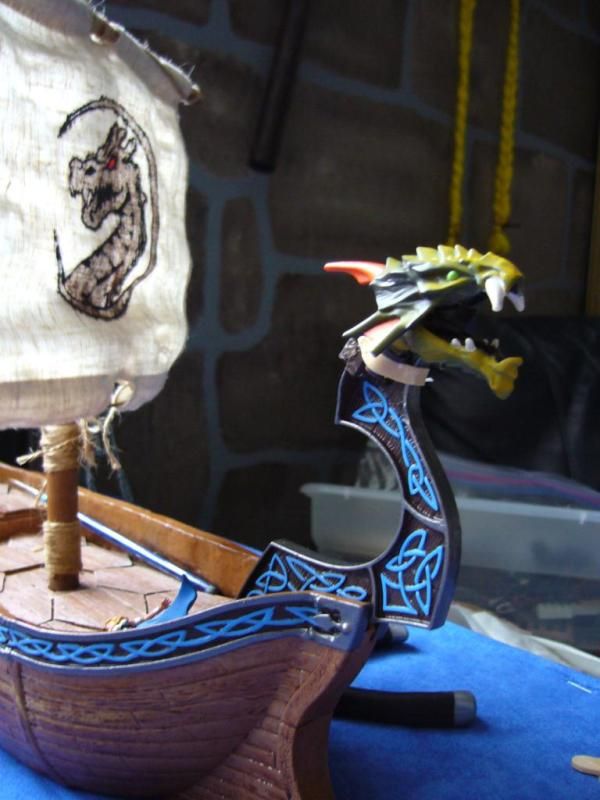 Took me 2 tries with the instant mold, the first cast came out hollow, also while its still white I cant see the imperfections so I sprayed it brown and then fixed what was missing with greenstuff. 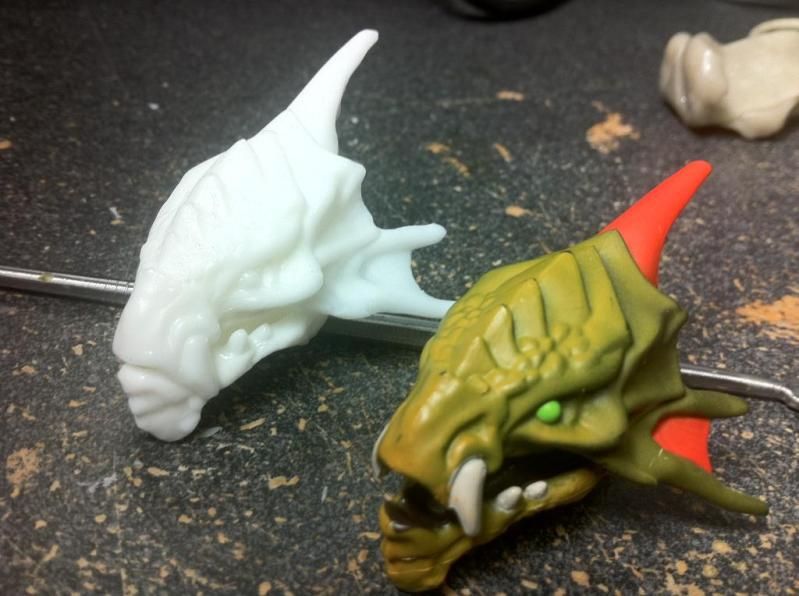 I carved out the front post a little bit then fixed the head in place with pins ( chopped up paperclips) and also fixed the upper jaw to the lower jaw to give it stability)  Once the head was fixed in place, I filled in the gaps with greenstuff and sculped it to look like scales to try and make it a little more seamless. I plan on painting it with shades of blue in the same way the toy was painted as it looked cool as it was. 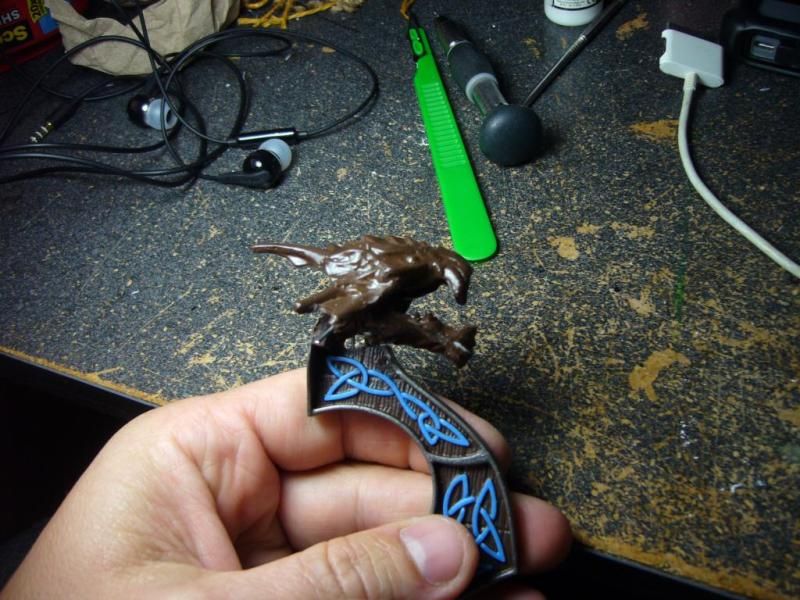 Any one have suggestions for this Jandar viking ship? I was thinking Jandar's Spear or Odins spear, or the norse word for Spear but it sounded really hard to say. Any suggestions? Update ( May 2012) Last night I spent around 3 hours tying knots. Good thing I still remembed what I learned in camping merrit badge! First thing was to find a new thread to replace the twine as Porkins had suggested Found this one at Walmart and decided to give it a shot. 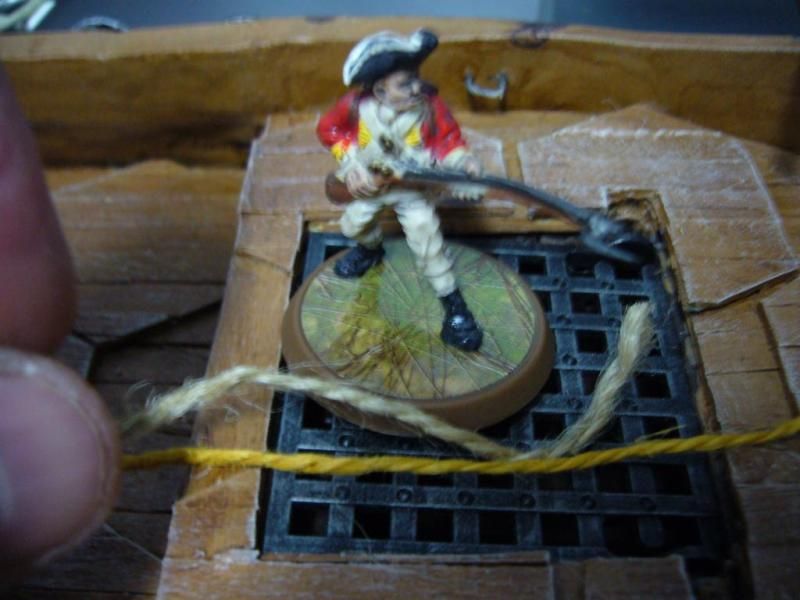 Took off the Walmart sticker to see what the name of the string was, and noticed it was a big $1 on the label... Walmart had charged me $2.50 for it.....  Not crazy about the color but looked a lot more detailed and defined than the twine. I liked the twine's color more. I tried not to use glue as it would change the color of the thread, plus since I was doing rigging I wanted to have some fun and use as many knots as I could remember to give it a nice detailed effect. I cant remember the name of this knot but its used to keep ropes from fraying in the end. I used it on the main mast several times. I was able to give this dowel a nice wooden grain by rubbing a hack saw blade up and down it a few times trying to get deep gauges, then used sandpaper to get rid of the little strips of wood that stood out. One base color, a dark brown wash and a very light tan drybrush.  And I used the little circle thats found on the end of guitar strings as part of my rigging. Its starting to come together. Still not crazy about the color. 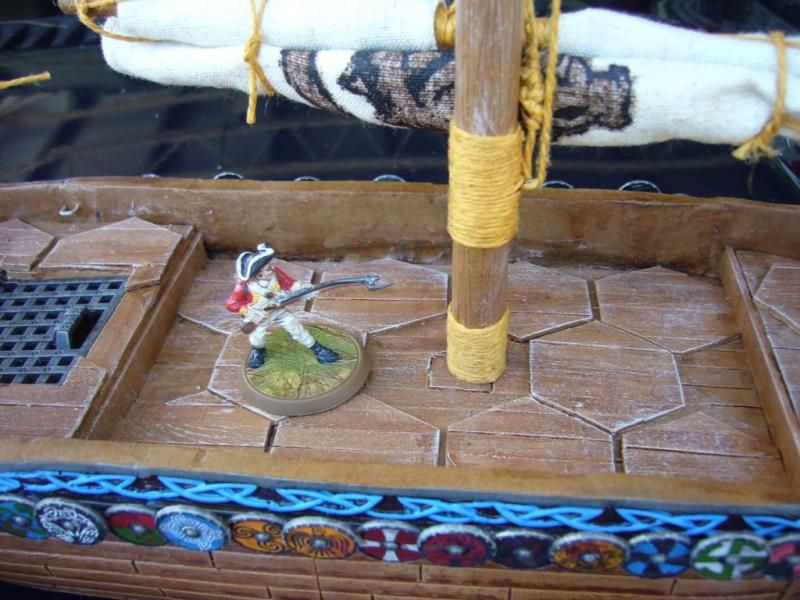 Also a few decorations on the top yard. 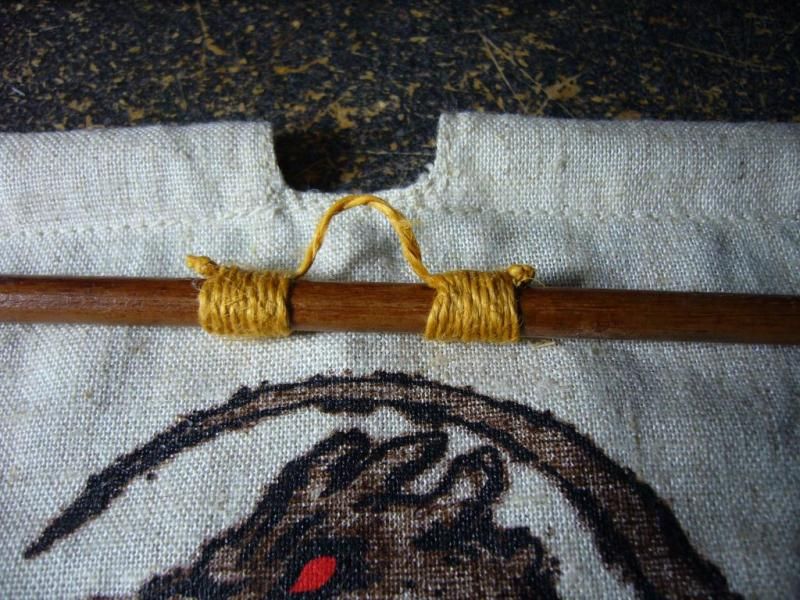 The top of the main mast I kind of went overboard with the " rigging" I included a Forestay and a back stay ( a rope going from the top of the mast to the front of the ship and one to the back to hold the mast in place) Its just for looks as it is not really needed as the main mast is very stable. 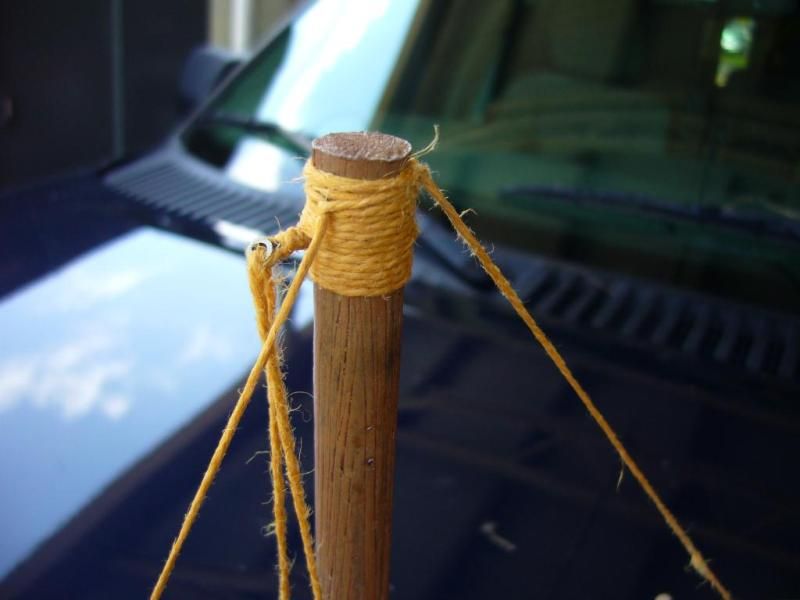 Again a little top heavy on the rigging but I was having some fun with it. 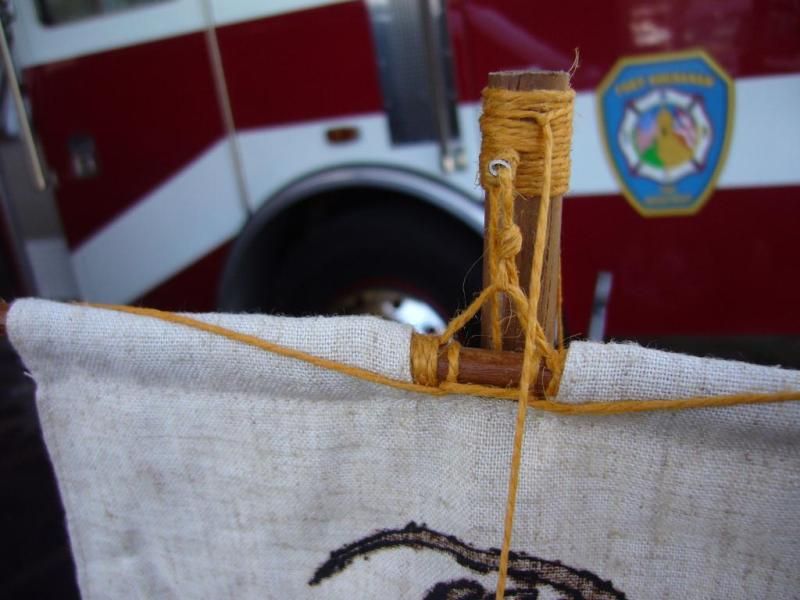 Its rigged in such a way that I can raise or lower the sail as needed. I can remove the mast and the rigging if it gets in the way of gameplay. 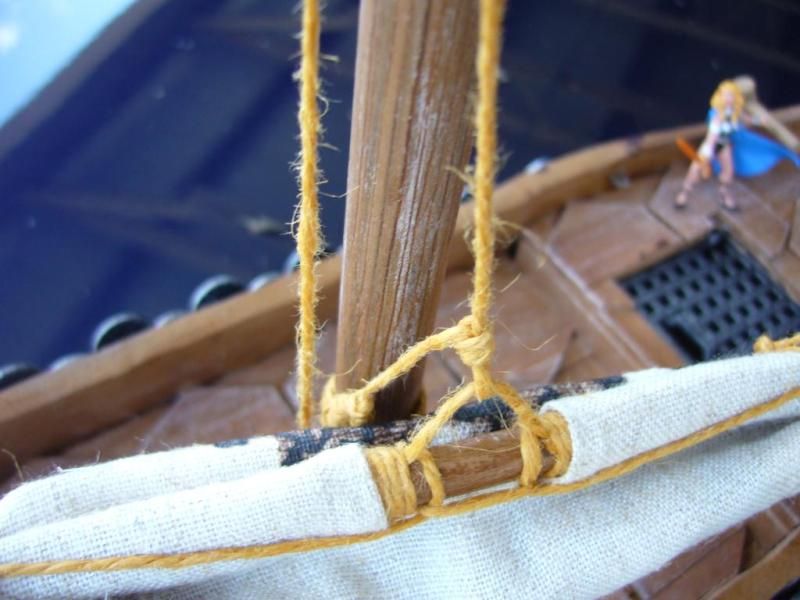 This is how the longship is starting to look with out the rigging in place 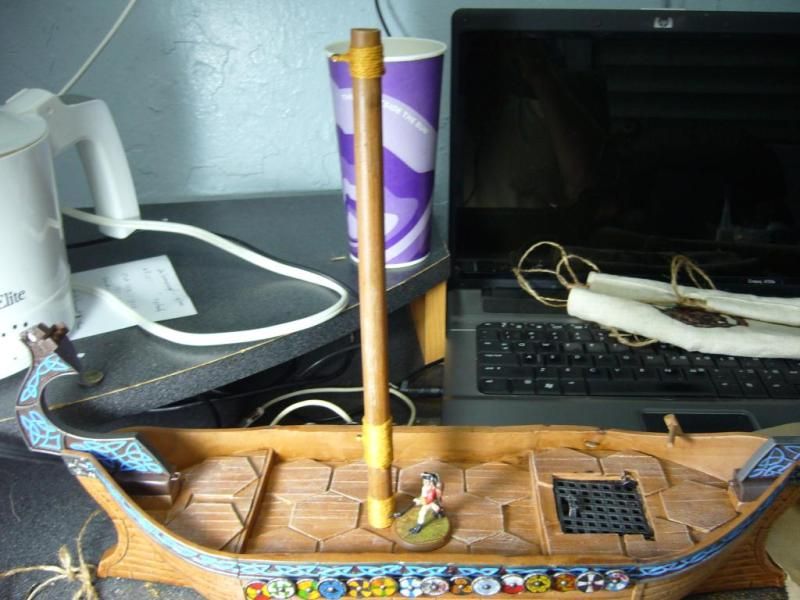 This is just a test, I will make new clips ( hooks) and stream line the taught line hitch knots ( a sliding knot to tighten the ropes) or I might just make smaller knots and much smaller hooks. 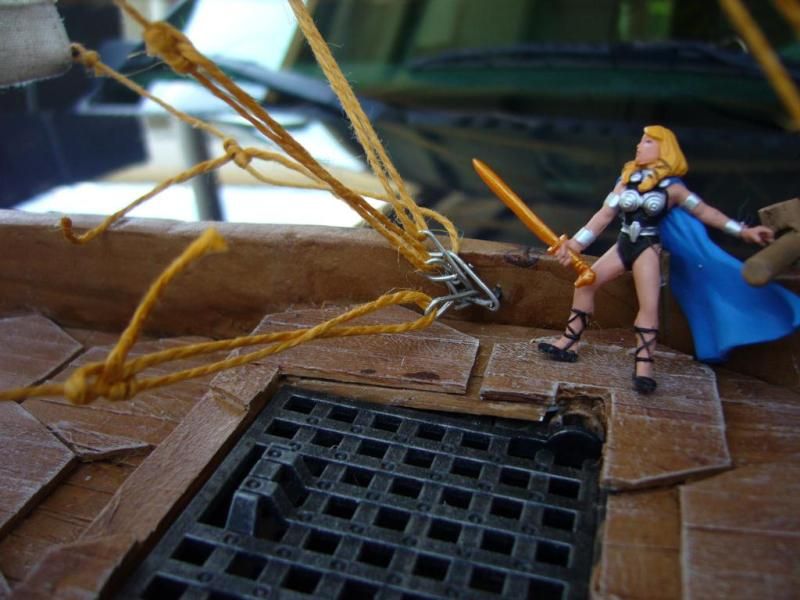 I like how the color of the figurehead matches the sail but I will paint it blue like the decorations. Also added another line across the top of the sail to make it look like it is holding the sail in place. 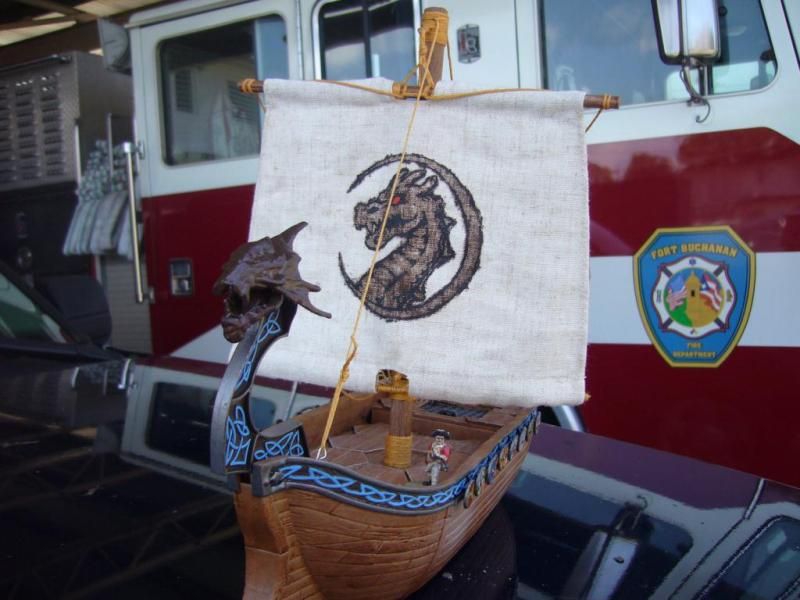 It seems like a lot of rigging and it might get in the way of gameplay but this was more for fun then actual functionality, plus it takes seconds to remove the rigging and mast if they get in the way. 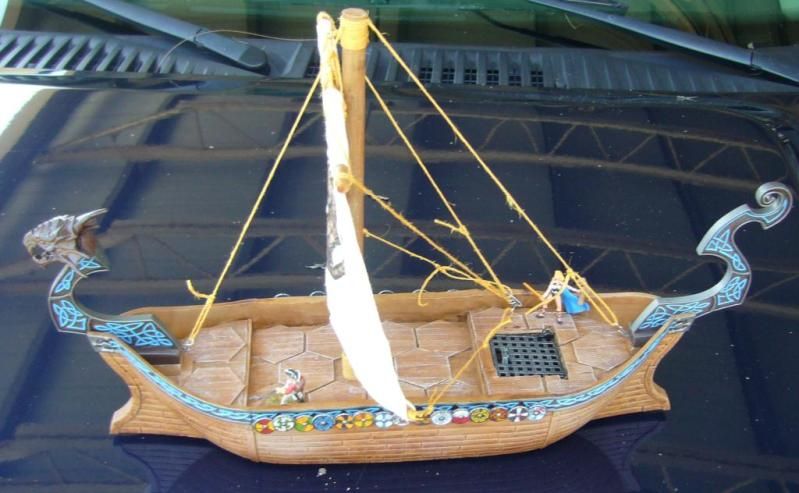 I also have it set up so I can lower the sails and roll up the lines inside the sails they are not in the way. Break out the oars!!! 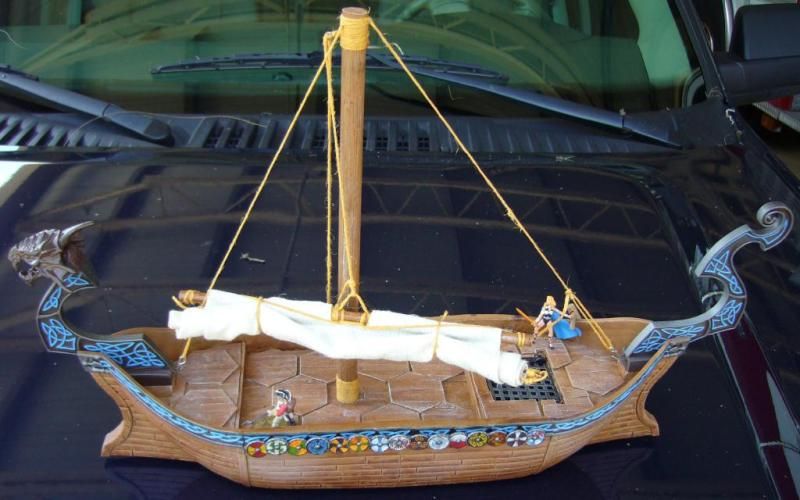 The shields are way to small, so this just doesnt look right but I kept them since I had already made them plus they cover up the imperfections of the sides I casted to fill in the gaps. ( And I already used the decals on them....) 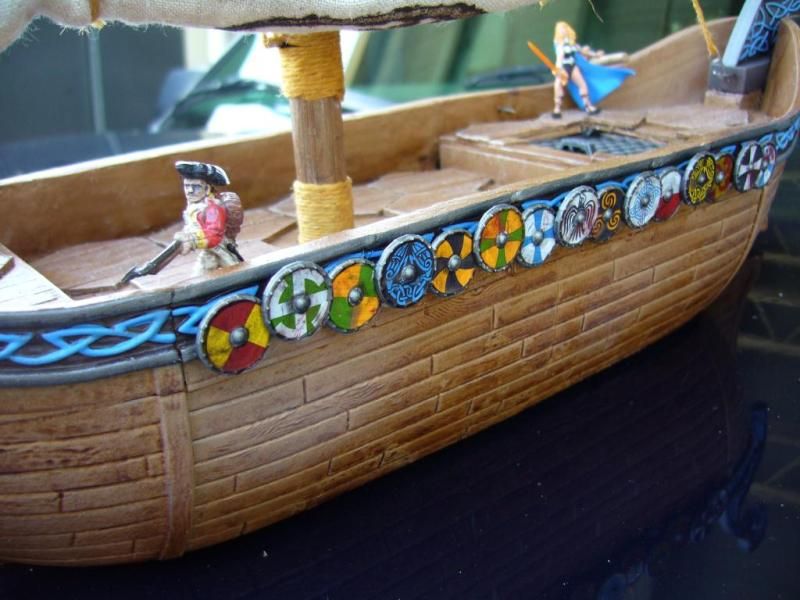 Update May 2012 First few coats of paint on the figurehead 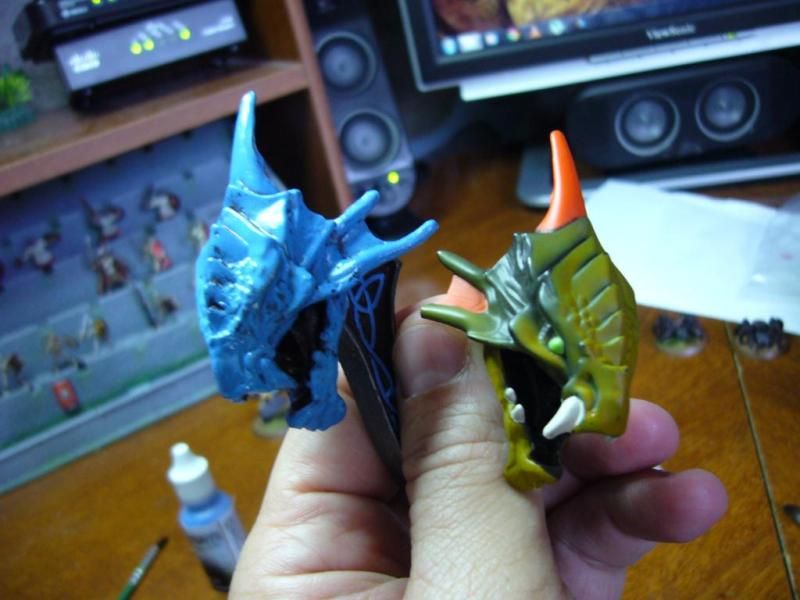 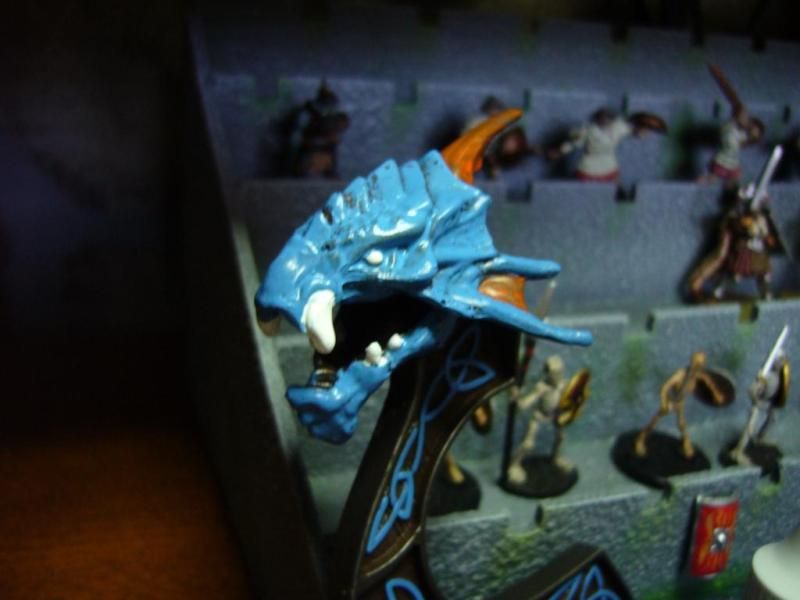 Update - (Oct 2012) I learned after spending hours creating the rigging that first, this is the wrong size thread, and second I should have pre-stretched it all to avoid it sagging after time. So I untied every single knot, tied a hammer to the thread and let it hang over night then tossed it all in a corner for a few months untill I could get back to start the rigging over again. Black Pearl
Spoiler Alert!
Update # 1
Spoiler Alert!
Mega Bloks - Black Pearl One of the more common ships that can be found on ebay. Prices range from $20 shipped to $120. I was able to purchase 6 of them for around $25-$30 each pretty much intact. I wanted to share what I learned when buying these ships to help others choose what ships to buy since there are a lot of pieces that might be missing that help you save money and are not important as you will end up getting rid of them anyway. Here is the basic hull of the pearl. You will need a few 6 pegged megablok peices to hold it together but this is not really critical as you can just glue it too. Make sure when you buy it you get all the hull parts as replacing them might force you to buy a whole new lot. 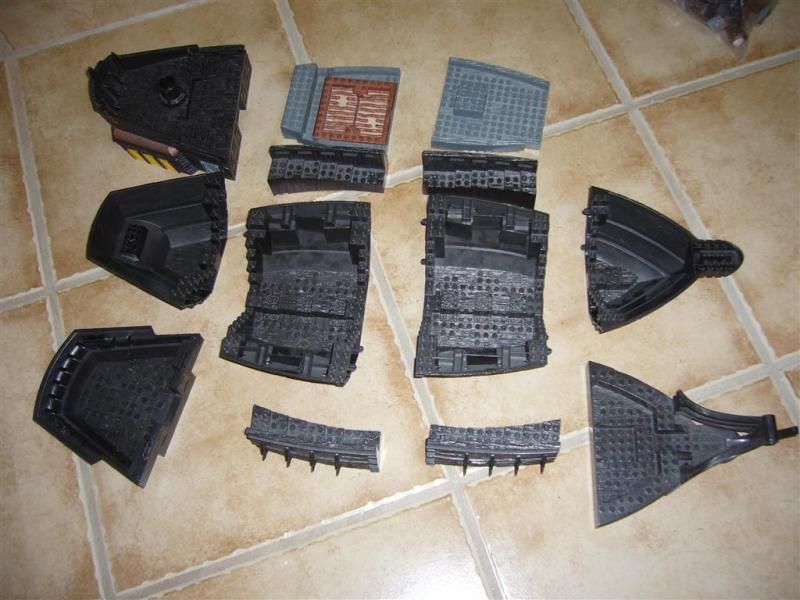 The mast are easy to replace with dowels, just takes a little more work. This is a complete Black Pearl playset, with all the trimmings. 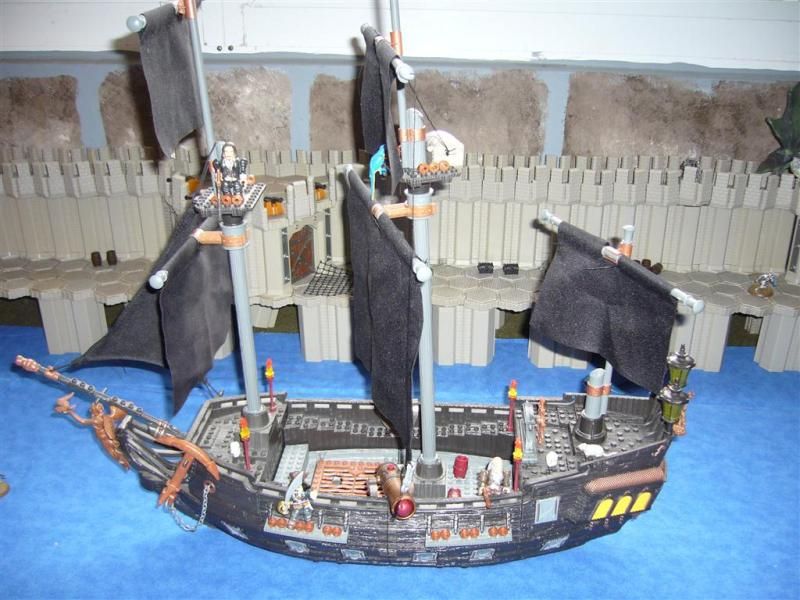 I am not a big fan of the limp black sails and might replace them with tan canvas custom made sails. This playset is the most frequently found converted mega bloks ship out there, followed by the predator ( capt cutlas's predator) 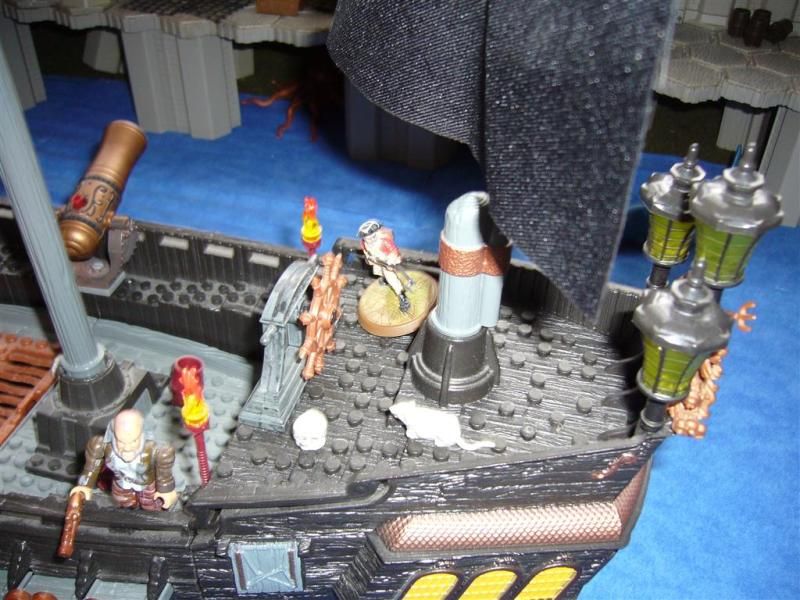 Everything is over sized, from the wheel, to the cannons to the skulls and rats. Even the anchor is unusable, but these pieces are easy to replace since there are a lot of ship model stores online. Trick is figuring out what the correct size is 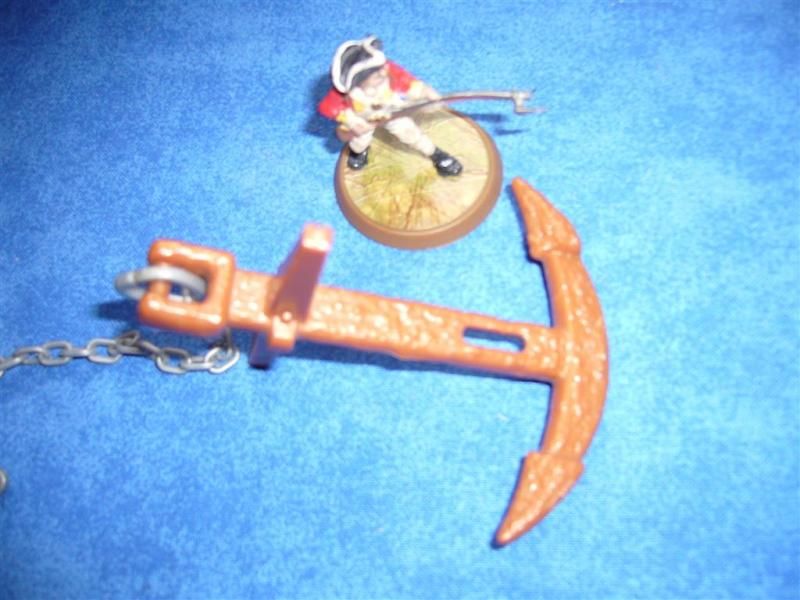 These are the Black Pearl pieces I ended up ripping out and giving away. The flames and the barrels and even the chest can be converted to be used so I kept those parts at least. 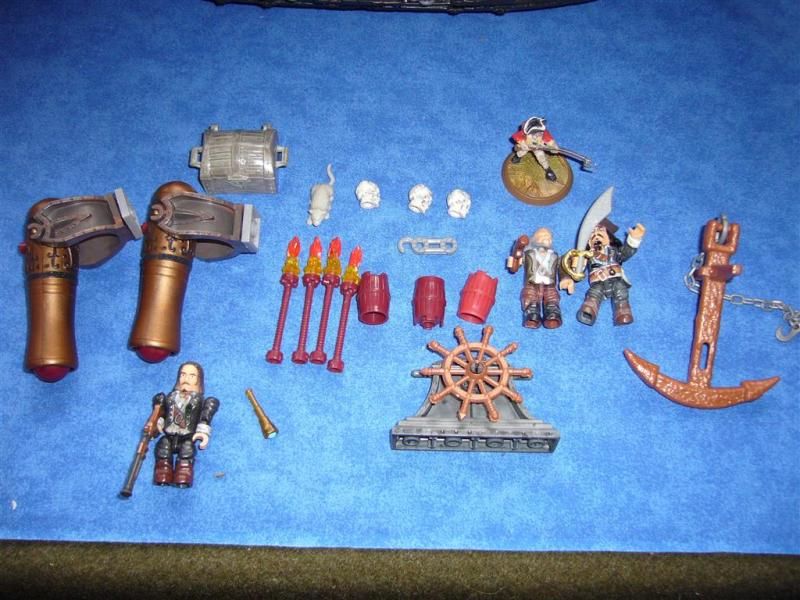 Here is the stripped down pearl from where I will begin my conversion. This is the basic hull, with all of its parts. 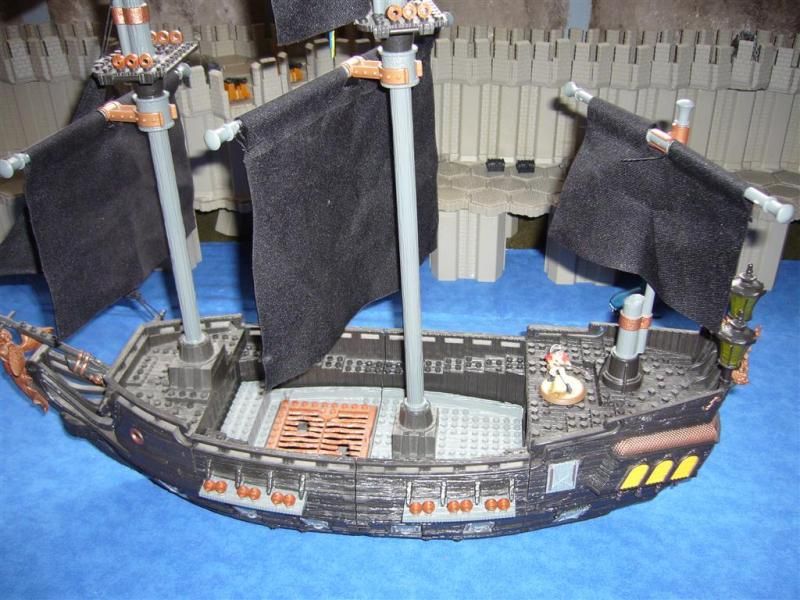 She has some great details, but the most common missing parts on this ship include missing her rear lanters ( Aft castle lanterns? Not sure what they are called) 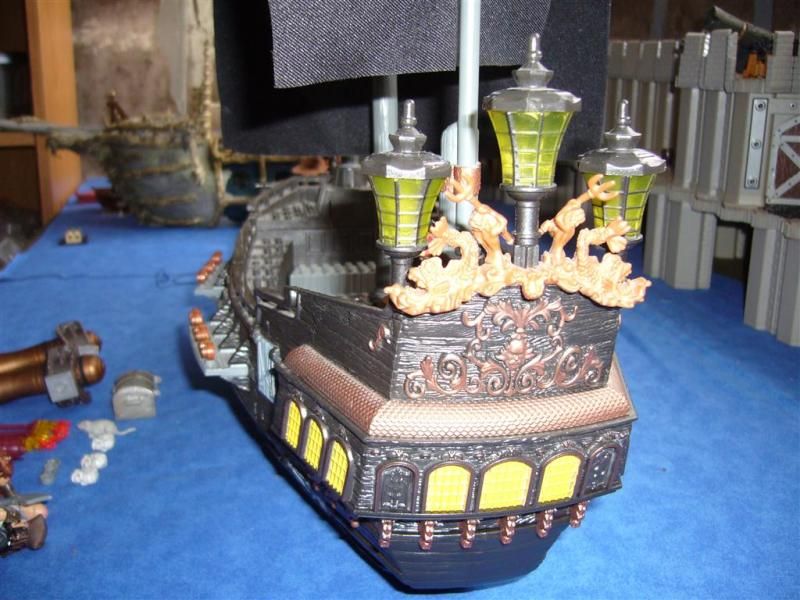 Update # 2 Sep/2012
Spoiler Alert!
HMS I have no name (Yet) This will be my third ship I will start but it will be from start to finish since the other two are still in dry dock. I have more or less an idea now what I want to do and a couple of reference photos for this project. I have a good idea about the basics for this project, her decks, her guns, her mast positions, what I do not have is her name. Her name will dictate her theme, her style, color of sails, figure head, decorations ect. Since she is not mine, I will leave it to the owner to decide her name and build from there. Untill a name is given to her I will call her Mer Ange until she is christianed to avoid back luck! The guys at Modelships.com also said its called a retrofit not a project. These guys love their hobby. Also its not a good idea to ask questions like a pirate.. Anyhow.... She started off as a $25 used Megabloks Black Pearl. Great ship very easy to find, lots of potential. Stripped off all the added stuff, and you have a pretty good looking deck. What I have planned for her is a double deck, maybe a furnished Captains cabin, custom figurehead, and a lower deck for cannons. I am not sure on how I will position her middle mast but I want the most room possible for a deck battle so I will not be placing cannons on her upper deck. First I will start with her lower decks, so I took her apart. I will work on her lower hull first. No need to cut off any pegs yet. I want her to have open gun ports with cannons inside that stick out. I took off the gun ports that come off easly with a flat screwdriver once you push the side pins in. Then I used my dremmel and with a bit to cut out the ports trying to avoid messing up the outside hull or carving up too much of the thin inner plastic. I took off the gun ports that come off easily with a flat screwdriver once you push the side pins in. Then I used my dremmel and with a bit to cut out the ports trying to avoid messing up the outside hull or carving up too much of the thin inner plastic. 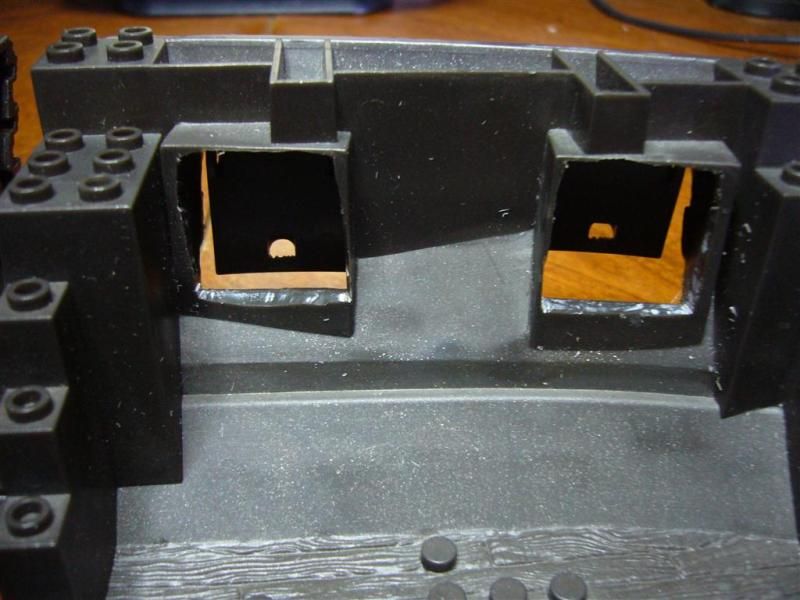 Don'tforget before you ever paint you will need to wash her well to get rid of dust, oils and shredded plastic. 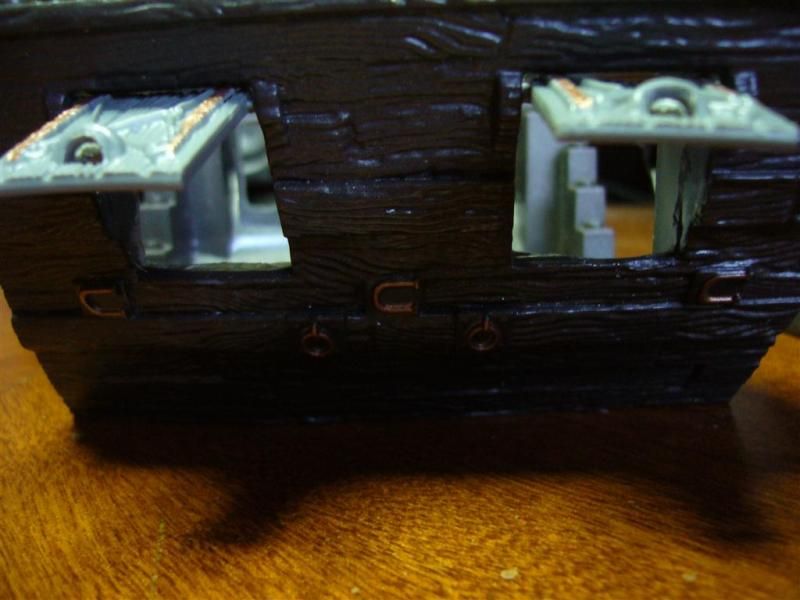 Cutting out the 8 ports was pretty quick and I used an Xacto knife to finish up details, here I tested the gun ports back on to see how she looked. I didn't want to have to make 4 more doors since the 2 ports on the Bow or stern are not removable so I left those alone. Here she is with only about 40 minutes of work so far. I am considering gluing her together now but first I have to make sure no other work needs to be done. And those messy gunport openings? They will each get a frame to cover up those imperfections. 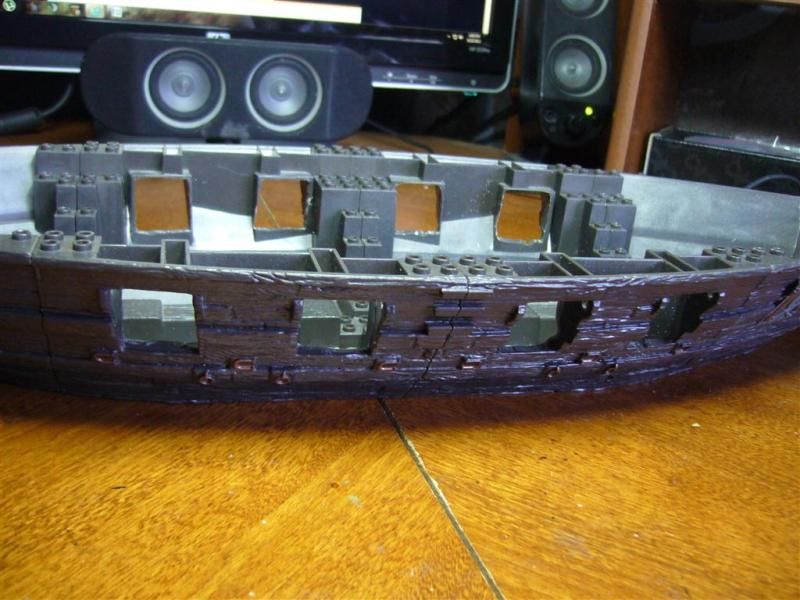 Now as to the name and figurehead of this fine vessel!! I liked the original Angel that came with the Black Pearl, from Wikipedia it says the pearl was originally called the Wicked Wench, but when she was burned with Capt. Jack on board she was raised by Davy Jones after they made a deal. When she arose pitch black she now had an Angel on her bow. Angel Figurehead. Either painted like wood for scary or creepy or full colors to make her a beautiful graceful ship. 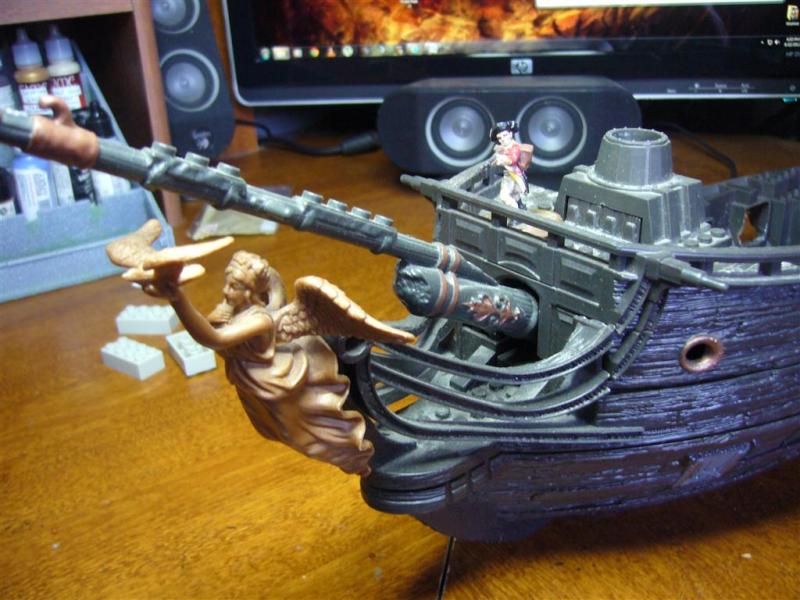 Dragon Figurehead. Why not go fantasy? I ordered 4 of these on eBay at around $3 each. I originally had them for my stormstalkers since I didn't like the over sized shark heads but they seem to fit well here. Great for a fantasy theme. 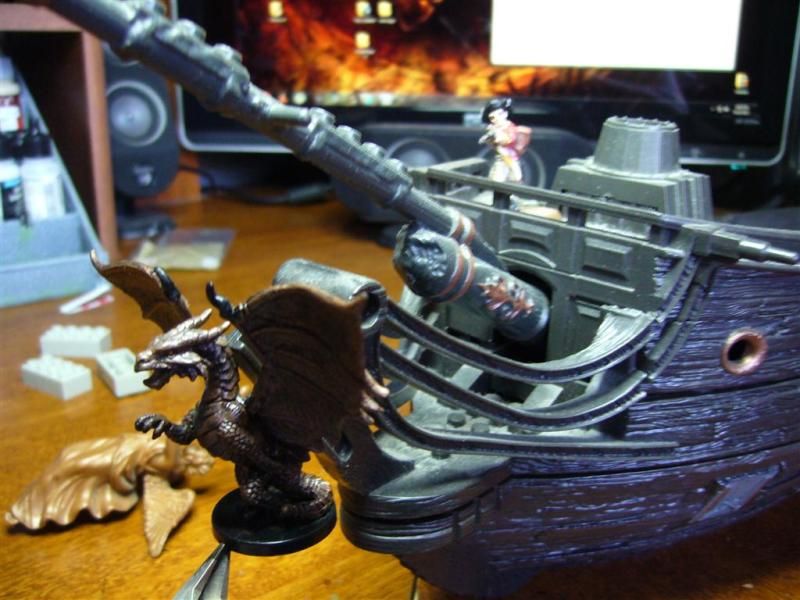 Seahorse Figurehead Ok stop with the color jokes a second and allow me to explain. Ever since Yodaking mentioned using a chess peice knight, I wanted to find a seahorse for a figurehead, and this rubber eraser from office max was the best thing I found. I can make a mold out of it and recast as a solid piece of plastic with Auggies kit I bought. I think it might look pretty noble... or I can just make this a warship for the Navy of Rainbow Bright and her Magical Ponies... 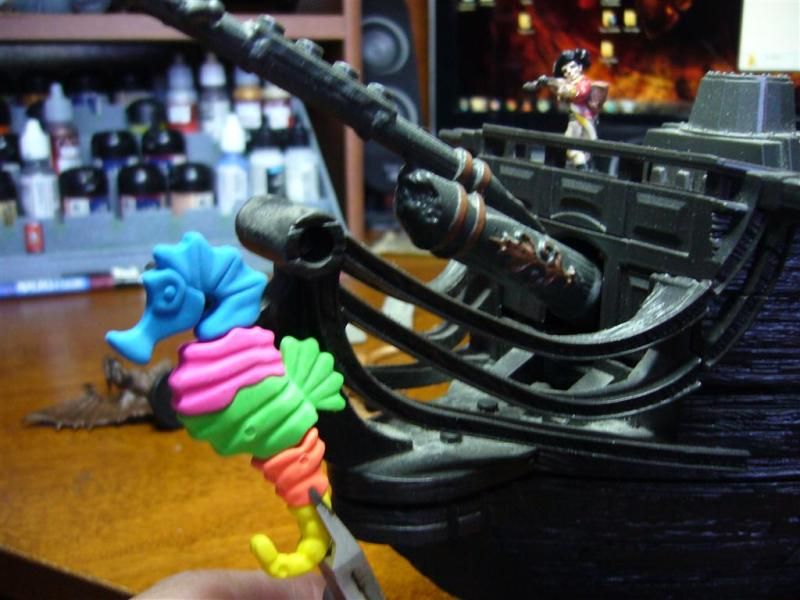 I have more done but need to take some more pictures , will do so soon Update # 3 Sep - 2012
Spoiler Alert!
Thanks guys !! Its been great so far, shes really worth it and encourages me to spend time on my hobby when I can ( since she has a hobby of her own,, they kind of work well together, she does scrape booking and I do Minis, so we hunt for supplies in the same stores when state site) As for the ship, she now has a name!! Fools Errand! More on the story later! Its a good one too. Here are some more before pictures, as you can see the depth of the hull is deep enough to have 2 decks, and it breaks apart into segments that make it easy to work with. 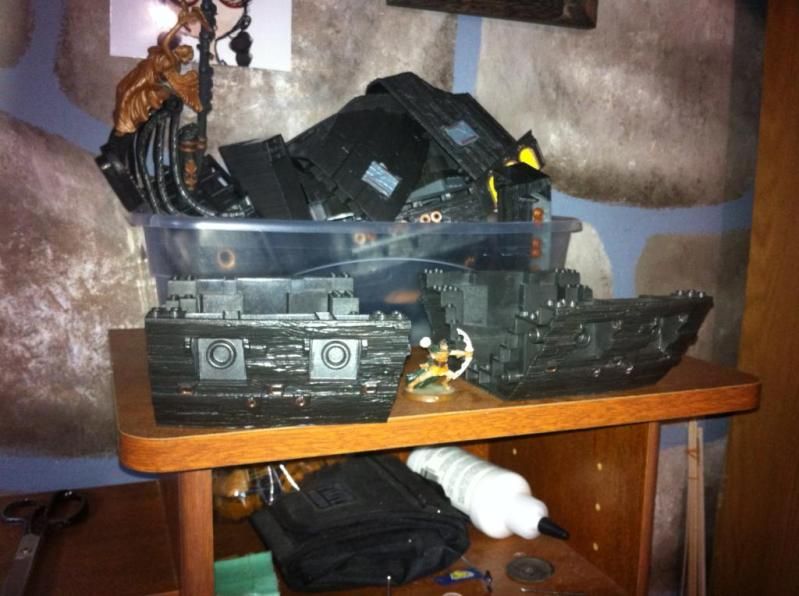 Top deck has some great possibilties but for now I want to make a deck that fits the most amount of figures. Alot of mods for this ship have multi-layered deck but it does not lend it self well to hexes. So for this ship I will try to keep it to just 3 elevations and the largest deck possible with minimal hex space lost due to decorations and Mast/rigging. 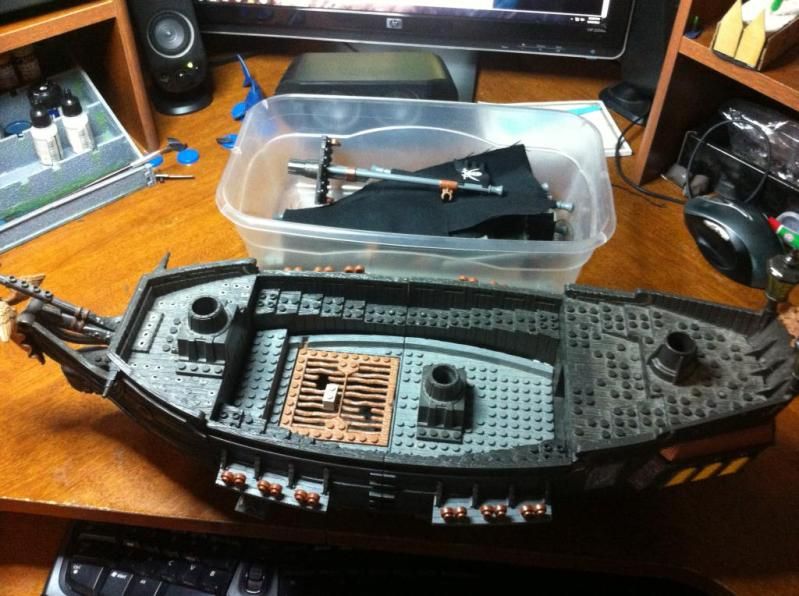 And this is the layout I am planning on her upper deck, 5 elevations, keeping the hexes lost to decorations to a minimun ( or squeeze them between hexes)  Update # 4 Oct -2012
Spoiler Alert!
Last night was able to work on the Fool's Errand for about an hour before I had to head to work to cover for some one ( plus I ran out of crazy glue !) The hardest part in making a custom project is first trying figure out what you want to do, second is actualy figuring out how to get it done. With these ships, figuring out the deck hight and the layout is the first part the second is making the templates. Once those are done the next ship takes a fraction of the time since the templates are done. After trimming off the pegs that I didnt need, and carving out the gunports, I crazy glued the lower hull together, plus another layer of GOOP ( another type of glue) on the inside to give it more strength. 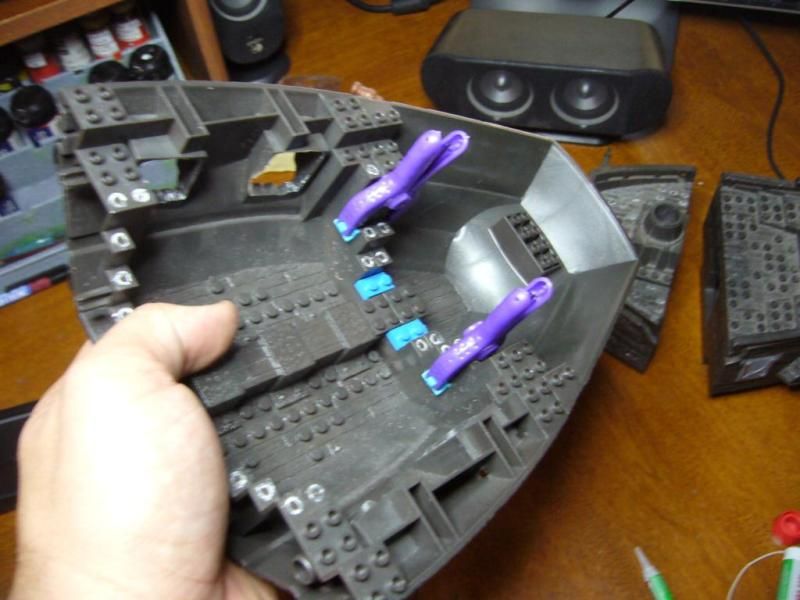 These little clips help alot to keep them pressed tight and keep me from getting my fingers glued to the hull. Now I needed to figure out how many hexes would fit and how the layout would be. In the lower deck I wanted the fool to have at least 4 cannons plus a middle row for units to be able to fight. More room if the cannons are removed. 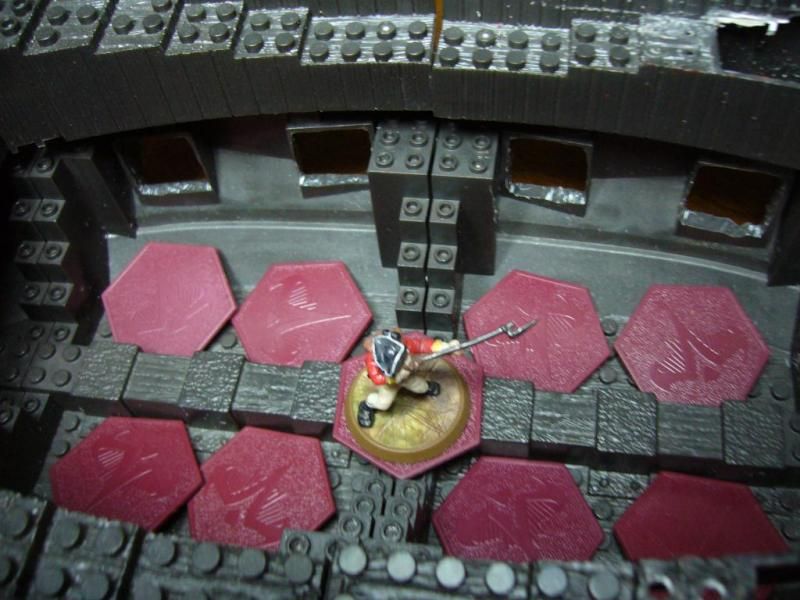 Now test fitting figures and cannons to see if this will work for me.  I cant remember who made this, but it helped alot. I found this template on the downloads section and its a great tool for playing around with the layout.  I start making a template with paper, trimming off the corners and borders a little at a time with a scalpel. Then I make a second one with paper and using the first one as a mold , make a second cleaner one. Some times even a third paper one before I trace it onto my plastic sheet. ( A for sale sign I got for $4 at Kmart) 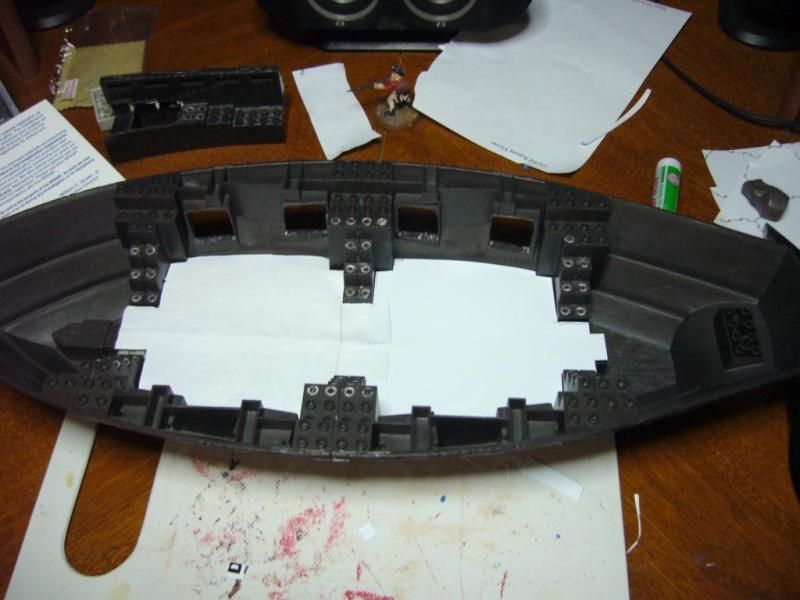 All in all this took me about 2-3 hours of trimming, tracing, trimming again, cursing because I cut too deep, then doing again. 4-5 paper decks and 2 plastic ones later I finally have my template. My next ship will only take me about 15 minutes to trace, and test fit its lower deck template since this one is already done. 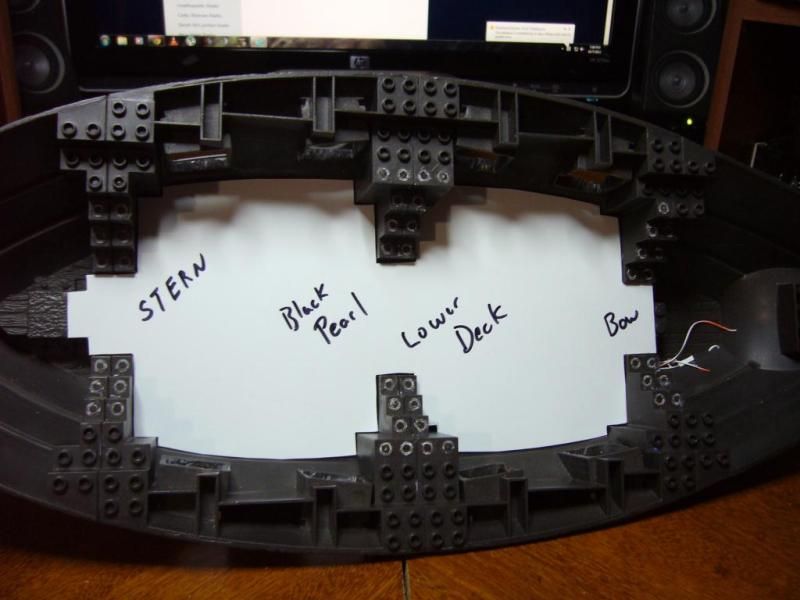 I make sure to keep my best plastic deck as my template and write all over it to avoid using it by accident and gluing planks to it. I started to glue on the planks on the first deck when I ran out of glue then I noticed I started my layout wrong, it just wasn't artistically adequate. In other words it just wasn't pretty... 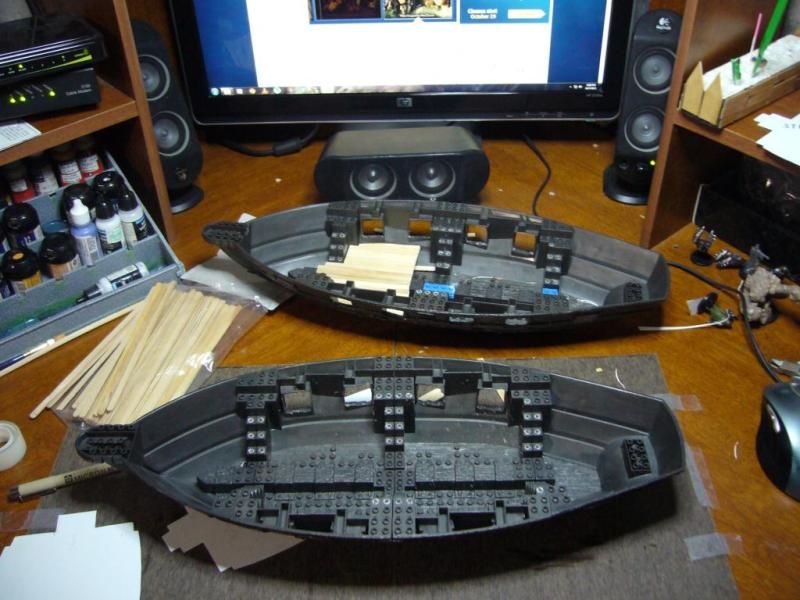 Update # 5
Spoiler Alert!
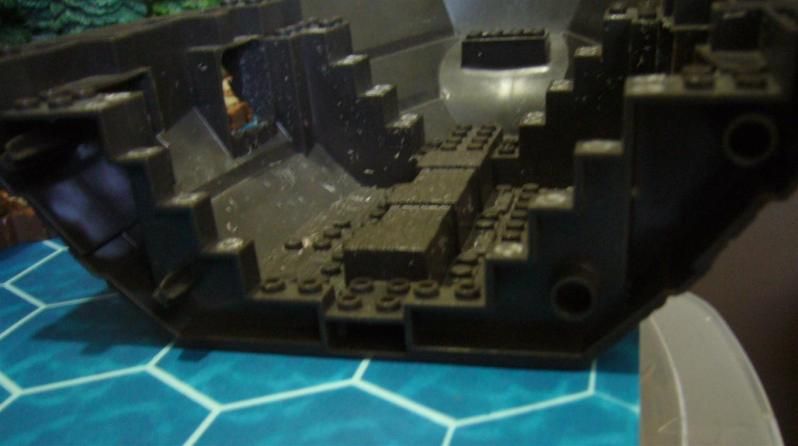
Now that I finished with the rowboats and Canoes I can get back to the Fool's Errand!! Rowboats & Canoes mini project Making the first boat is always the hardest. I have a lot of ideas I have found online but making it work with heroscape rules is the trick. Once the first ship is finished it will be a template for the other ships and go much faster. The first part of this project is just building the ship, and making sure it follows official rules. It will just be for terrain initially, later on I will work on getting rules for it. The naval rules will need its own little book like C3G does for its vehicles. I have been getting some really good advice from a few members of the CG3 and I think I have a rough idea how it will work. I took some measurements of the Mega Bloks Black Pearl I am using for the Ship Fools Errand. First I had to design a very sophisticated technique to measure heights on each section. Very sophisticated, I won’t try to explain the details here… 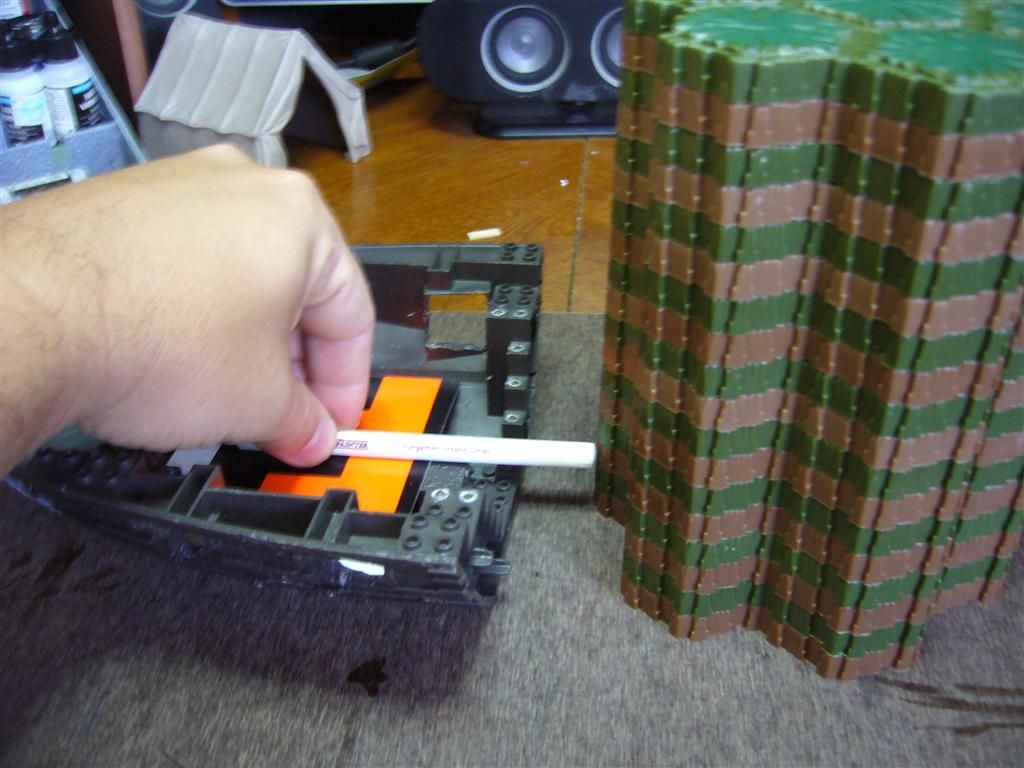 I was glad that almost everything landed exactly on a hex height and there where very few half hex measurements. This is where I measured the bottom of the gun port ( window where the cannons stick out). 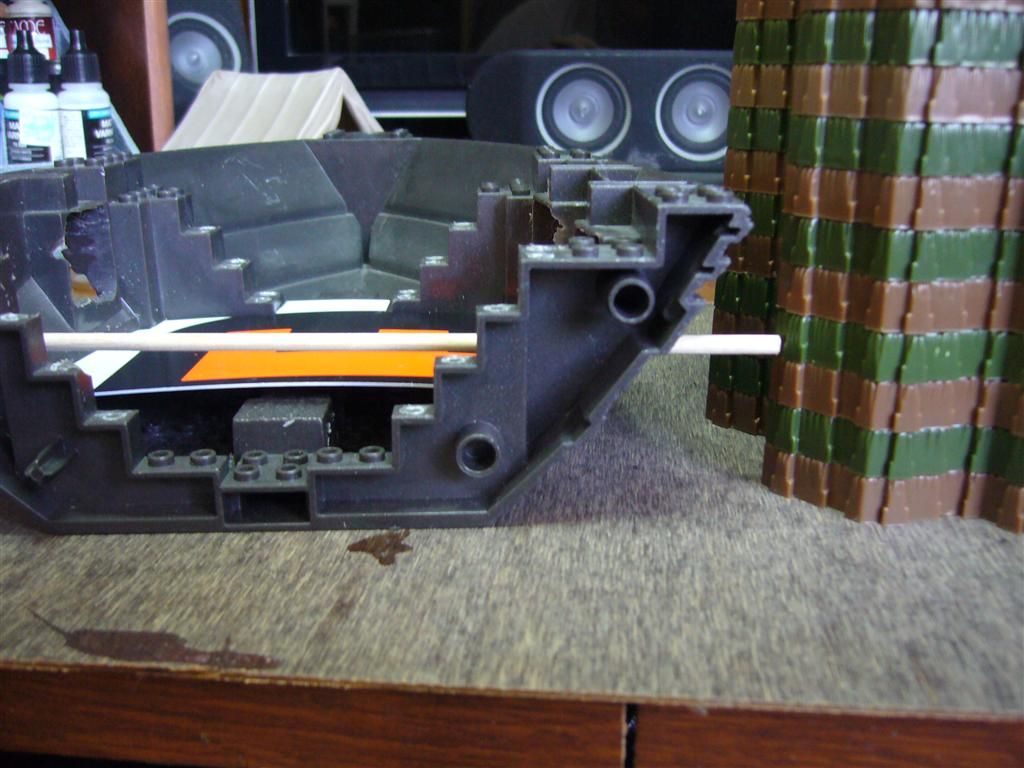 I had to change where I had originally wanted the top deck to be, to make sure that the railing would be the same height as the rules the walls and bridges. 2 hexes inside. 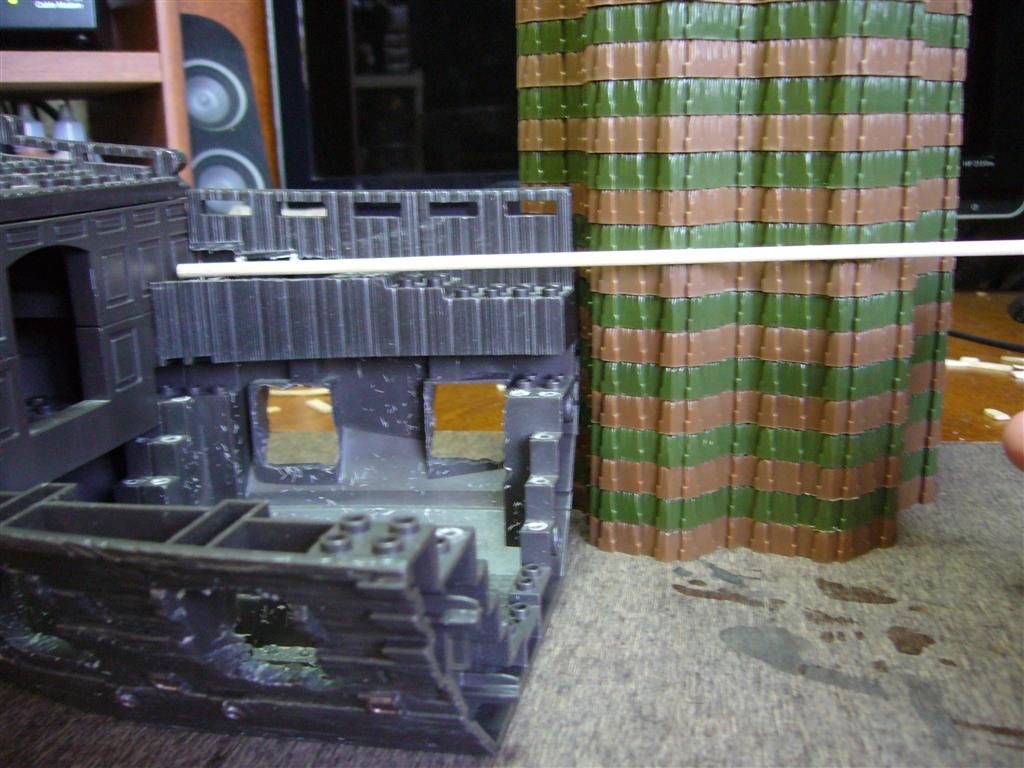 Another change, I originally wanted a middle step but this would only be 1/2 a hex high so I will eliminate this step and just extend the lower deck or upper deck ( Most likely the upper deck because its less work, the lower deck extension I would have to trim away the step, while the upper deck extension I just have to fill in the gap0. Here are the final measurements; 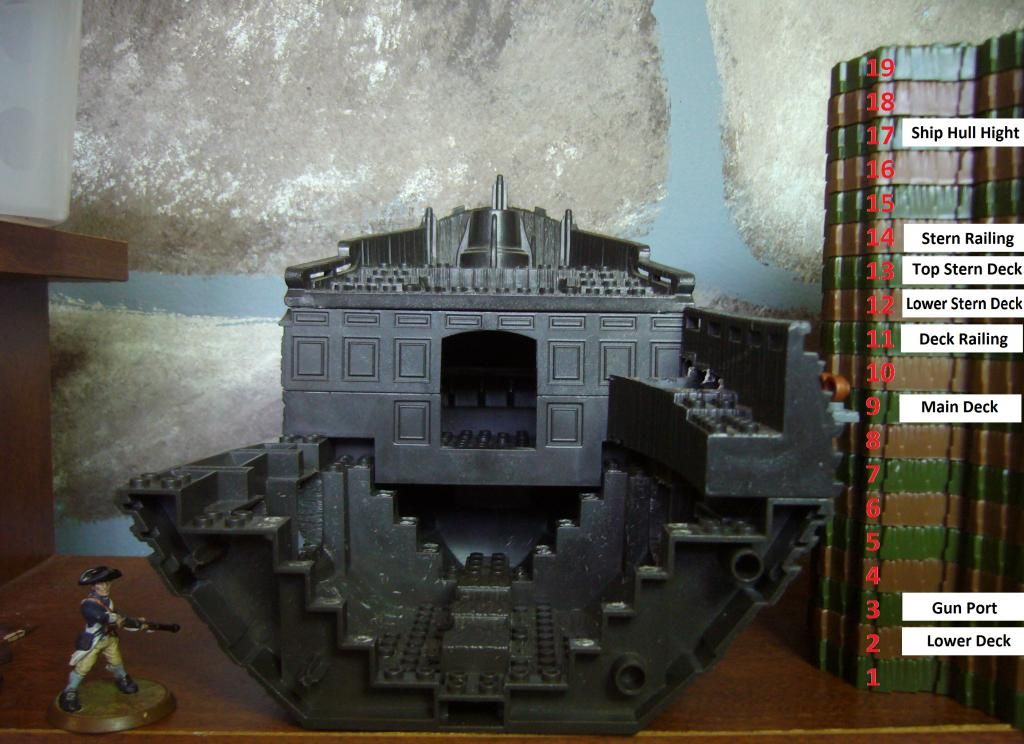 I also took pictures of the outside of the hull and how much water it sits in, I will upload those in a few minutes. Update # 6
Spoiler Alert!
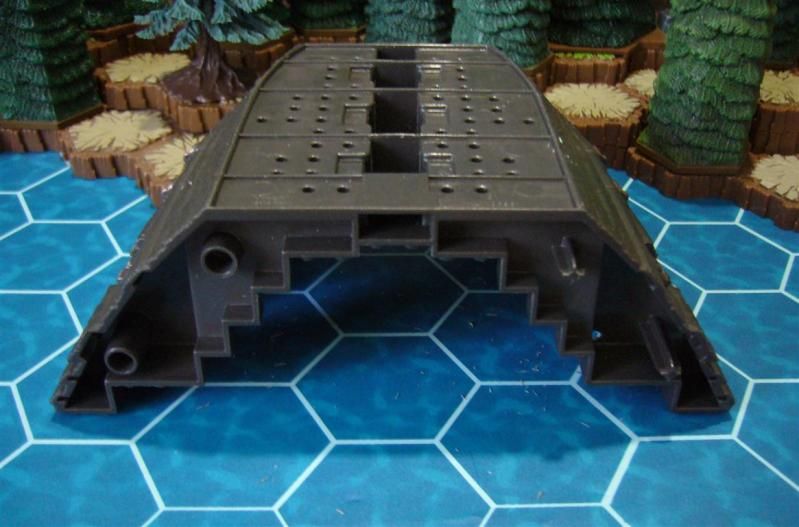
Here are the sizes for the hull. I took a bunch of reference photos but they are not really needed. To make life easy I plan on just using the rules made by IAmBatman for boats on the other thread. Water Vehicle The Pirate Ship must be initially placed in a water space, and may never move out of water. The Pirate Ship does not have to stop when entering a water space, and can only move down in elevation, not up. When the Pirate Ship is destroyed, all occupying figures now occupy corresponding water spaces below the Pirate Ship, and roll one attack die each for sinking damage. So if it fits, its good Here is the lower half of the Black Pearl hull in water. 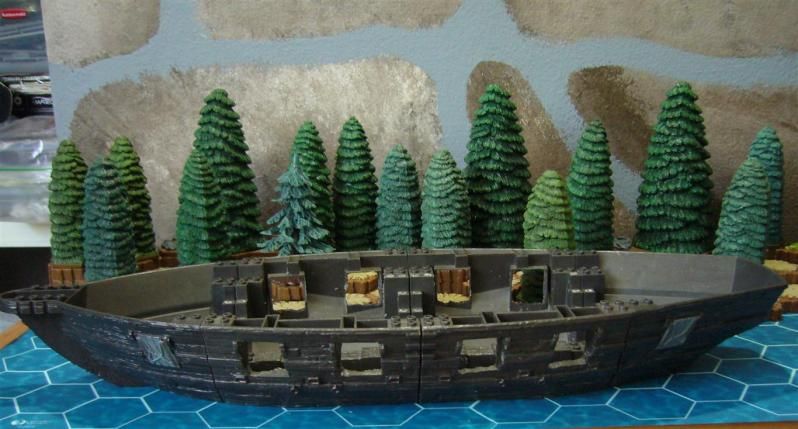 She is 11 hexes long if you count the hull from bow to stern ( front to back)
Spoiler Alert!
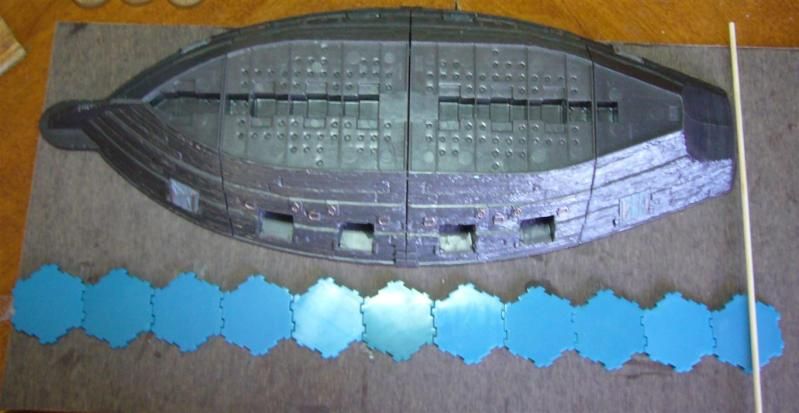 But she only needs 8 hexes in length to be in the water.
Spoiler Alert!
 She is 4 hexes wide but only needs 2 hexes width in water.
Spoiler Alert!
 No here it gets tricky but it doesnt really matter. This is how much room she takes in the water;
Spoiler Alert!
 And how much room she takes on the board if you count the full hull
Spoiler Alert!
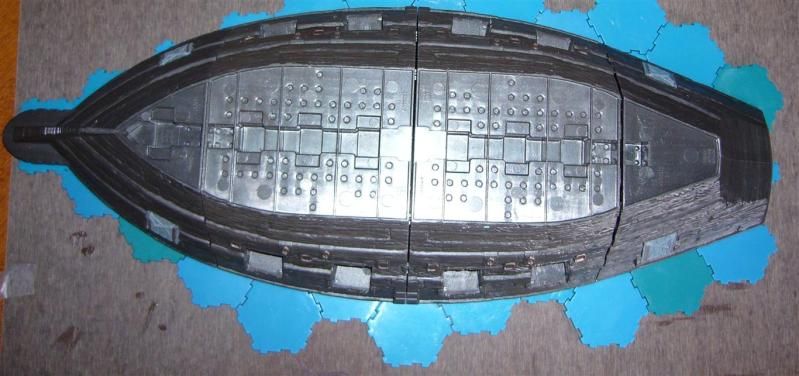  If we follow the simple rule posted by IAmBatman, all that matters is that she fits in the water and on the board. Figures can stand ( swim) under her overhanging hull if they fit. I think height is what will make a difference when we update the rules for ships. Here are two more of the same ,just a different way.
Spoiler Alert!
  Update # 7 Oct 2012
Spoiler Alert!
Spent a few hours yesterday night playing around with the lower deck. Here are a bunch more of progress pictures. I am going really slow as I am trying to make this ship so it actually fits inside the heroscape terrain rules.
Spoiler Alert!
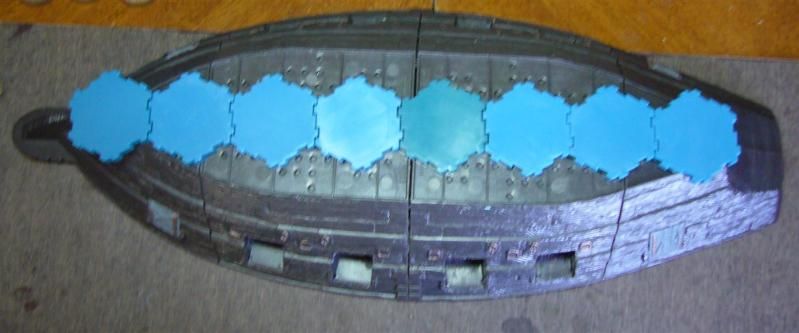
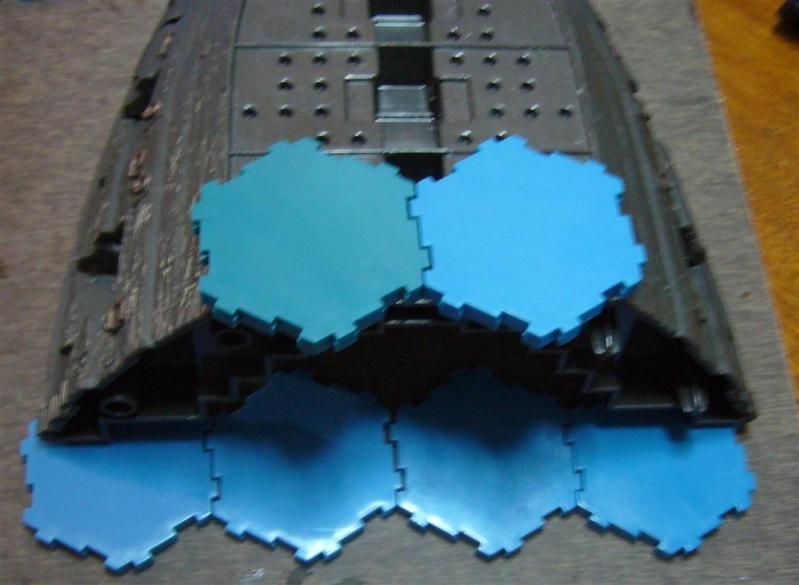
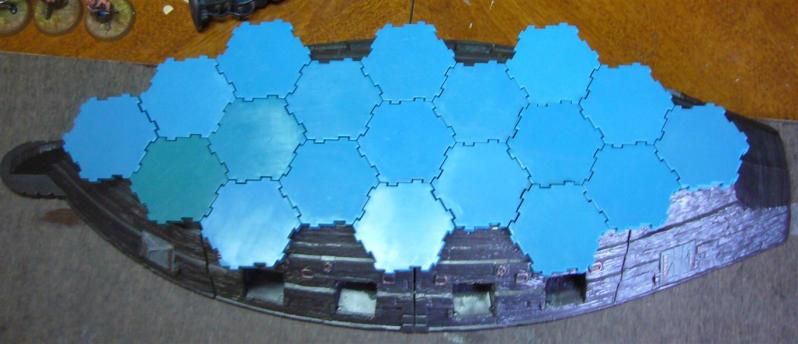
I glued some sticks over the pegs I had removed and when it was dry I used a xacto knife to trim them down so they would be flush with the walls. 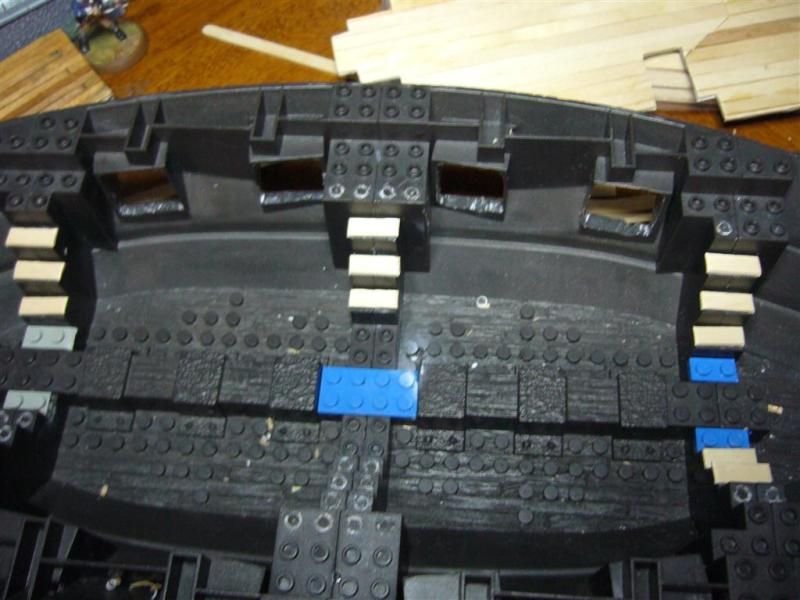 This was before trimming, I had to make sure the pegs where completly removed so that the wood would be flush.  After I did all of the wood trimming, I had finished the planking on the lower deck a few days ago but now I sanded it just a little bit to make it smoother and get rid of any Popsicle sticks that might have been sticking out a little higher then the rest. 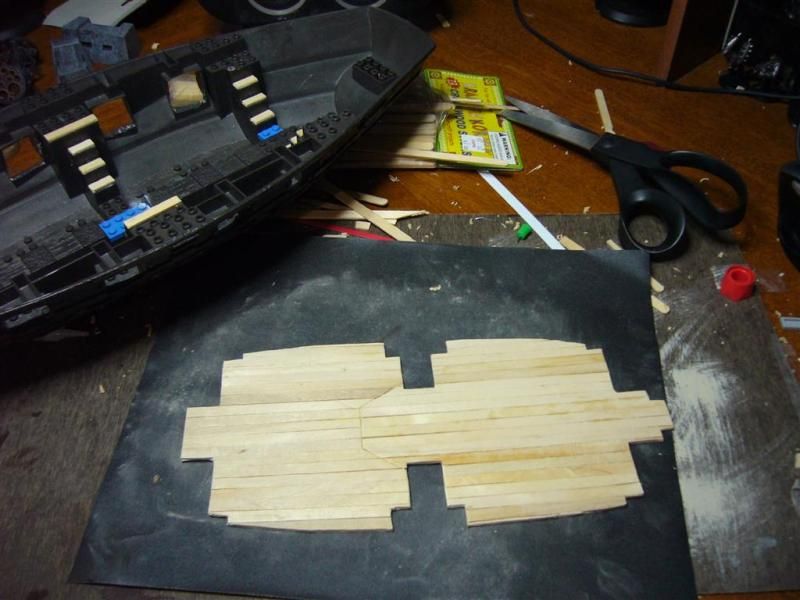 I had originally figured out how I wanted to lay down the hexes but now I wanted a more official looking layout. Originally I just placed a bunch of glyphs and figured that would work. Now I wanted it to be more precise. It took me several attempts to get it to work. I kept printing out Grishnaks hex layout and placing it under a cut out of the lower deck. It took me a while but I was able to set up the lay out so the cannons and the figures would all fit. I had to use Capt. Kirks approach to unsolvable situations. 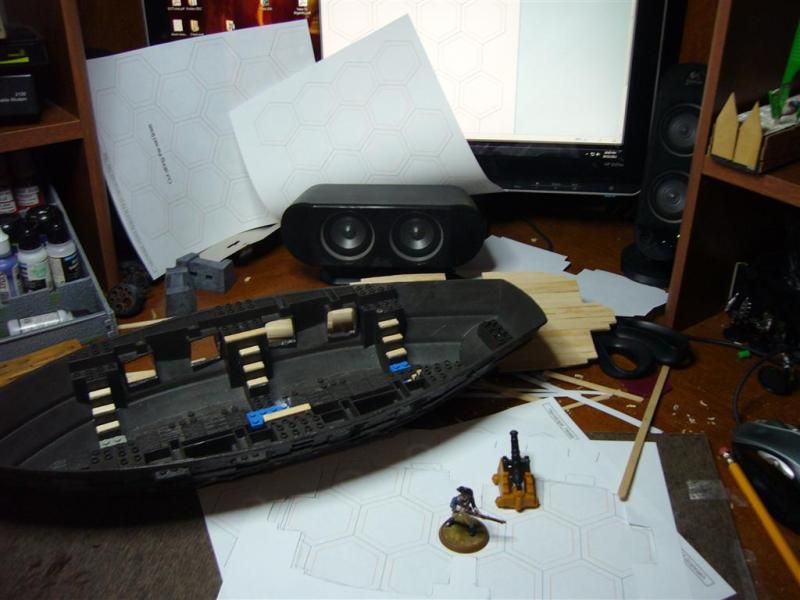 This looked a lot better than what I had started out with. It will be crowded but that's OK. I fire each figure can fire off one cannon per round/turn. 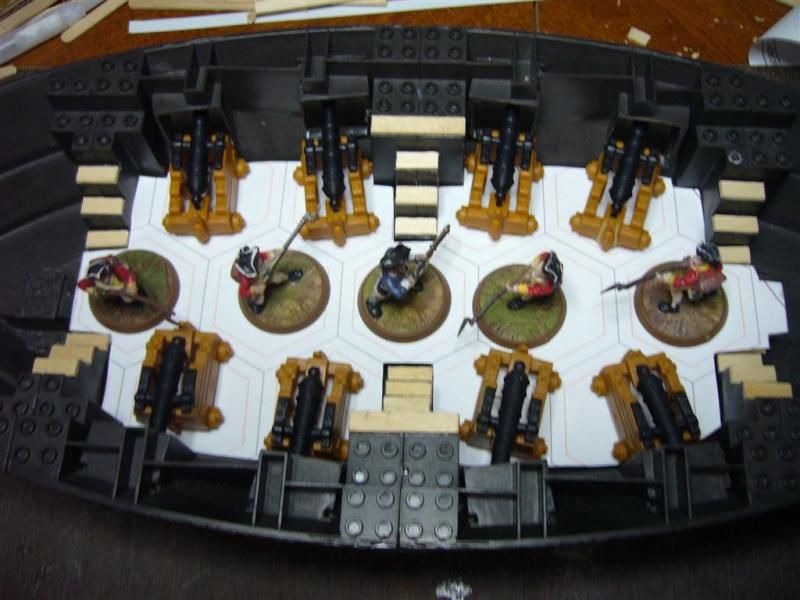 Wont leave much room for fighting but if the cannons are breakable objects that would clear out some room. 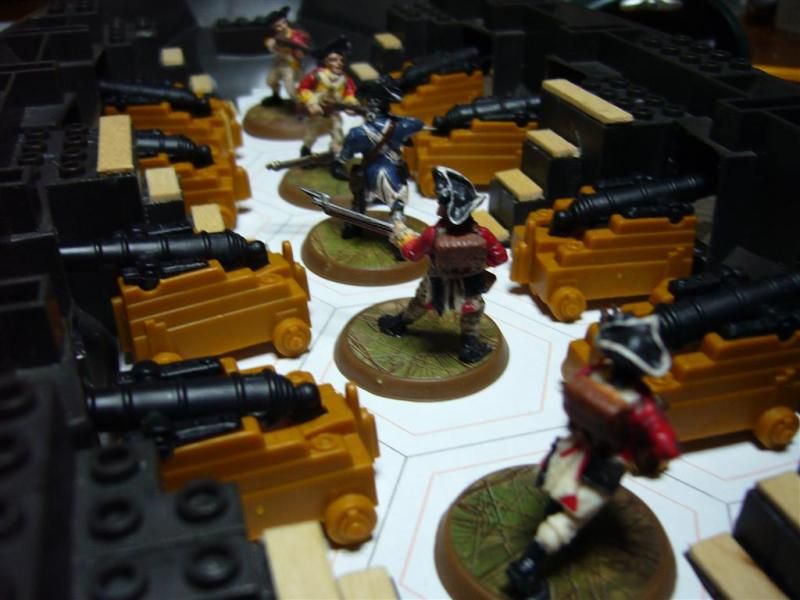 Missing the gun port covers, but its starting to shape up. 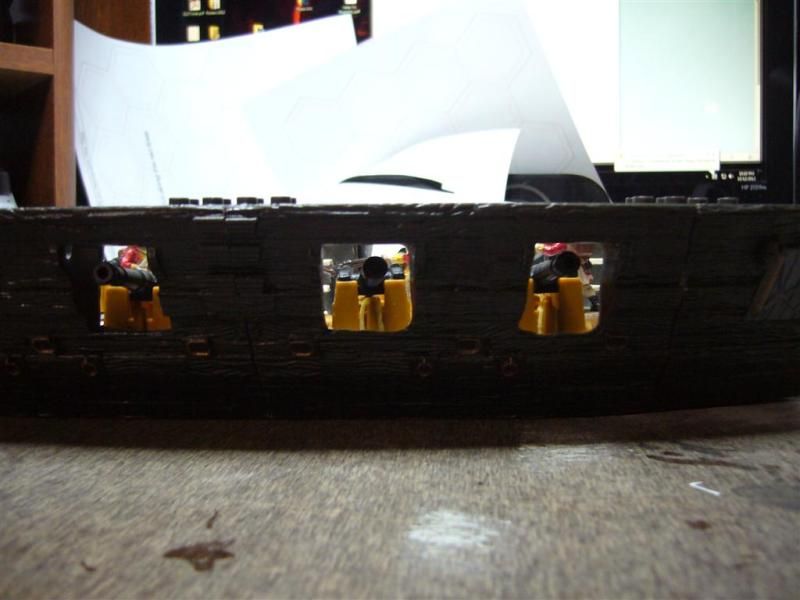 I figure tiny sized figures should be able to crawl in through the gunports. Not sure how that would play out in the rules though. 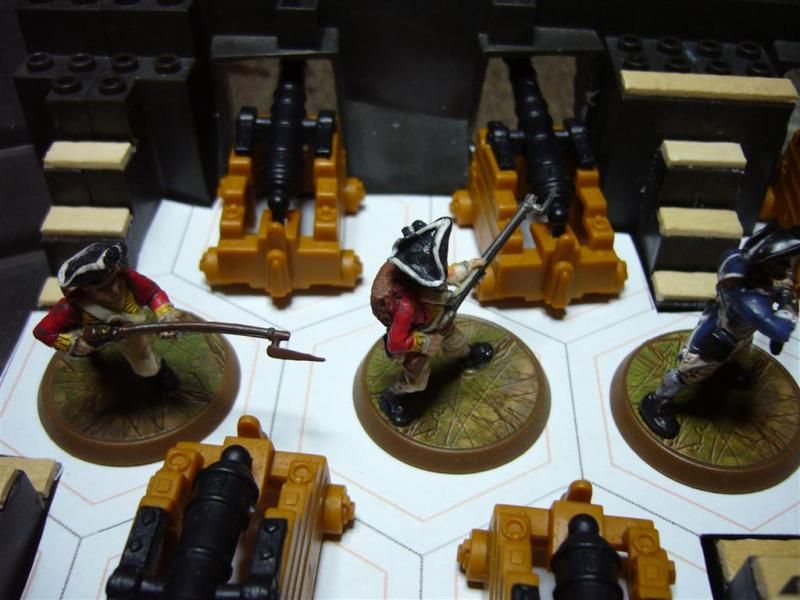 I installed the frames on the gun ports, more to clean it up a little and give the ship some more details. 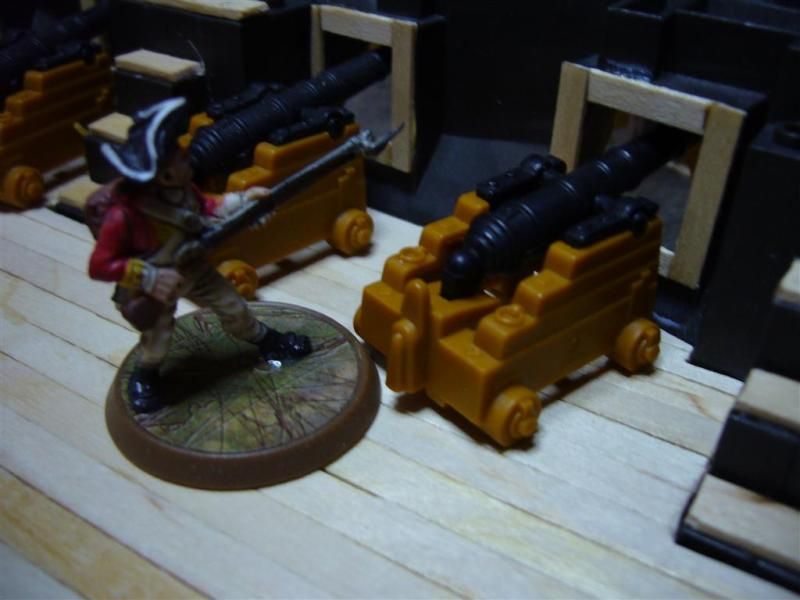 This is before I trimmed them down some more and filled in the gaps with milliput. I think the lower deck will be painted all wood and these frames will be a different color, like red or something to make them stand out. 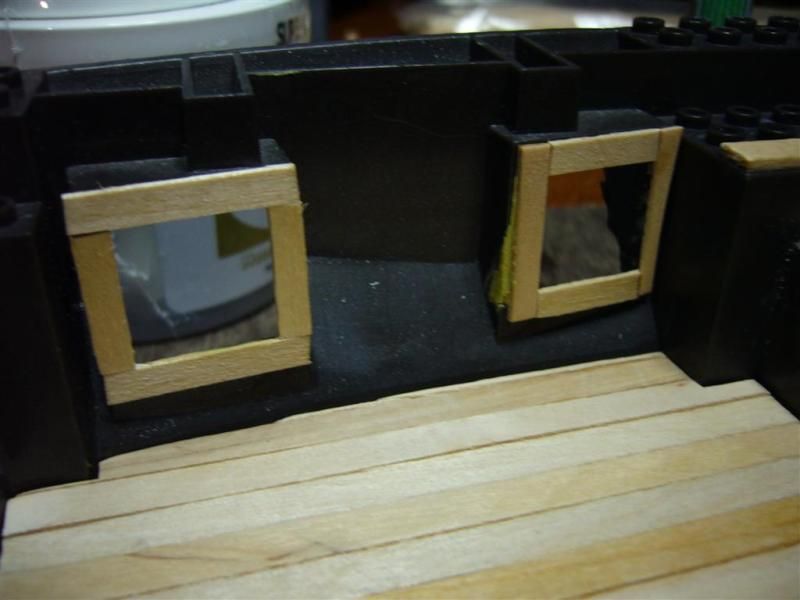 Its taken me a very long time to reach this point but the good thing is with all the templates and pictures I now I have the next ship I make to reach this point should not take me more than 2 hours tops if that. 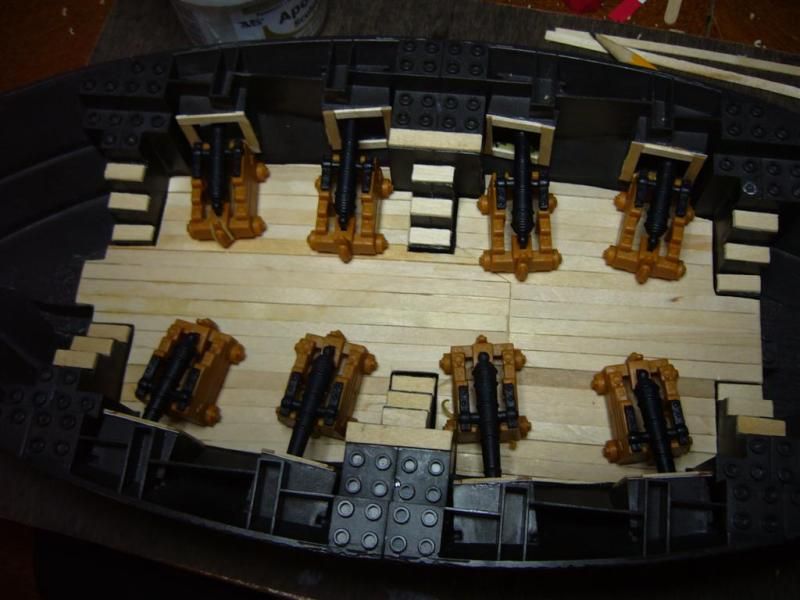 There is still a lot to do , but the Fools Errand is starting to look like an actual 28 mm Ship now. I will start working on her upper deck next, then the fore and aft decks. 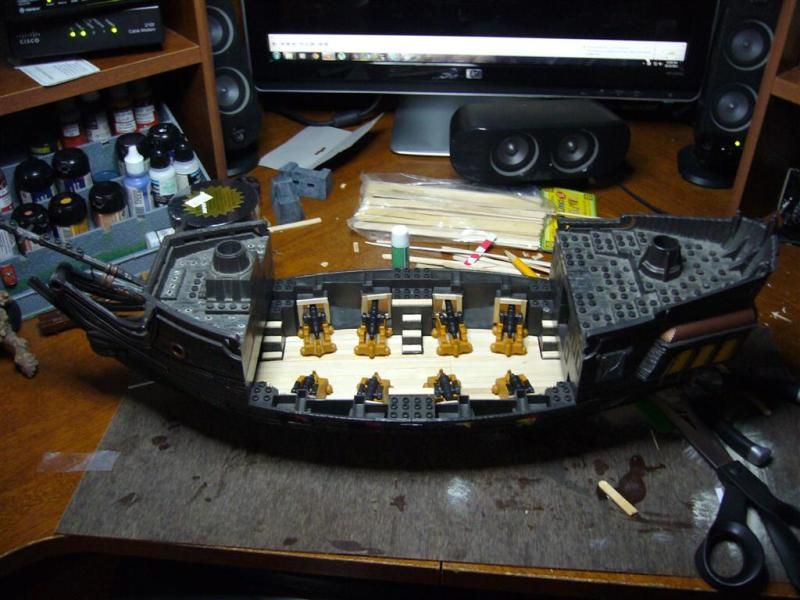 Painting is going to be interesting. Guess I go watch Master and Commander to get some ideas 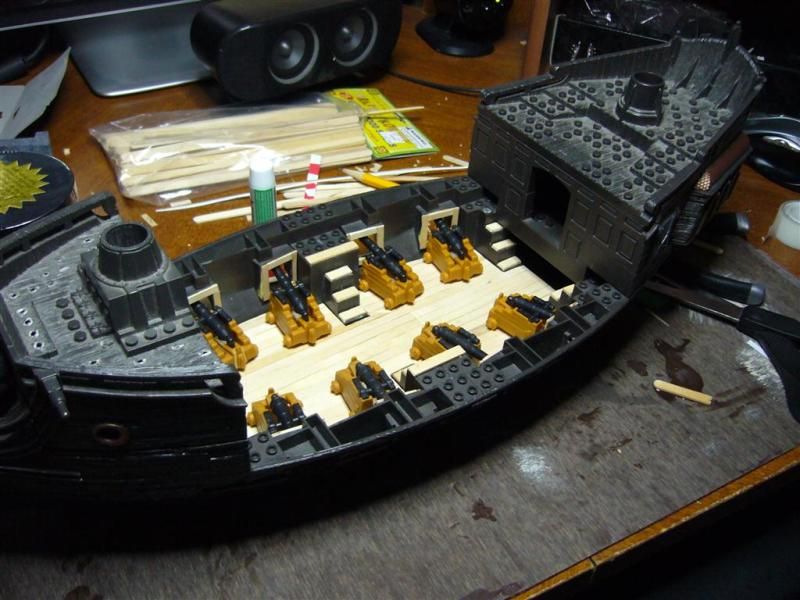 Update # 8
Spoiler Alert!
Updating this thread after a few months of being away. Due to school and work and a few other things had to stop working on my hobbies for a while but always kept tinkering around when had time and kept looking for supplies. In the last few months since I started this project I have purchased at least 8 different types of craft sticks, coffee stirrers, several dozen accessories, chains, threads, cloths, decorations, and misc bitz and pieces and a TON of glue. When I am done with the Fool's Errand my first full mega bloks conversion ( the viking ship is still incomplete) I will re-write this guide and keep it very very simple as 90% of all the steps I did and stuff I bougth was unnecessary. ( Although part of the learning process to get here). Plus when I have all the templates uploaded it will be super easy to print out and just cut them out and place on the ship with minimal modding needed. The whole point of this project is to learn how to do it then figure out how to do it correctly and faster. For now I will keep posting everything I do and at the end I will sum it up in a quick short guide. So back to Fools Errand! The whole idea of planking the decks sounded like a lot of fun, and really it was, but it adds a ton of work to the conversion and not many people will want to do this, after spending hours learning how to do it and testing out lots of materials I finally have a decent glue and craft stick to recommend that makes the process really easy. If your not into decking the ship with real wood planks you could always just print out a deck and glue it on a plasticard deck but I will get into that later. For now this is how I decked my first ship. Even though its extra work, the look of a real wood deck is neat and feels pretty good once placed on the ship. It gives a lot of grainy detail and once figured out is not that hard to do. 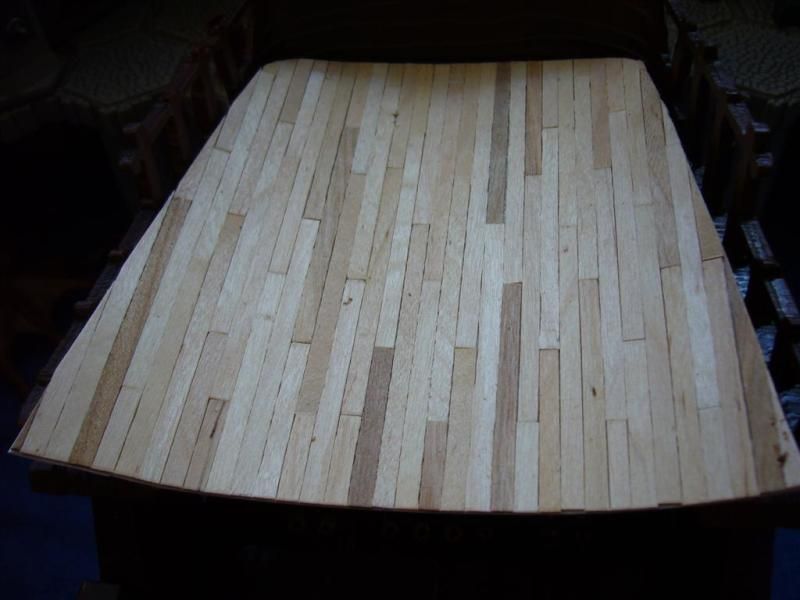 I didn't want to paint over the craft sticks as I wanted to keep the original wood texture so I made a bunch of test squares by laying a bunch of cofee stirrers over some double sided 3M tape. 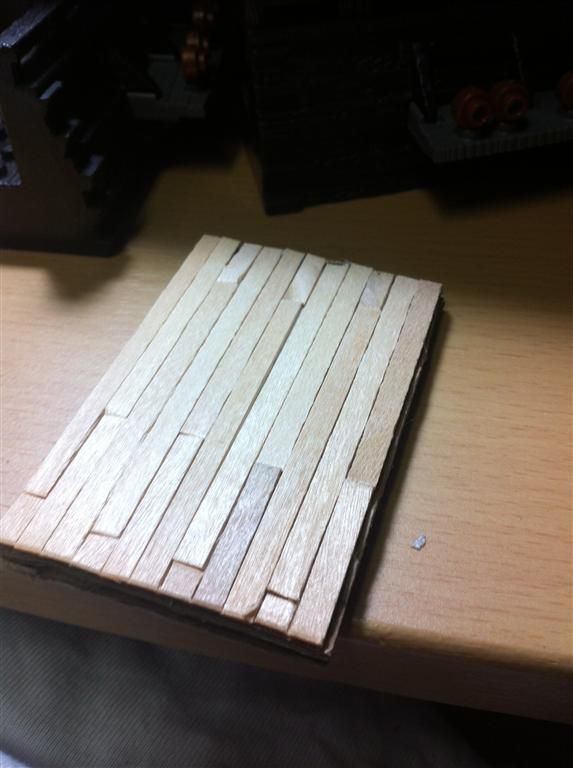 With a dozen of these made I tested out every wood stain I could get my hands on, I must have tried at least 8 different stains until I found one I liked. 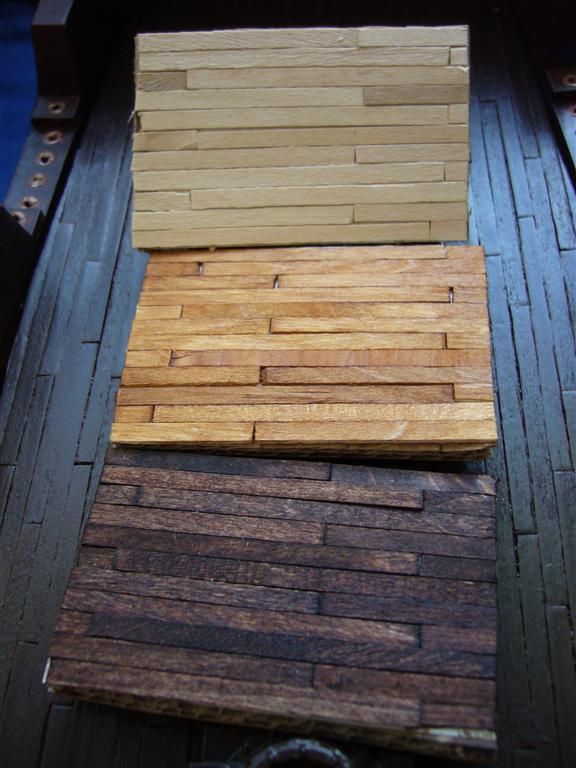 A real wooden ships deck is lighter color than the rest of the ship as it is supposed to be Holy-stoned every day to avoid splinters and keep a clean non slippery deck. This creates a much lighter color of wood on the deck then the rest of the ship. I liked this color although golden it was lighter then the darker colors I would paint the ship and it allowed a lot of the wood grain to show through. 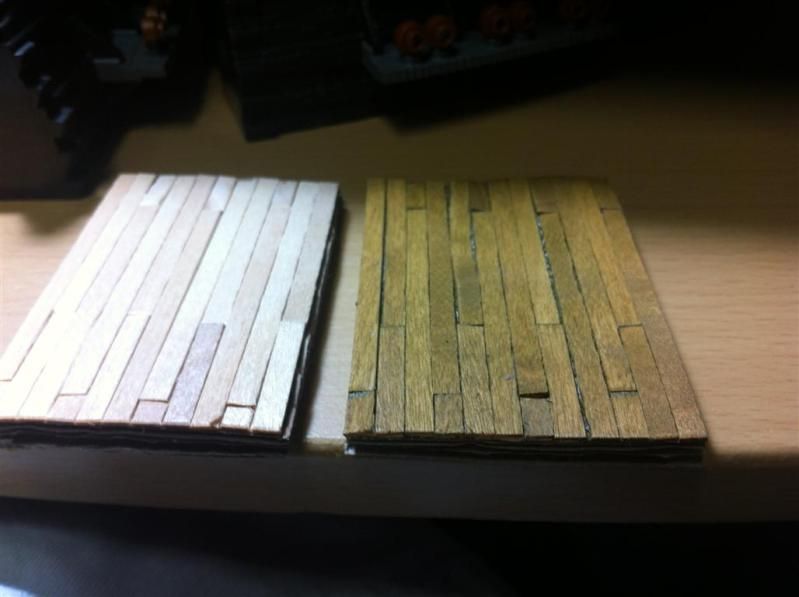 Also, since It was a GEL stain, I could smear it into the crevices between the wood "planks" staining the white card underneath and filling in all those holes of white showing between the craft sticks/coffee stirrers. Easy to use, smear on a ton , wait 2-3 minutes, wipe off the rest in direction of the grain. 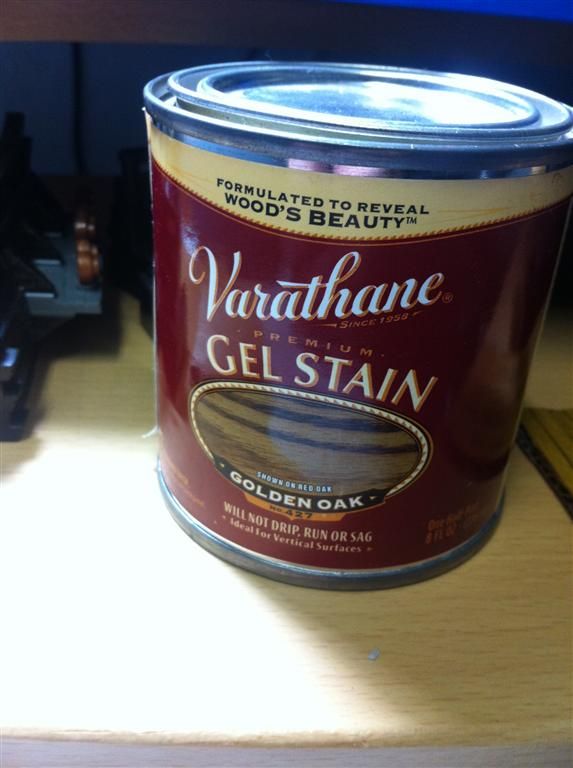 The final effect was pretty neat. Before the stain 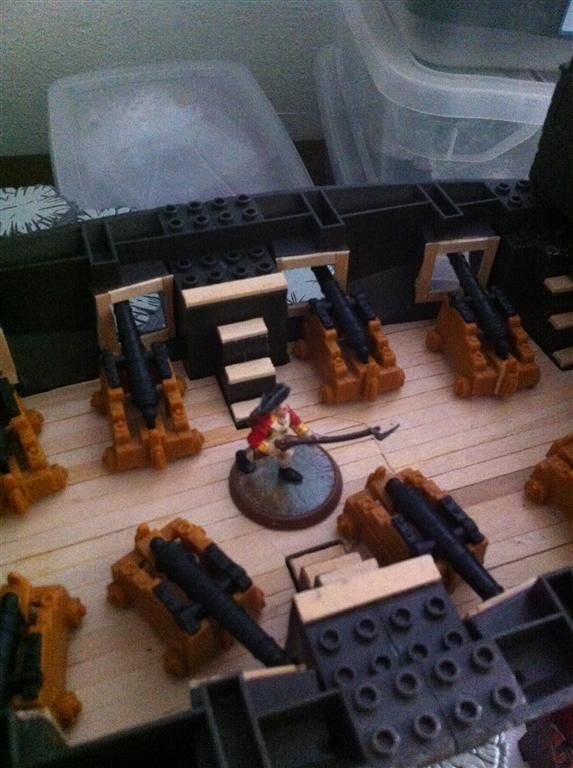 After a quick 5 minute stain. 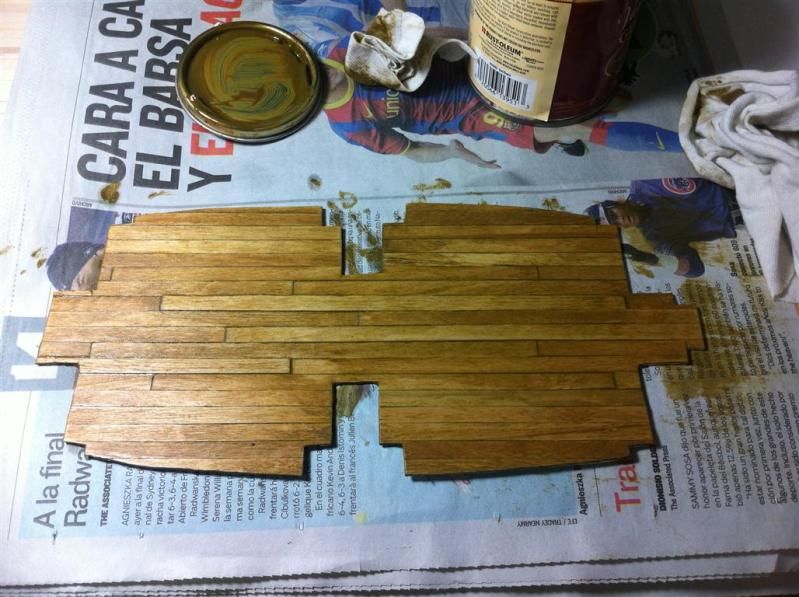 All that extra work and searching for stains was worth it when you see the end result sitting in the ship hull  I trimmed the sides to fit the upper-deck, 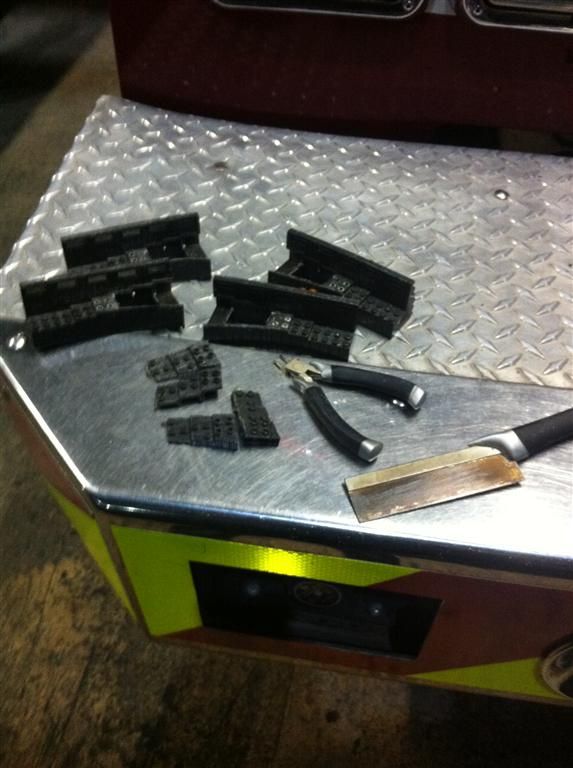 then made some covers for the holes I had just made from plastic card and tongue depressors to make it look cleaner where the upper deck would sit. 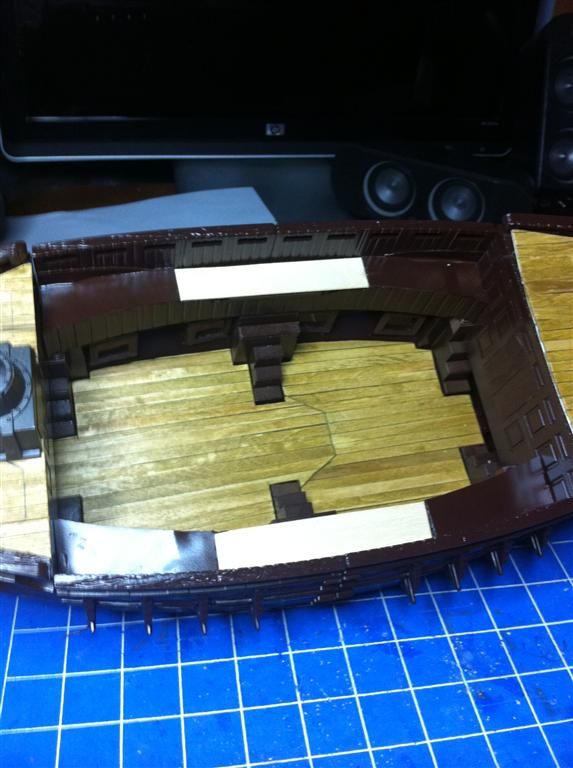 This is the part that took the longest, cutting and trimming the decks untill they fit into the ship, now that I have templates made for all of these parts this will be super quick to do next time. 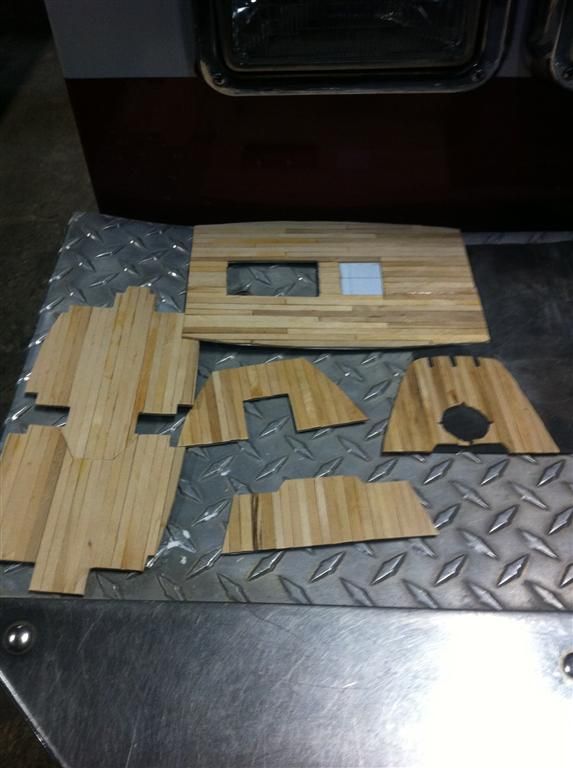 Update # 9 Jan 2013
Spoiler Alert!
As much as I would love to just fill the deck with decorations and squeeze as much as I could in there, like this ; 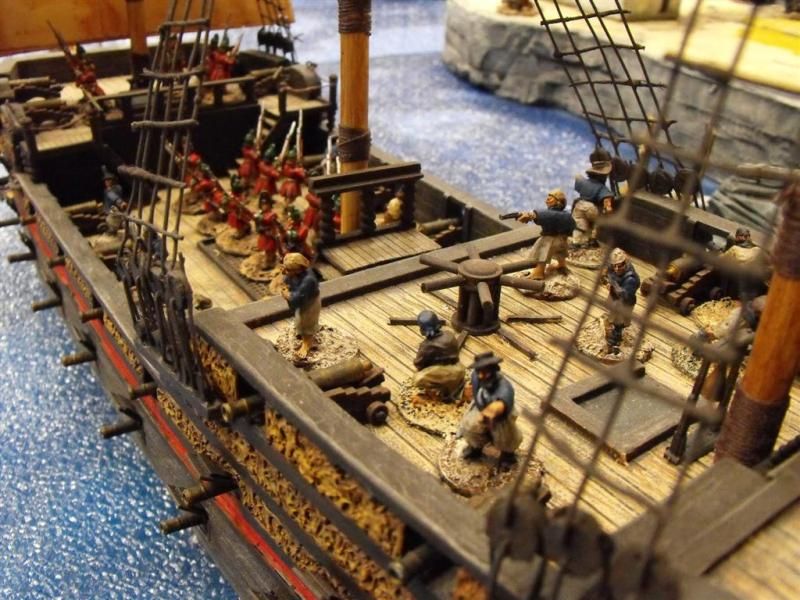 I have to make sure that as many hexes fit on the deck to make it a usable terrain piece for heroscape. I had originally done 2 other hex lay outs for this ship but ended up scrapping them when I noticed that my upper deck and lower deck lay out did not mesh together seamlessly. The second layout although it looked prettier did not mesh correctly with how the ship sat in the water hexes. Trying to keep this "terrain" to work with in HS rules, instead of just a stand alone item was really tricky and it took me a few hours to reach this point after printing out Grishnakh's hex layout guide over 15 times, cutting trimming testing over an over again. This was the end result.  It was tricky and I had to make one main concession but I will get to that in a minute. In the fore deck I was able to squeeze in 3 full size hex spaces by trimming down the mast base ( In other custom ships I have seen them remove this completely and just stick the mast into a hole in the deck and decorate with some rope, might try that on a smaller ship next time) 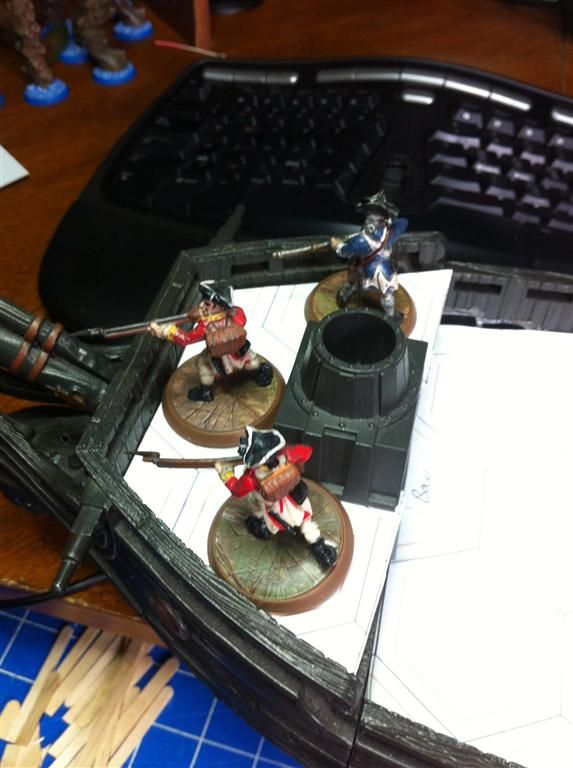 This is the big IFFY here. Along the edge of the upper deck you get 3/4 hexes. You can either play this by making the characters stand on the railing if they are occupying these slots ( but they fall off easy) or as the second figure shows, you just place it lower in the hex and ignore the fact that its not on the full hex. I know this will be a deal breaker for most , so I can either widen the size of the railing to make it hold figures better, or play with as the second guy and press the figure as close as possible to the ledge. One single factor here kept it from being a very clean terrain fully compliant with the HS terrain rules. 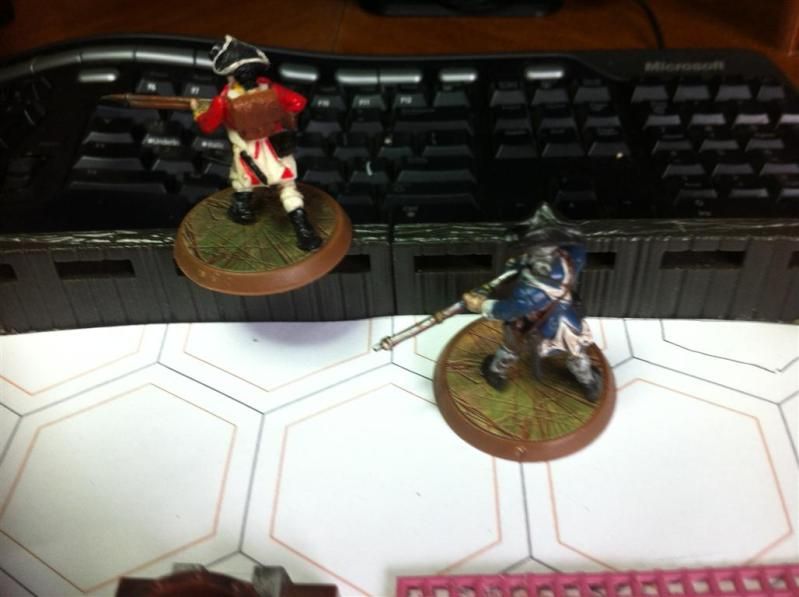 To mark the hexes I taped one of Grishnakh's templates to a for sale sign ( plastic card sheet) and cut them out to make my template. 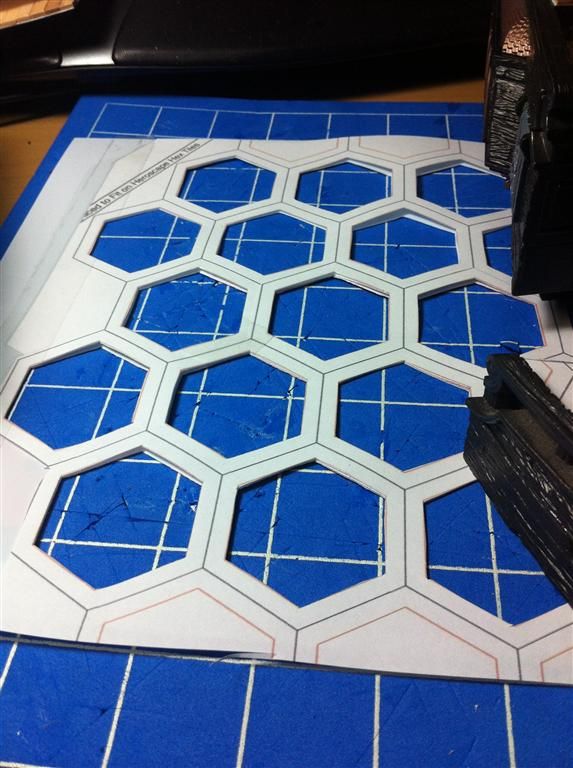 I tried using stains, and although it looked decent, nothing really over the top, since the first stain had saturated the wood, the second one didn't hold on well and just slid off when I wiped it with a cloth. 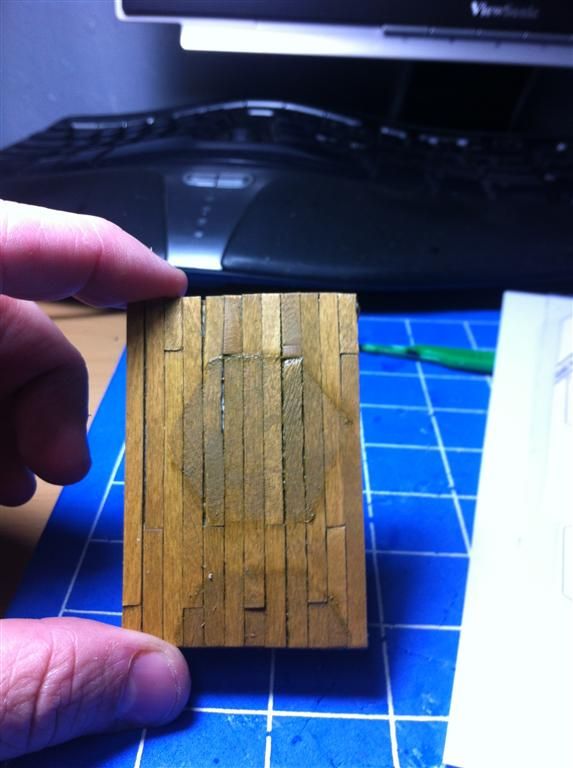 I tried drying the other varnishes and stains using a blow-dryer but nothing worked as the wood was already saturated with the gel stain ( I think) 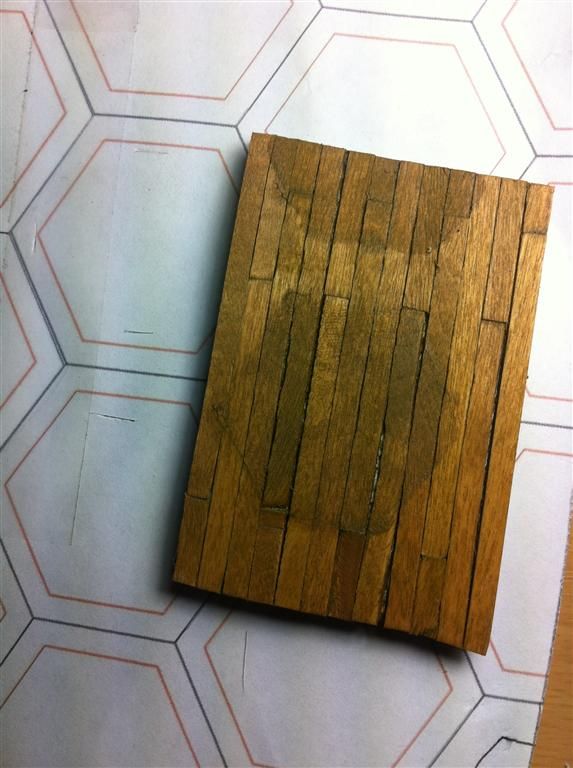 I tried a dry-brush of Games workshop bubonic brown, but I didnt like the checker board look. 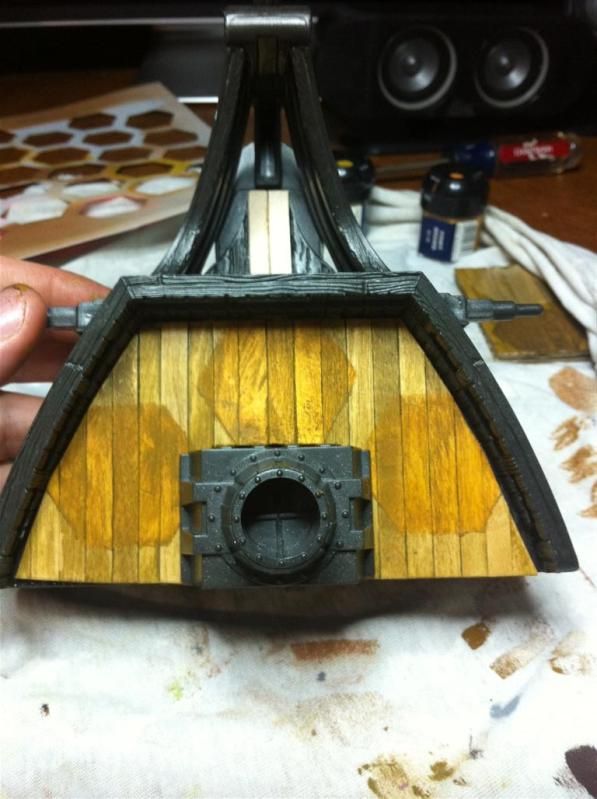 Tried with a lighter tan and darker ( bleached bone and scorched earth) Both in dry-brush, but same thing, it worked but ruined the whole idea of making a nice model ship type terrain. 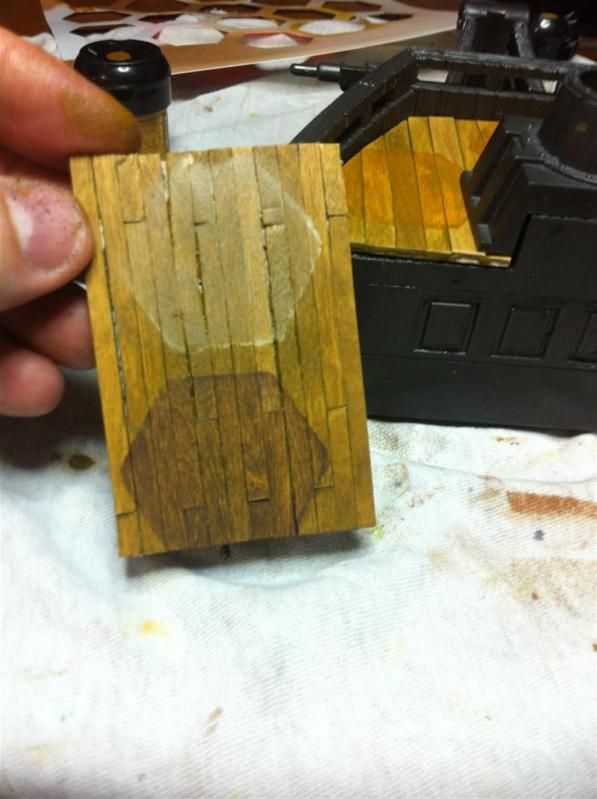 I ended up going with simple pencil marks, I could erase them later with a normal eraser if I found something better or I could protect them with a clear coat of Matte Varnish 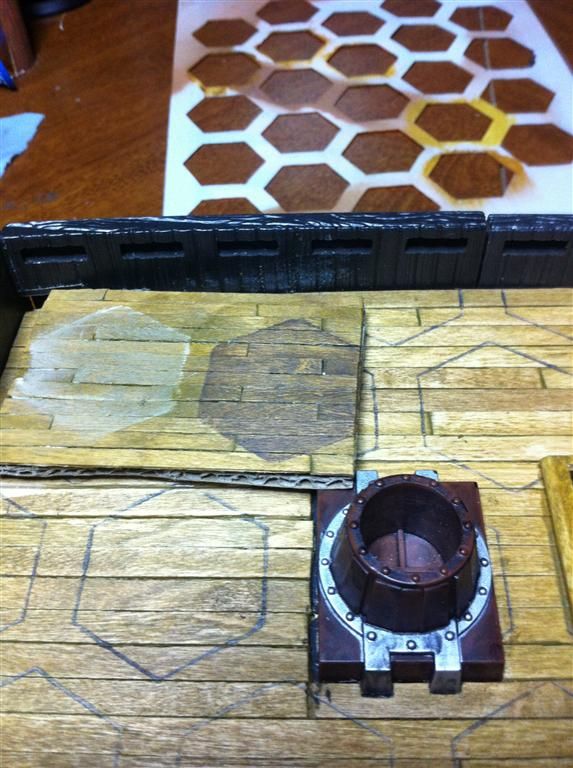 Simple, yet not as easy to see from tabletop height, plus remember you will have a lot of stuff in the way, sails, mast and maybe some decorative rigging.  I might do a second stain on top of this pencil marks to make them look weathered or a little blurry to give it a worn down look.  From table top height you cant see the marks as well. 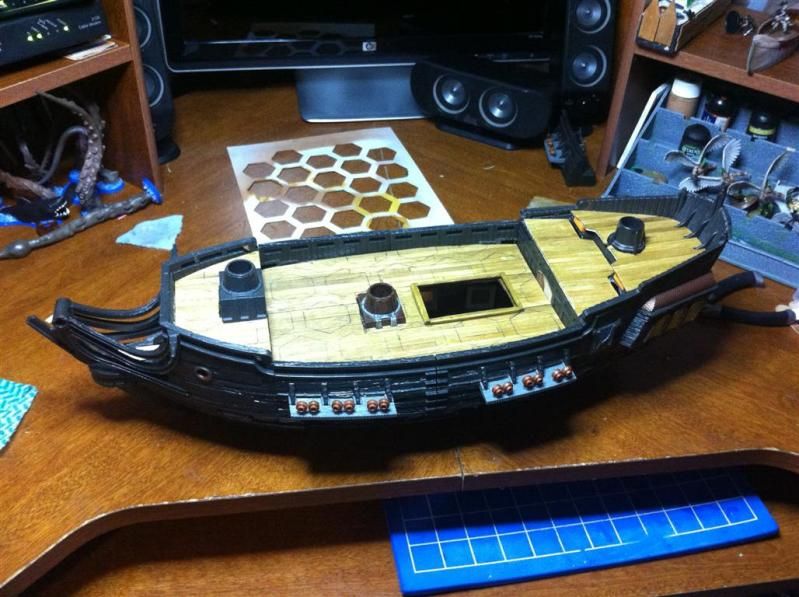 Although this ship is still missing a lot of things, it has taken me a TON of hours to reach this part, this is its first prime coat of espresso brown to act as a primer and to give me an idea what direction I will be going with the paint job. I have spent over 20 hours on this thing so far, but to reach this point again a second time wont take me more than 2 hours since I now know what I want to do and I have the templates already made ( Which I will upload once I have a full set) 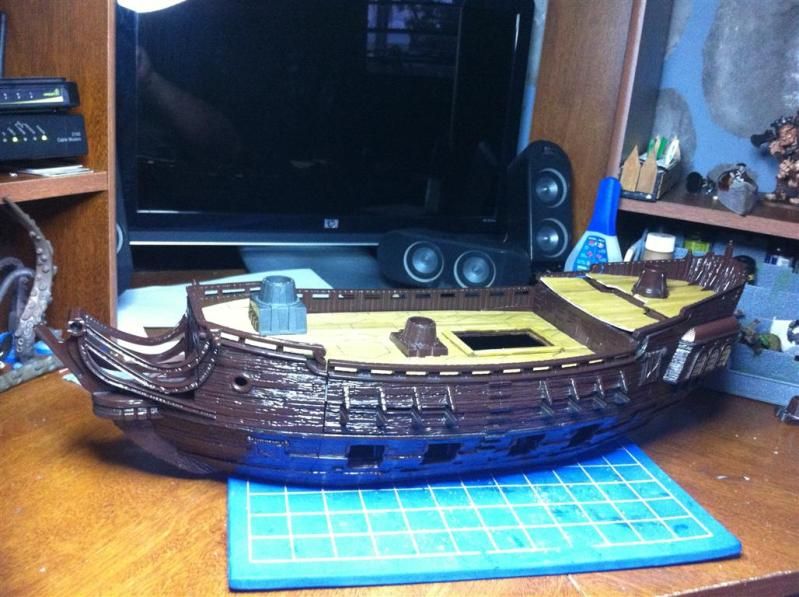 I am missing mast, sails, decorations, anchors, ladders, figurehead, gun port covers, paint job, ships wheel, and a few other tidbits Update # 10 April 2013 Figurehead!
Spoiler Alert!
Fool's Errand Figure head The main item in the theme of any ship is the figurehead, it often gives the ship its name too. The original toy was the Pirates of the Caribbean Black Pearl. It was a nice looking figurehead too.  I had thought about changing it to a dragon or something more fantasy. When I asked Grisson what he thought he had another idea in mind but wasn't sure yet what it was going to be.  While on vacation to Universal's Adventure Island, I saw this winged Seahorse and thought it looked perfect, I sent Grisson a message and he agreed. Damn, now to custom make something that looked like this!  About two months later I found a little kit that had 3 puzzle erasers of misc animals, one of them was a seahorse that seemed like it would be a perfect fit.  Only problem was it was a very cheap soft rubber, and had lots of imperfections. I would have to figure out if I could cast it it with my casting plastic and instant mold. Now all I had to do was find some wings for it.  Found these a few weeks later in Wall-mart in the arts and crafts section for making jewelery. Now just to figure out how to put it all together. Update # 11 April 2013 Figurehead part 2
Spoiler Alert!
Ok here goes, I hope Photobucket's up-loader doesn't freeze again. I have added all the comments into the pictures. Only thing is paint does not have a spell checker and I really need it. Fool's Errand Figure head part II              Update # 12 Jun 2013
Spoiler Alert!
Thank you sir Ok next batch of pictures/comments Crows Nest and Initial Paint job.       Update # 13 Jun 2013 Gun Ports
Spoiler Alert!
And the gun ports!   Part 14 Jun 2013
Spoiler Alert!
More misc things I worked on;    This is the original Black Pearl's Black sails, although they don't look bad, I want to make custom sails that would give it a more "merchant ship" look. Plus black sails makes her stern look fat.  Update # 15
Spoiler Alert!
When I painted the mast, I knew they would have a lot of friction on them from how the sails are held on by these plastic clasp. I made sure that I primed them with spray paint to keep them from chipping away to fast. No idea yet how I would make the sails but I did make a run to the cloth store to go buy some fabric.  Update # 16
Spoiler Alert!
Thank you kind Sir Now to do an update on the sails. Sails Part I The original Sails are black rectangles and I wanted to remake them with a tan canvas color, and add a general logo in the middle some where. The cloth was really easy to find, its like a soft canvas and its dirt cheap, like $3 a yard or so. I had no idea what sails looked like or what the different configurations where. Turns out they are called sail plans and there is a TON of different types of plans. I ended up looking at Wikipedia for Sail plans and there is a lot of cool examples. I choose this one because its what the original Black Pearl was thought to resemble ( various sources say the one used in the movie was a hybrid of sorts).  At first I entertained the notion of doing a fully rigged ship but decided it would get in the way of playing the game so I ended up going for as simple as possible ( but pretty!). I kept reading all sorts of strange names so I searched for this.  After figuring out what each sail is called its actually not that difficult. I now understood what they actors where yelling in the 4 ship movies I kept watching over an over in the back ground. Mutiny on the Bounty, the one with Clark Gable and the remake with Marlon Brando, Master and Commander, and Treasure Island. I was having fun learning this new stuff instead of painting the house and cleaning up my very messy hobby room These are the clips used in the original toy to hold the sails on the mast, that's why I primed the mast first to keep the metal and brown colored undercoat. I had a limited supply of these so I had to get creative when I run out for the next 14 ships.  The rear mast, or mizzen mast had a side ways sail called a Mizzen course ( or just Mizzen sail). It had to go side ways so I decided to try and hold it in place with magnets. If I tried anything stiffer it might snap or break during play.  Hobby Lobby Magnets suck, they barely hold on to each other. I ended up using one of my rare earth magnets ( for miniatures). I broke it in half to reduce the size.  Now to figure out where I wanted the logo, in the front sail so every one could see it;  Or on the Mizzen sail so any one about to be broadsided ( shot with the cannons! HARR!) could see it. Technically for drive by cannoning....  Now that I had no idea what I was doing I bought a mini sowing kit to learn how to sow some sails. I knew I would do the top and bottom. Top to have a loop to fit the wooden bars to hold the sails and the bottom to give it some weight.  First try at the Main Course sail ( Big center sail). I kept it really high so it cleared even a tall figure like Krug, and kept it pretty small so as not to have it stick to far out the sides like a real one would. Its supposed to fit on a shelf after all. It didn't look so bad, and its all wrinkled right now because I still have not ironed it out or fixed it up yet, this was my first attempt.  Since its a type of canvas it frays pretty easy so I dipped it in white glue and water to kind of seal it, it also had a cool secondary effect to give it a nice stained look. I want to splash this all over the sail later on. I didn't use Elmers White glue for this I used Games Workshop PVC glue ( same thing). This one stained the cloth though. When I did elmers glue on a later sail it came out perfectly transparent. Few hours later I have a few sails done, the two bottom big ones ( course sails) the rear triangle ( mizzen course), Now Just need to finish the to top ones ( Top sails). I feel like a old sea dog by now !! HAR me mateys!!  After working on this ship for a while and watching so many Pirate movies, I could not live with my self if I didn't learn the lines to the classic Disney Pirate of the Caribbean song, A Pirates Life for me. Much to the dismay of my wife I learned it, and sang it... over an over and over while I played around with this. Drove her nuts. I want to do some holes in the sails later to look like this.  Update # 17
Spoiler Alert!
So here is the completed sails, took me a few hours and they are really small compared to how they should look but its all got a purpose. I swear in my head it made sense.   DONE ! now to finish up some smaller details, some weathering, gluing on the ships wheel and a few minor details ! Update # 18
Spoiler Alert!
So I showed this to my wife, who is absolutely awesome and encouraging and very thoughtful. I brought this to her table and showed her my last 2 days of spare time and creativity and my first attempt on making custom sails. So what do you think Z??? ( My wife's name starts with Z so I call her Z She looks at them , turns the ship over, hands it back and says; Wet napkins. They look like starbucks wet napkins. You can do better. I tried not to laugh, but when I looked at the sails again. By Gosh George she's right!! They are terrible! Oh well, back to the beginning. Update # 19
Spoiler Alert!
I stayed up until 2 am that night searching pictures of Sail Plans and Sail ships, until I found it. Sir Francis Drake had a ship called the Pelican that he later changed the name to the Golden Hind. It was a English Galleon with a 5 sail plan, well six if you count the spritsail ( front one in over the figurehead). After working so hard on the figurehead I didn't want to cover it up with a sail so I would skip that one. But here are some examples of the Golden Hind's sail plan.   This might be perfect for the Fool's Errand, these irregular top sails would give the ship more character and would NOT look like starbucks napkins. Update # 20
Spoiler Alert!
Now that I had a picture of what I wanted to build, first thing I noticed in the Golden Hind is that the top Yard ( the side ways pole that holds up the sail) was shorter that I originally had. Using some really scientific measurements ( I held up a string to my screen, measured the length of the top yard and compared it to the bottom yard) I noticed that the top one was almost a third the size of the bottom Yard. I would have to start chopping things up again. After chopping it and making sure I sand it down a bit to keep it straight, I drill a hole and place a pin ( tiny piece of paperclip) and glue it that way.  Update # 21
Spoiler Alert!
Ok now that I had an idea what I wanted to do, I needed to make new shapes for the sails.     This was pretty close to what I wanted to achieve.  Few hours later I was able to turn it into canvas sails. Good thing is each time I do something over and over it gets easier and faster to redo.  I dipped the sails in elmers glue + water and put small balls of cloth behind them to bulk up the sail when it dried it would look like it had wind blowing into it, plus I placed a thin wire in the bottom of the sails to give them a curved look. ( Jewelry aluminum wire)  I think I can retry to wet them again and get a little more bulk out of it  Much better than the wet napkin sails. Update # 22
Spoiler Alert!
I made a newbie mistake, I dry-brushed the whole ship before I had given it a ink wash. When I did give it a wash I didn't want to use my tiny bottle of gamed workshop wash, since I have to order everything online. I found on hirstarts.com that they use a combination of KIKI black boot polish mixed with future floor wax and water to make a cheap yet effective wash. I had to try it out. It worked  The effects are subtle but I will re-drybrush the whole ship and do most of the minor details again to get them to stand up.  I thought I would need a brown wash for the boat but this cheap simple black wash helps it look a little more official. As the official pieces have some cheap simple paint jobs. I painted the gun ports bright red, like a merchant or war ship would do to show off its guns, then painted over it sloppy black to cover it up to hide the guns, like a pirate crew would do to surprise its pray. I didn't want to keep the figurehead gold so I gave it a brown ink wash to give it a coppery / brass look. I will high light it with brass later on.  Update # 23
Spoiler Alert!
I am baby sitting my boss's 2 year old Golden Retriever, she is a sweet huge puppy and has no discipline what so ever. My wife and I have her for 20 days and we are trying to teach her how to behave. I opened the door of my jeep to get something and she climbed in thinking we where going for a ride. I shouted at her to stop and she got scared and sat down, in the front seat, on top of this. My wife couldn't stop laughing, she could barely breath. After a few minutes I had to laugh too. The dog was so scared we had to drag her out of my jeep because she tried to crawl under the dash. Its a really big dog too...  Update # 24
Spoiler Alert!
Ok here are the last pictures I have of the Fools Errand as she has been packed up and is reading for shipping on Monday with FRAGILE written all over her. I am worried about the figurehead as it is in a very bad spot, on hindsight I should have made it removable. I took some very bad pictures with my phone, I think the lens was foggy and the lighting was terrible. So my very last vanity shots are pretty lame. Here she is, after months of tweaking , cutting, ordering pieces, re-ordering after everything that arrived was the wrong size, painting then having to do almost half all over again when a huge dog sits and breaks most of it in half. Guess shes kind of cursed?  The sails are pretty tall but do not affect game play as you can remove the mast pretty easy so that you have access to the upper deck. Pus the sails where kept high as not to cause LOS issues.  And of course until another ship is built, she needs to be attacked some how, so here is a modified version of Annerious's Kraken  The figurehead was probably one of most fun parts to work on, took me a very long time to figure out how to do it but the next one I should be able to do in under 1 hour or so.  Another badly taken close up shot  I actually considered building a rigging to carry these rowboats over the main deck or hanging from the sides or rear of the ship but if I kept playing and modding this thing I would never finish it.   Decks     Here is a shot of the lower deck, after actually making it I realized it doesn't add much to the Heroscape tabletop playing experience and could have been left out. I thought it looked really neat and for a normal 28mm tabletop game it would be great but for HS it doesn't add much and can be skipped next time.  Here is a side shot of the ship, the story behind the Fools Errand was it was a flashy Merchant ship, but was captured. I had originally painted all the gun ports flashy red, but now they are hidden behind a sloppy paint job of black with a lot of red showing but not from far away. This way the pirates can surprise their new prey.  I also painted some life boats for the ship, these came from Weapons and Warriors , Pirate battles. Here you can see how the gun ports are barely visible, my next ship will have them bright red so they stand out. I gave the whole ship a very dark wash as to make it look gloomy and badly maintained. I still need to give these tentacles a wash and highlight the suckers with pink and purple drybrushing too.  Every one gets to fight  I made around 4 different sea monsters while I worked on this ship but I will post more on those later. This would be a terrible place to be with out backup...  I color coded some of the parts to make it easy to put the ship back together, with the exception of the sails all of the mast and pieces fit inside the lower deck.  DONE! Captain Cutlass's Storm stalker
Spoiler Alert!
Captain Cutlass's Storm stalker This is a great looking hull. She can still be found on eBay for around $25 plus shipping from toysRus. This ship comes out in several sets, a red version called the Predator ( with a lion figurehead) the Storm stalker in 2 versions, one with red sails and this one the tan sails. This is a great ship to customize as it has a very simple deck and you can do several layouts for it. The two things to consider is that the Aft Castle / stern castle ( the rear room) should be closed off so that it doesn't look like a garage instead of a room, and also the Storm stalker version comes with a transformation chamber in the front that will either need to be covered up by making a forecastle ( room in the front) or by removing the cylinder, which is what I decided to do. You can either keep one mast or add a second one but I will enter details on mast and sails later. First lets take a tour of this very simple yet elegant ship. I can picture her being a merchant ship with a removable cargo hold. 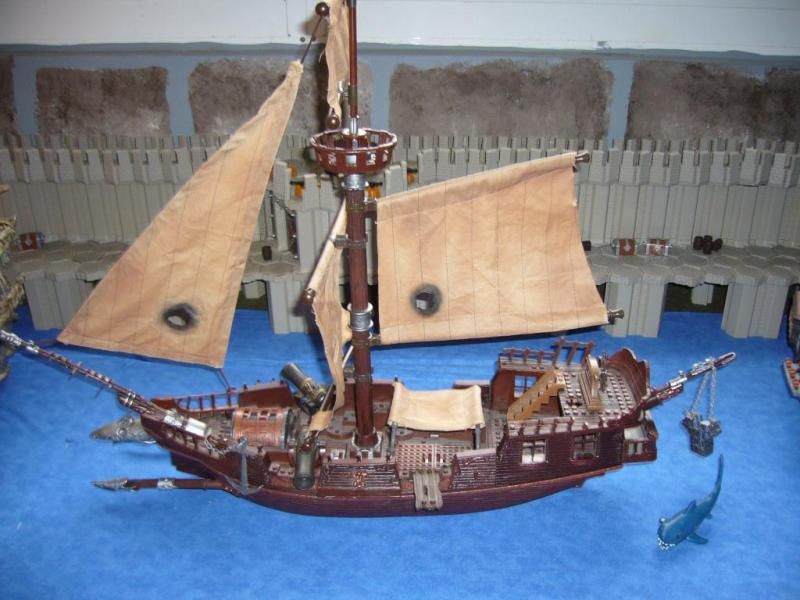 The storm stalker comes with a single mast, a large main sail , a second smaller sail on top, and a jib ( triangle front sail) and a spanker ( sideways sail in the rear). There is a couple of added items that make the ship seem out of proportion for heroscape like the cannons and the ships wheel. 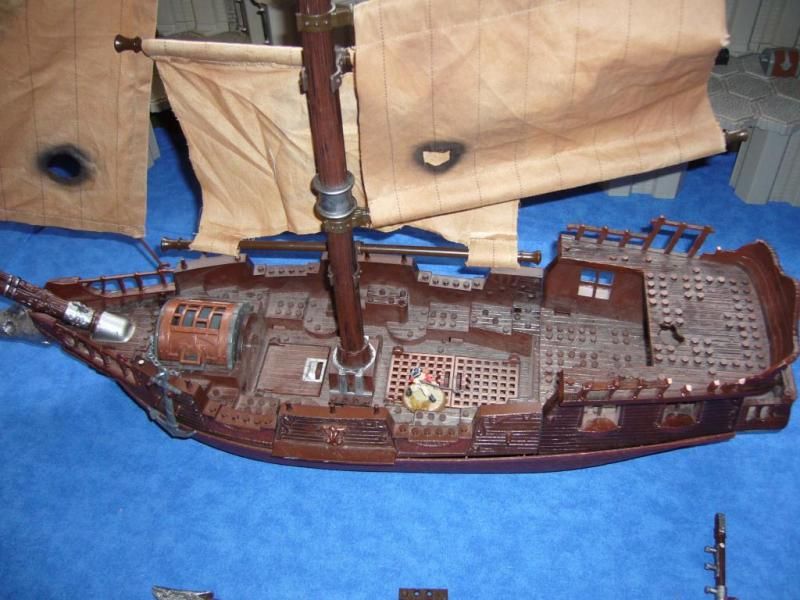 Lots of room for figures on the deck, for heroscape we need the flat deck to place our hexes, so redecking the ship is needed for our game. Notice the transformation cylinder in the front that needs to be covered up or removed. 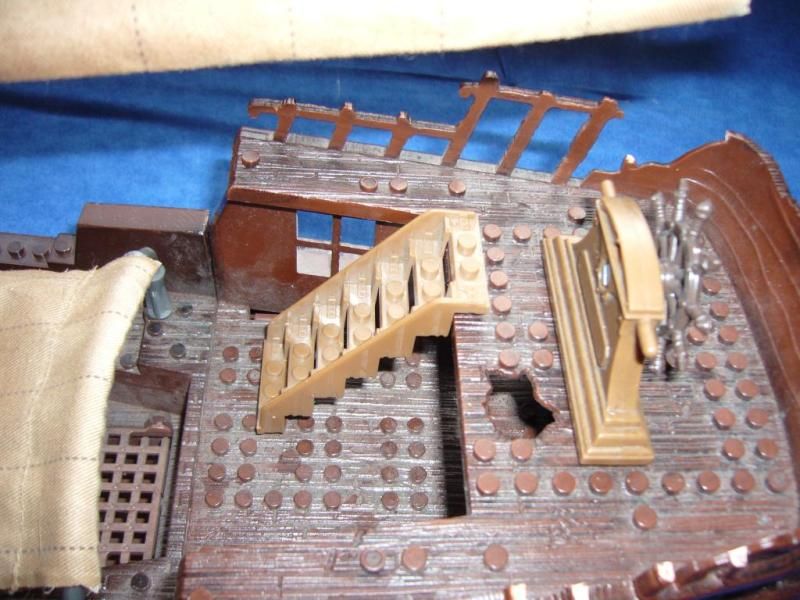 The stairway can either be modded or replaced with a ladder from the castle set, I have not made my mind up yet but I am thinking of using the ladder from this one for decoration purpose but make it exchangeable with a heroscape ladder for gameplay. Also this section should be closed off to increase the deck on the stern castle giving you at least 3-4 more hexes of room. I like how this section looks, but there is no way figures would fit under it. 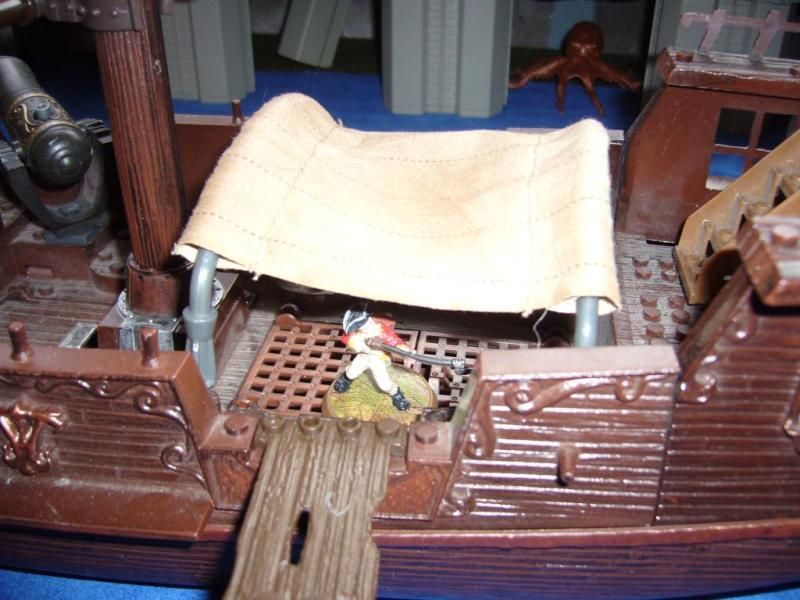 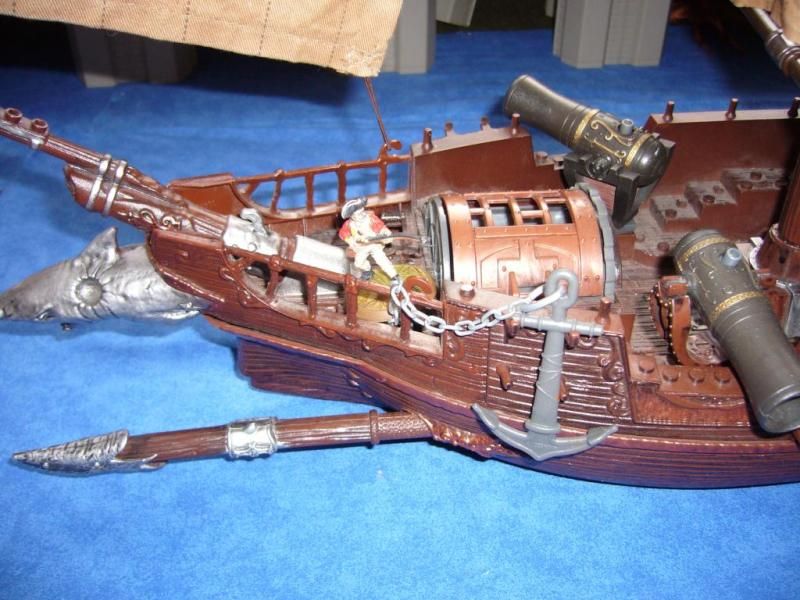 The two spears in the front I removed but saved for future custom terrain projects, and I am not crazy about the huge shark figurehead, I plan on changing it, just not sure what to use yet. Maybe using a spare Raelin. Also the cannons are just to big for us to use as anything other that huge siege cannons. 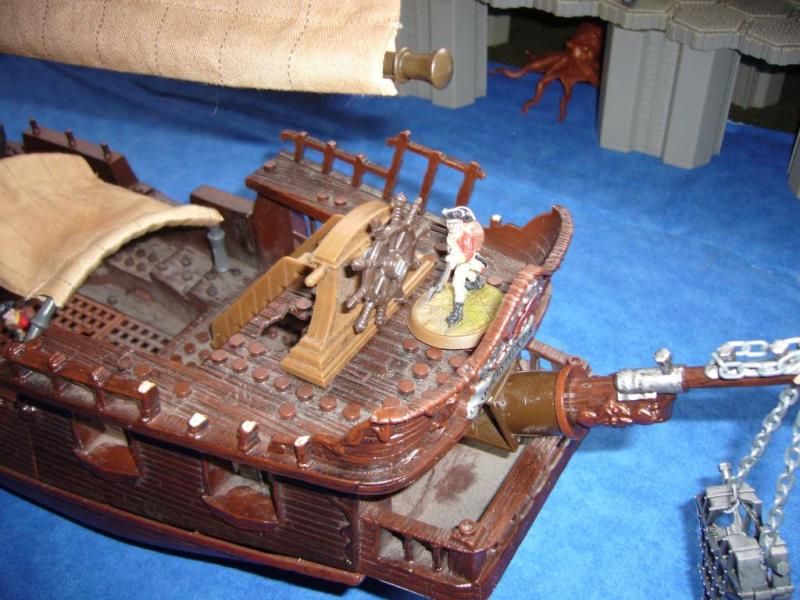 Replacing the wheel and cannons are not that expensive. I still need help buying the right size of ship wheels. I ordered a 14mm wheel and it was to small I will try getting suggestions from a shipmodel forum I found. Also the spar?( dont know the name of the pole pointing out the rear of the ship) It holds a cage to hold the mega bloks figure. This also can be removed easily. 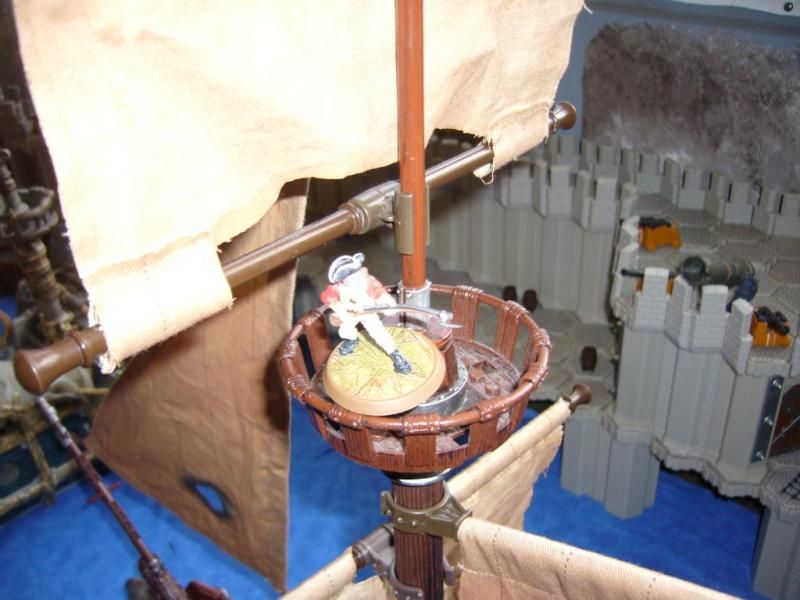 I like the crows nest but I cant see any use in the game for it, you can remove the top mast for a figure to fit in but its going to be so high up in the game I dont see any use for it in the game. ( Unless you plan on having Sniper Sam up there 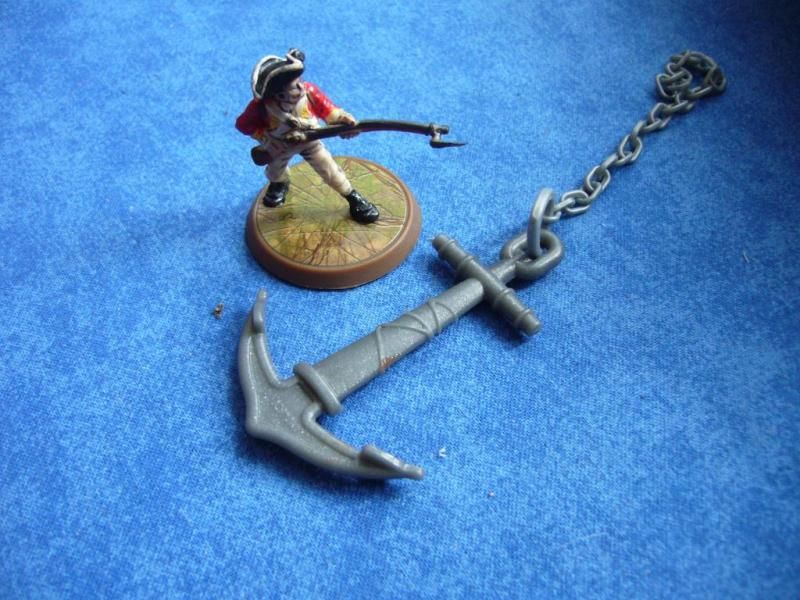 The anchor doesnt look to big, unlike the Black Pearl and the Dread Eye's Phantom that have HUGE anchors. I bought some cheap lego anchors and they look like they can be used as replacements. For now I will keep these that came with the stormstalker.  Not crazy about this figure head, I will be looking for options to remove, you will need either a very long time with a scapel to wittle it off or a hacksaw or a few minutes with a dremmel. 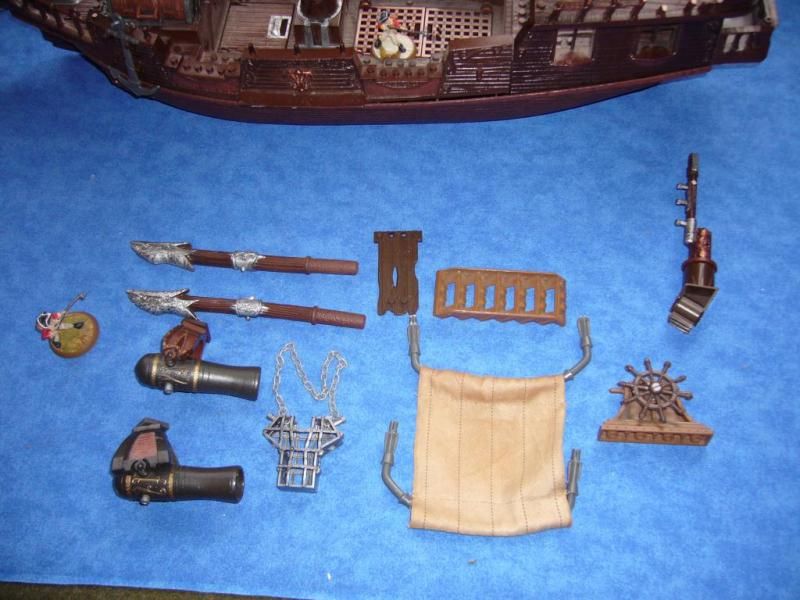 These are the parts of the ship I removed , I know I will be buying a new ships wheel, and maybe replacing the sails. These are some of the possibilities for the sails set up. I would have to add a second mast. 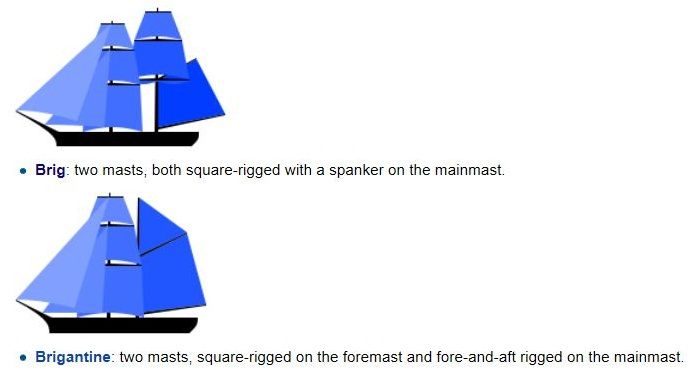 Taking apart the hull makes it much easier to remove the pegs and install a new deck. First I used a flat head to push open the 4 clips holding the top half of the hull from the lower section 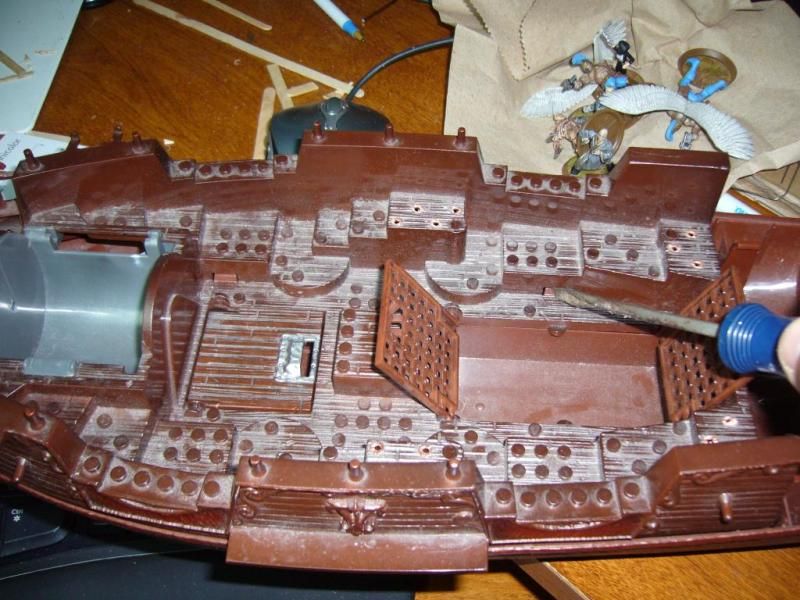 The front has a clip on the inside you have to pull apart carefully to keep it from snapping, slowly pry the two halves from the rear towards the front and it will pop apart. Its a lot easier once the hull is separated to be able to remove the transformation cylinder from the bottom, I just pried this one off with the same flat head screwdriver. 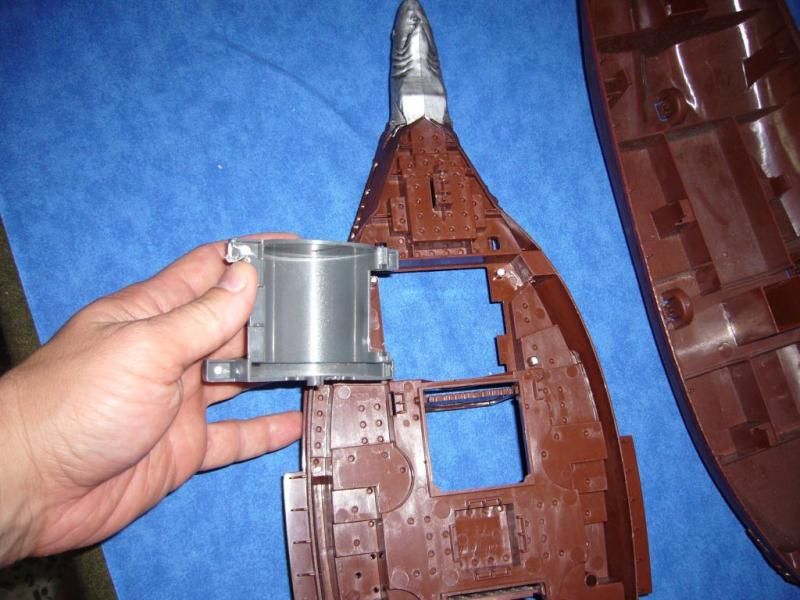 It looks kind of cool, also headed to my bitz box for future terrain. 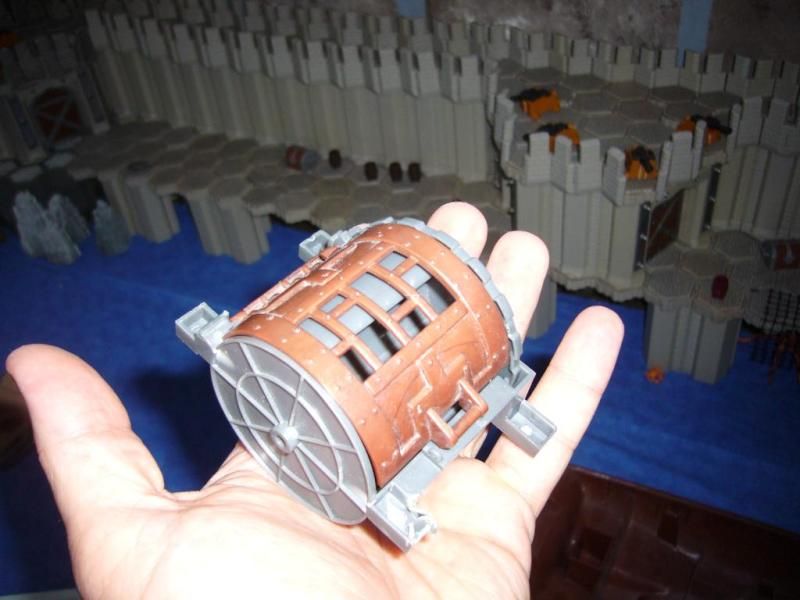 I then clipped off all teh pegs on the top and bottom of the stern castle. 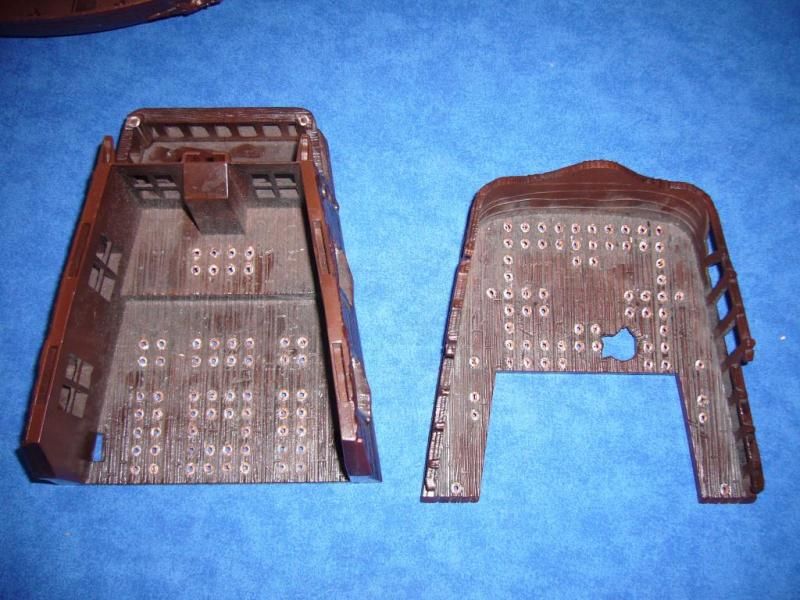 First time I tried this I used a dremmel to cut them off then I sanded them down but that was way to much extra work. This time I just used clippers and it was much faster. And here is a before and after picture. If you look at the top section of the deck you can use that as a reference as that would be the perfect hight to sit the new deck on. 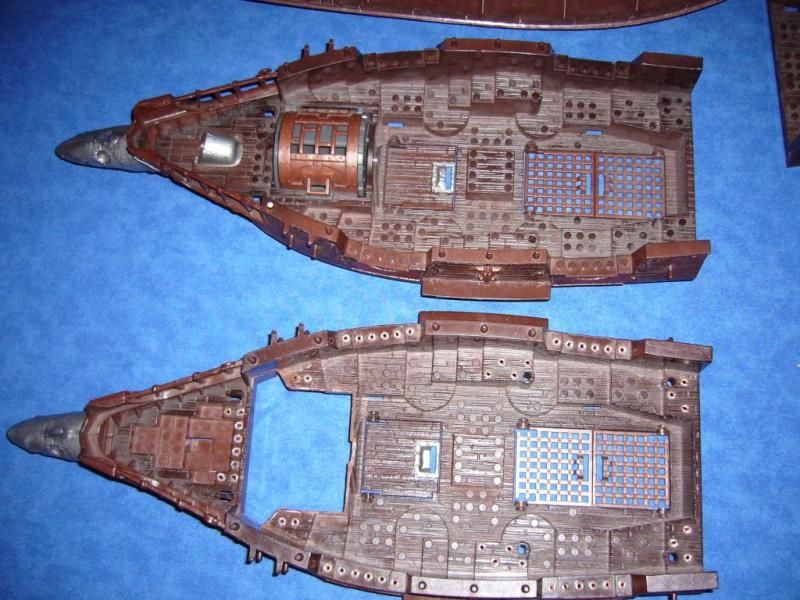 I made some templates to see how the single deck would look. 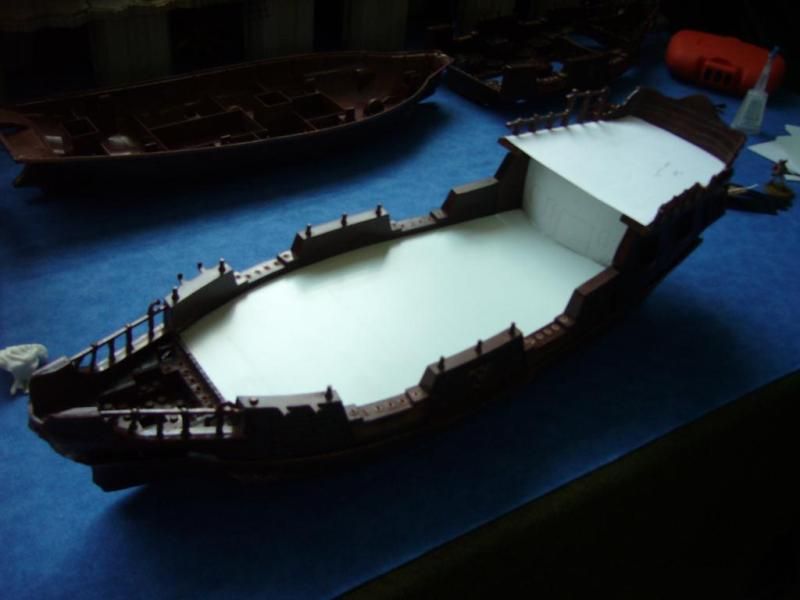 I wanted to see how many hexes would fit on this ship and was surpised it fit 31 hexes. 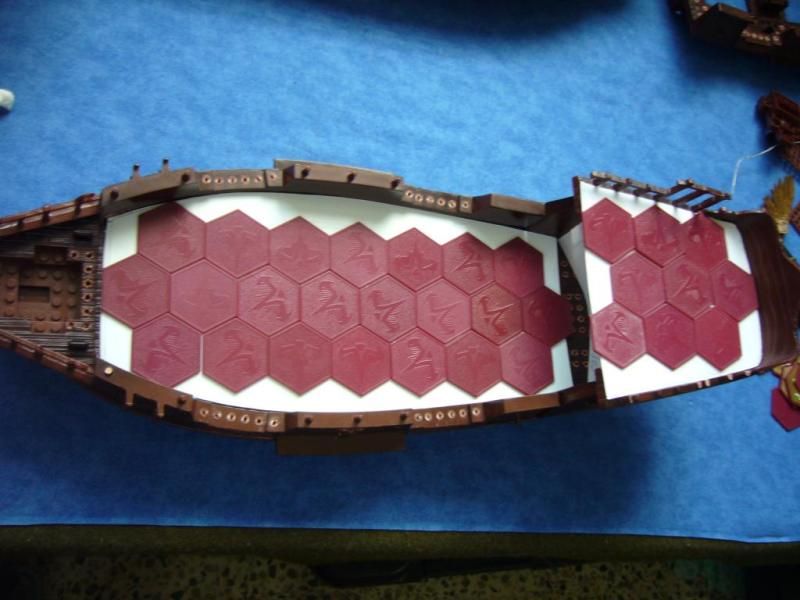 Not sure if will use 1 or two mast on this ship though. Each mast will take away one hex worth of space.  I migth try 2 mast and a third smaller one on the stern castle or maybe use 2 mast and a spanker. Not sure though. Dread Eye's Phantom
Spoiler Alert!
Dread Eye's Phantom This is a great looking ship that can be modified quickly as its highly detailed and has a lot of upperdeck room to use. This ship has a lower deck that opens up on the side. The biggest concerns when modding this ship would be patching up the 3 holes on the side ( gunports) and covering up the feeding well. 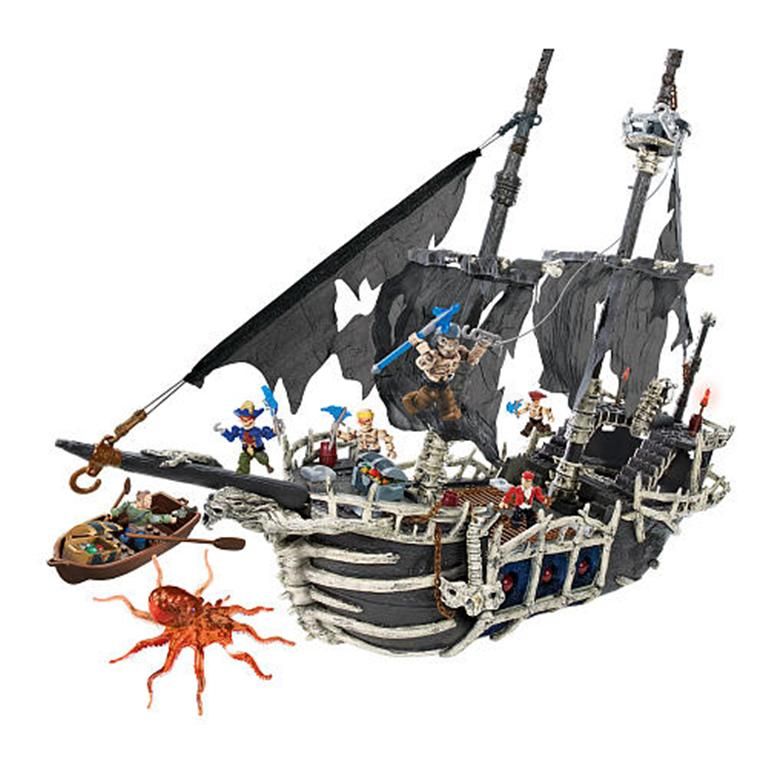 I recieved my first Dread Eye's phantom wrapped like a burrito. Originaly I did not know how to put this thing together as it had all sorts of shapes and peices sticking out. 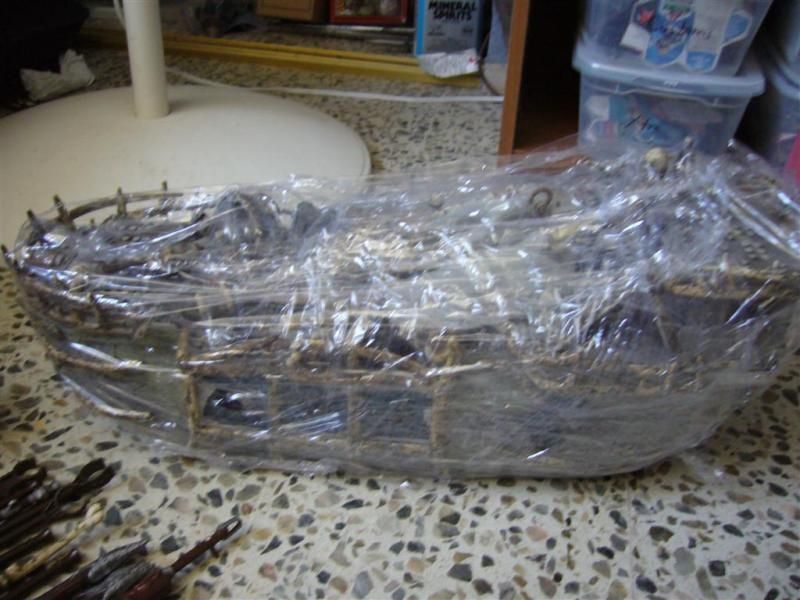 The details on this thing are pretty cool and it just screams ghost ship! 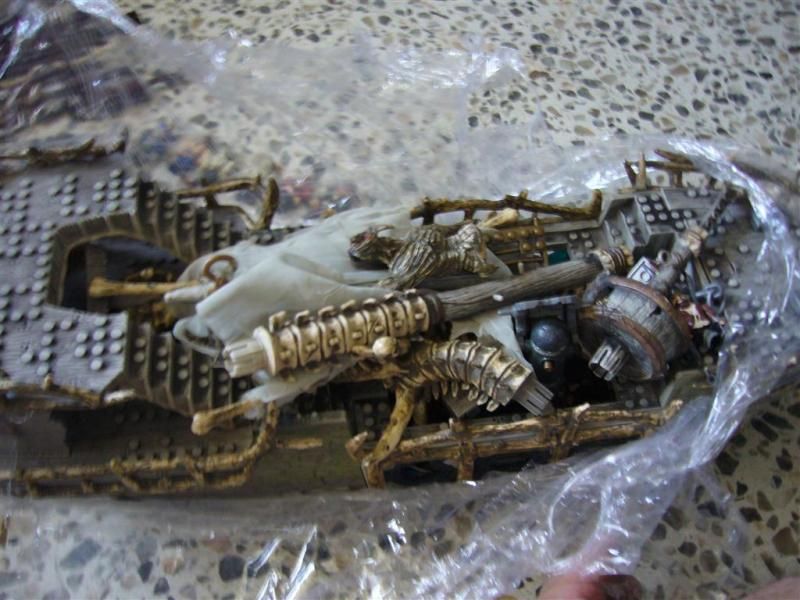 The figurehead looks like something straight out of a Iron Maiden CD cover. Who ever made this was thinking of Evil Eddie. 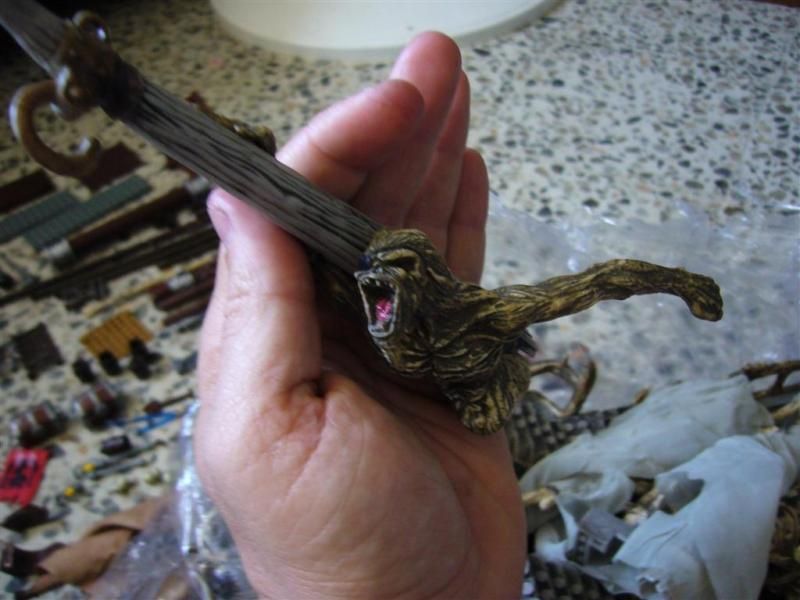 I know my nautical knowledge is limited, but I just had to ask, is this what they mean when they say poop deck? This is a little trap door for figures to fall out of when they are swallowed by the well in the aft castle. Also theres a trigger in the slide that lights up the belly of the ship when its "Fed" . Looks pretty cool, might not get rid of it. 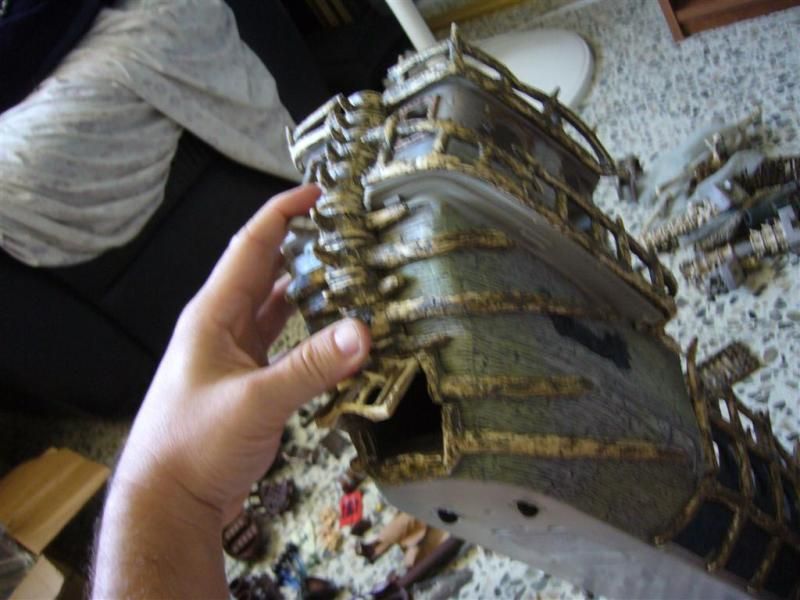 This ship is incomplete as its missing the main segment of the main mast, also its missing a few of its sails and the rigging that goes from mast to mast. I recently recieved a second one and will post pictures of a completed ship soon. 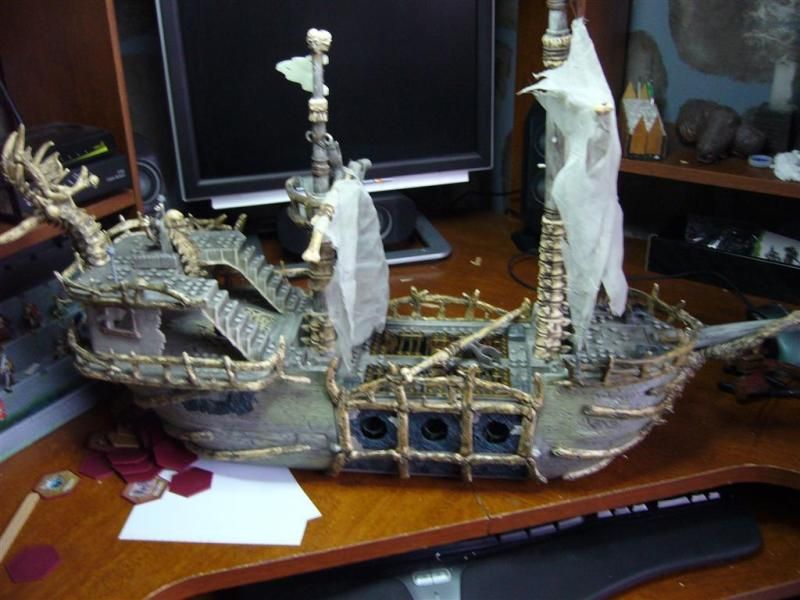 The mast needs to be repaired, and the crows nest is useless for placing a heroscape figure, unless the top mast is removed. Might consider it, the little flag that came with it is also glow in the dark. The stairs will be tricky, I am thinking about ripping them out and replacing them with ladders from the fortress set. 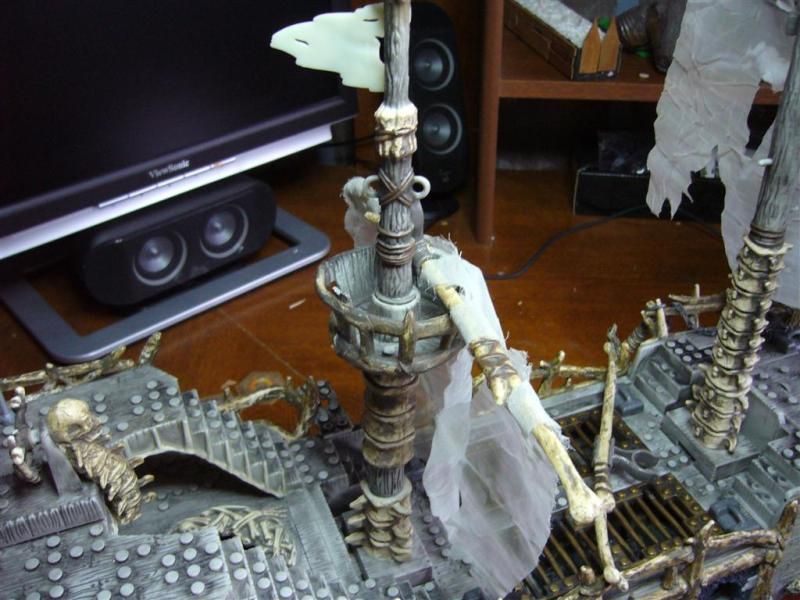 The top deck splits in half, to reveal the second deck, not sure what will do with this, but I do know I like having 2 decks, I might make a upper deck that splits down the middle to keep this feature. The lower deck looks easy to modify once the cannons have been removed. The holes on the side need to be covered, not sure if will do so with planks or keep the ghost semi transparent bluish film there to give it the image of a specteral ship. 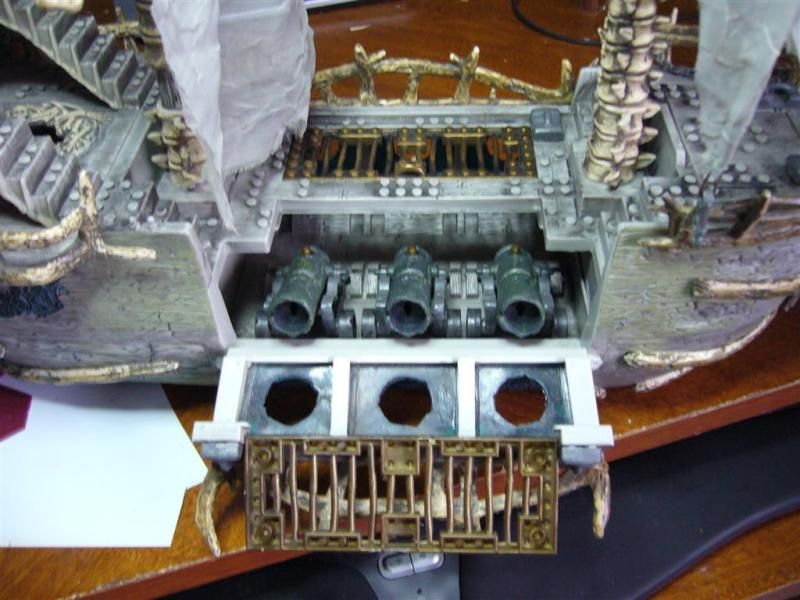 If there is some way to remove those pegs and use minimal decking to keep the details that would be pretty cool, the ship per-se looks like the perfect size to have a half dozen figures fighting on the main deck itself. 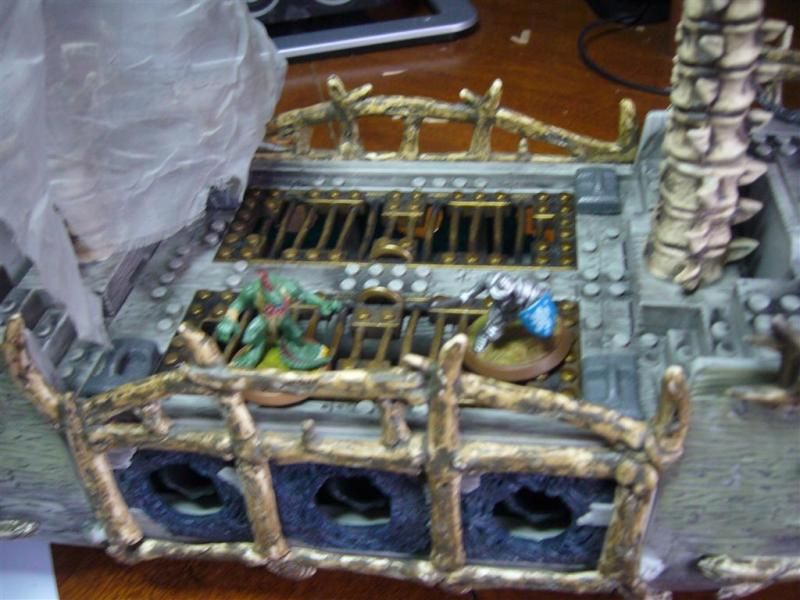 The captains throne chair type of skeleton pelvis thingy can be kept as decoration and maybe even attach a sail to it. A mega bloks figure is supposed to sit on it but you can tell. The Ships wheel must be removed but there is a really cool one to be found online for $10 that I will definitely be getting. These would be perfect for this ship!  And a very hawt Undead pirate girl!  Anyhow, back to the Dead Eyes Phantom, at $30ish or so this ship is a great buy with plenty of room to play around with. 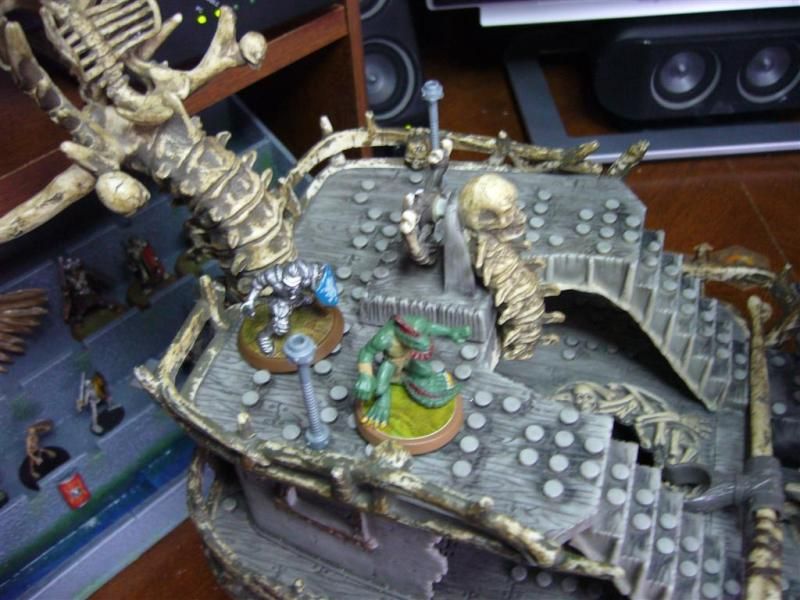 Although incomplete she looks great, and with the fan on her , the sails flow back and forth in a spooky fashion, very cool. 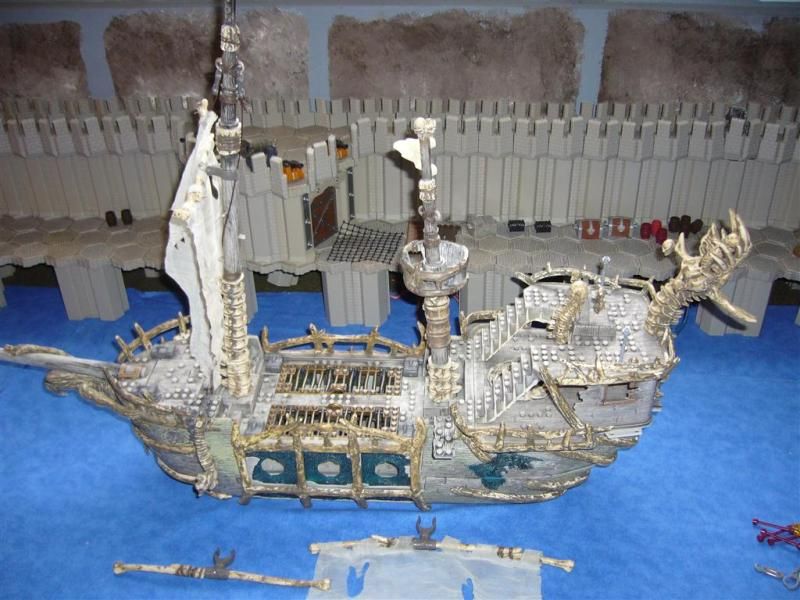 Another shot ( although badly taken with flash) of the top of the Aft Deck  This is the feeding well, you would toss figures into this sacrificial pit and the belly of the ship will light up, and the figure drops out the read trap door ( Still think its a poop deck). Not sure if willkeep this but its got some cool factor in it, just cant see any use for a heroscape game. 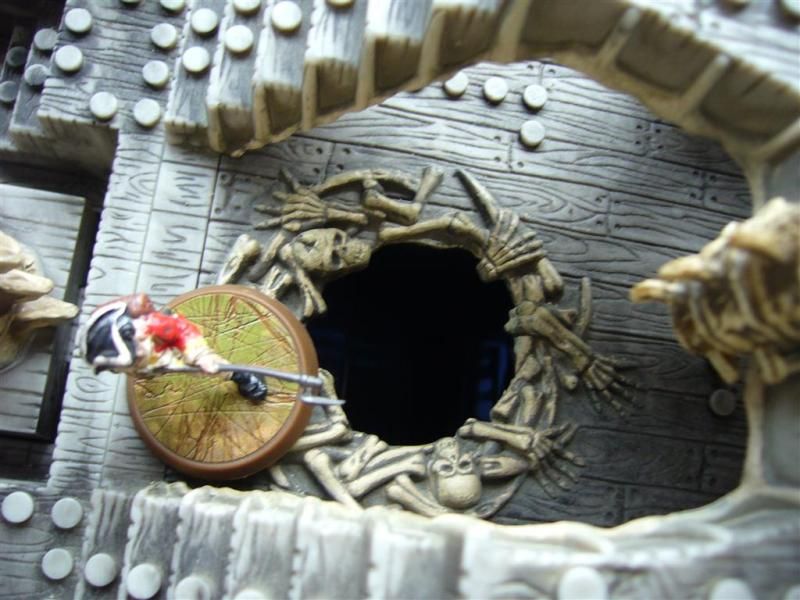 Although this will be removed, I am sure I will find a use for the skeleton spine and head. 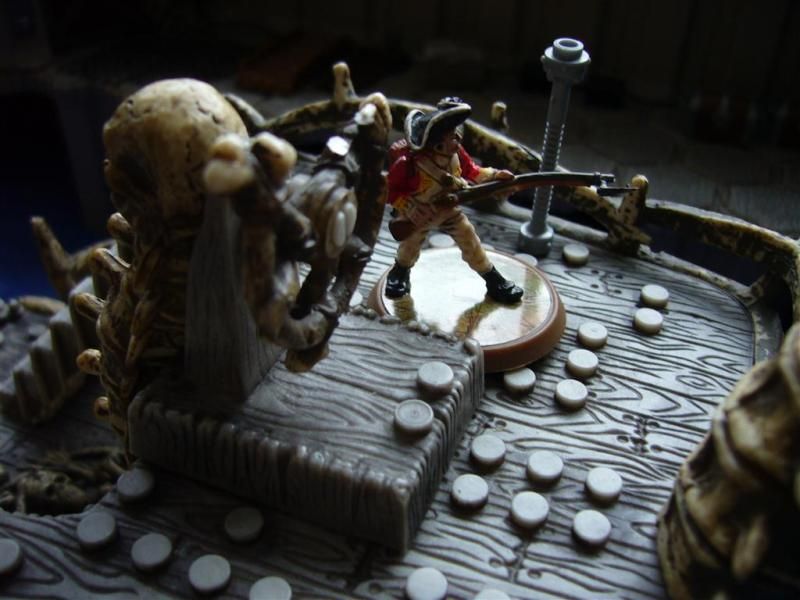 Much better shot of the wheel section. 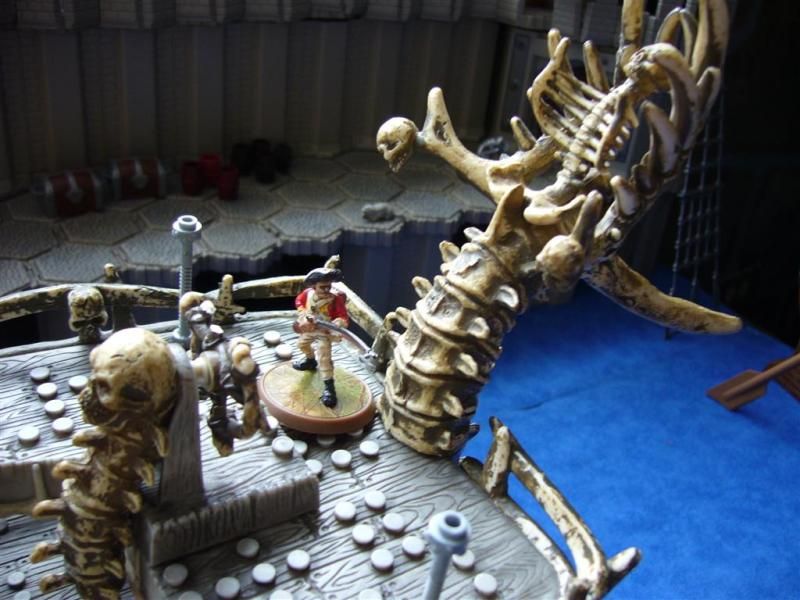 The sails are tricky to replace but you can find them in walmart cloth section, just take one of them with you to compare as they are so many shades of grey to choose from. Also the pelvis /spine anchor is to large to use on this ship, so that was also removed. 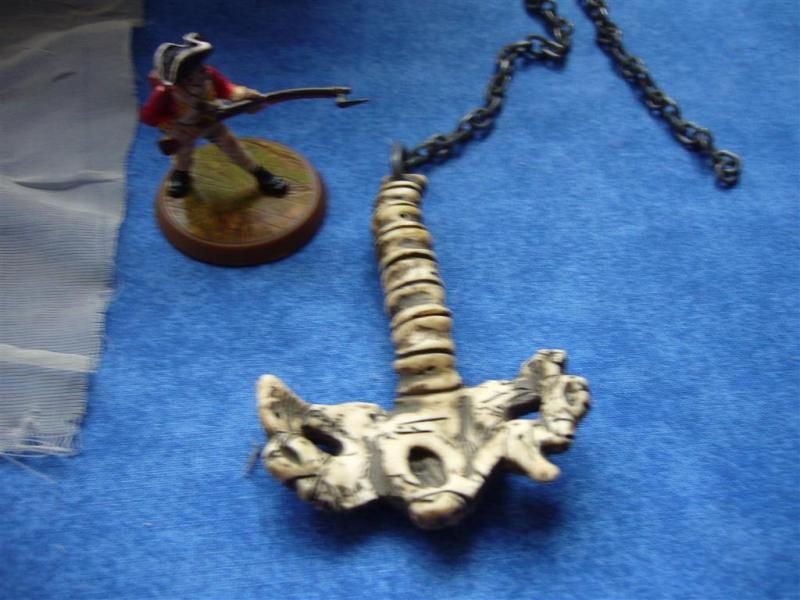 This section is easy to pop off, and can even be left off if you want to turn the ship into a barge instead. 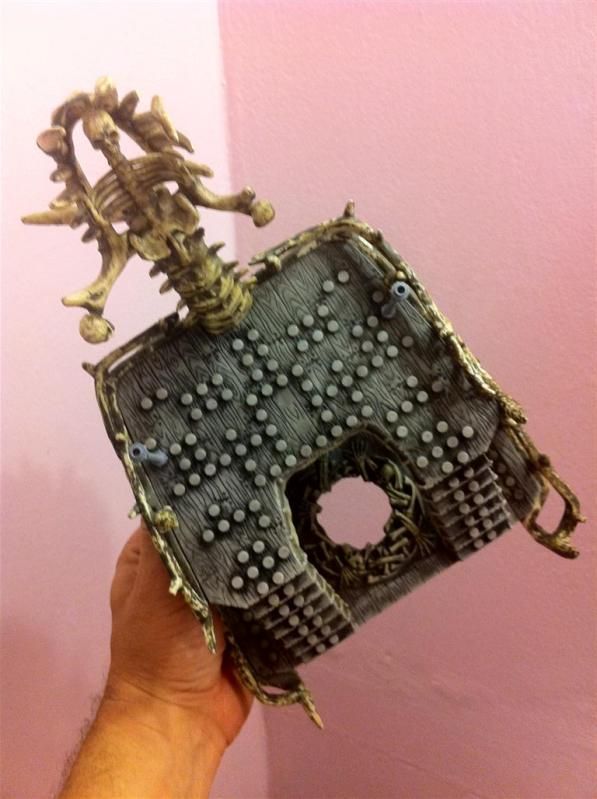 Cannons are to large to use but I have seen them converted into siege cannons for 28mm wargaming. 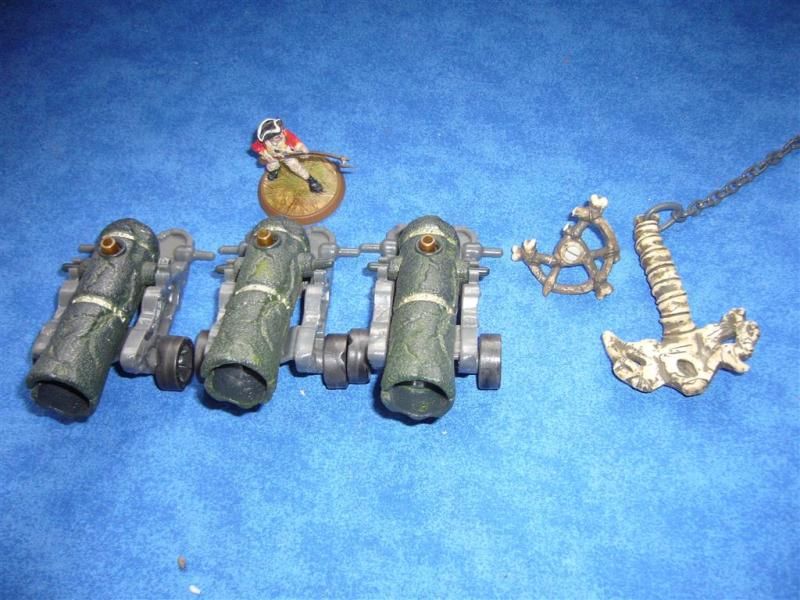 All in all a very cool ship Sea Monsters!!
Spoiler Alert!
Saw this on another minis website a while ago and had it on my Will-do-eventualy-list. Seemed like an easy enough project. First I had to find where I could buy the Wild Republic Octupus, for $3.75 on amazon and a measly $25 shipping charge to Puerto Rico since Amazon vendors think Puerto Rico is located on the dark side of the moon.... So I had 2 of these shipped to someone stateside and he was nice enough to forward them to me. Easy mod to do  Very soft rubber, easy to slice off, remember when cutting off the tentacles that if you want to keep the body try to trim it so a little of the tentacles stick out of the base. 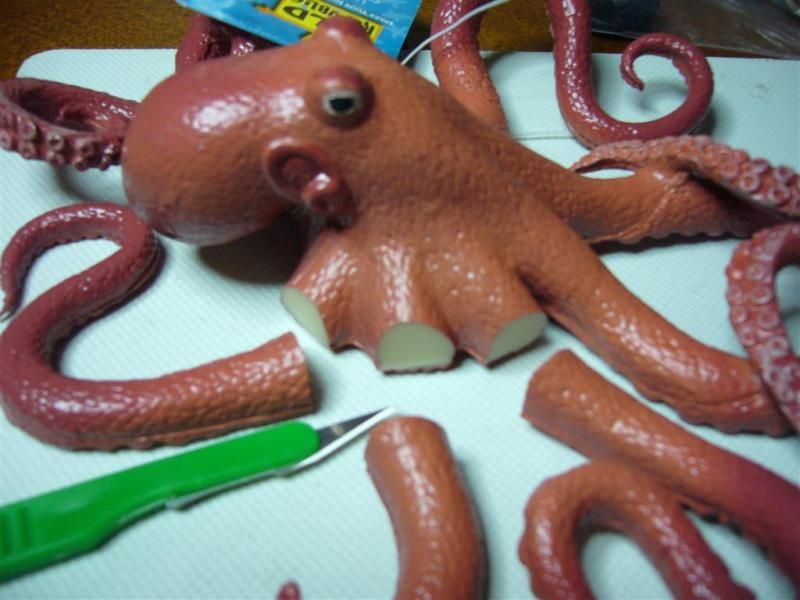 The base is a little high so slice off the bottom half to lower the heads profile to the water. Very easy to do since the rubber is soft. Also carved out a little the stumps to flatten them out when I glued them. 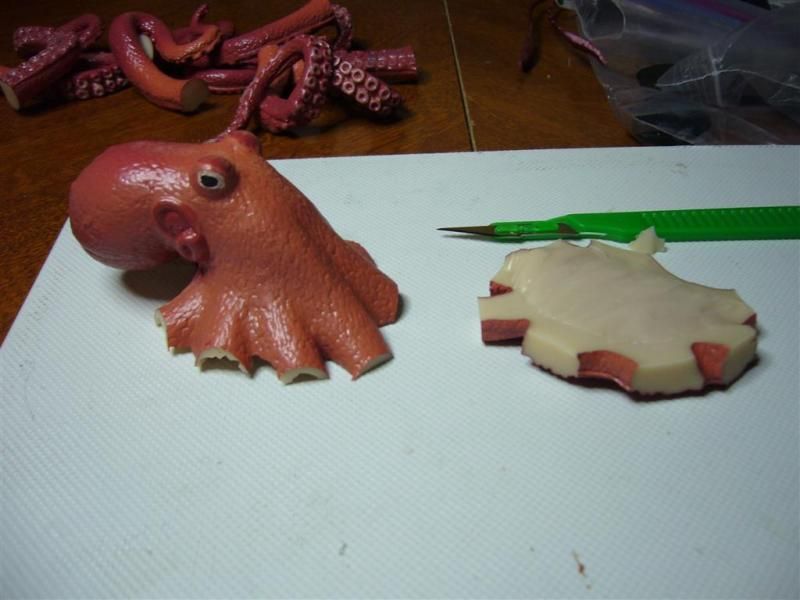 I used a mage knight base for the body, I think it was the giants based thats being used for CV3. 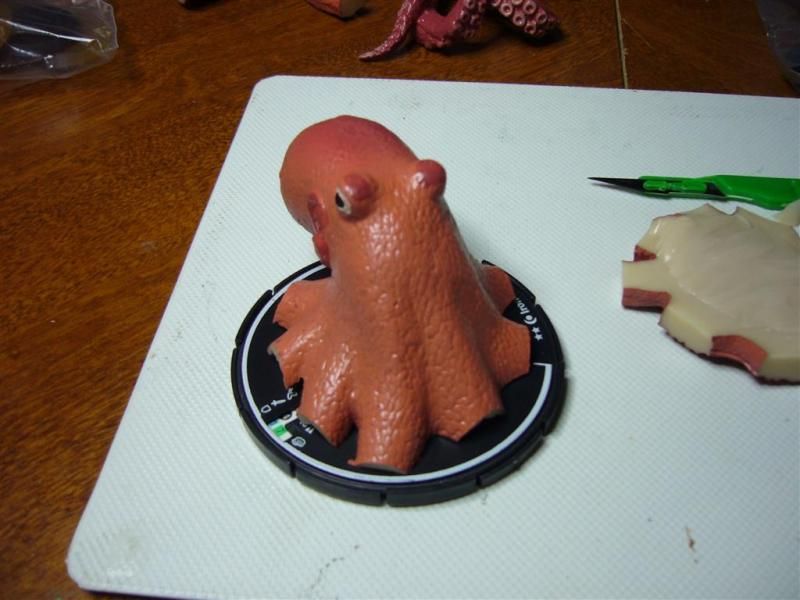 I grabbed some 25mm bases and spray painted them a krylon blue. I like how bright the blue is, but next time I will use larger bases for the tentacles as they are all top heavy and these tiny bases where not a good call. Normal Heroscape bases would have been better to stabalize the arms. 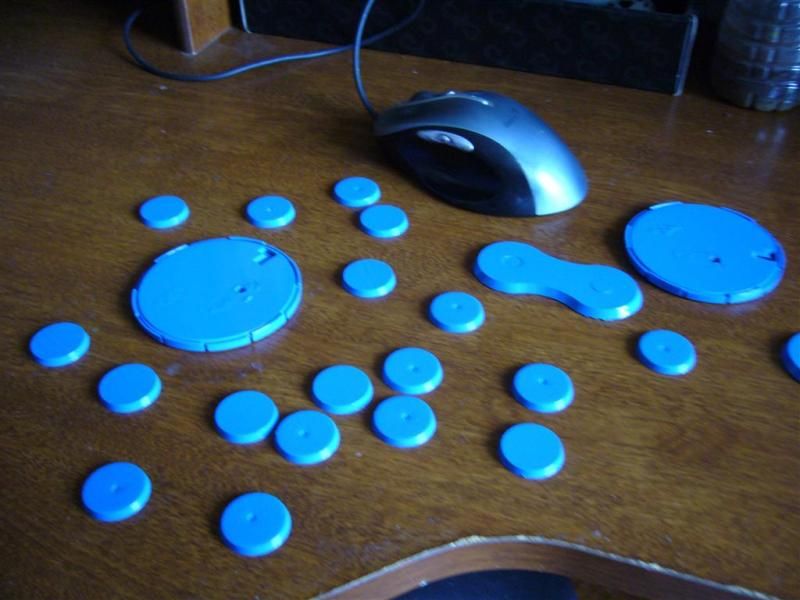 To help hold them in place and to give them a little weight in the bottom I used screws and nails, I would slice a slit into the arm and the tricky part is to trim the arm so that it sort of stands up by its self and balances the weight to the middle. These are easy to trim and I would just keep slicing thin slices at different angles untill they almost stood up by them selves. 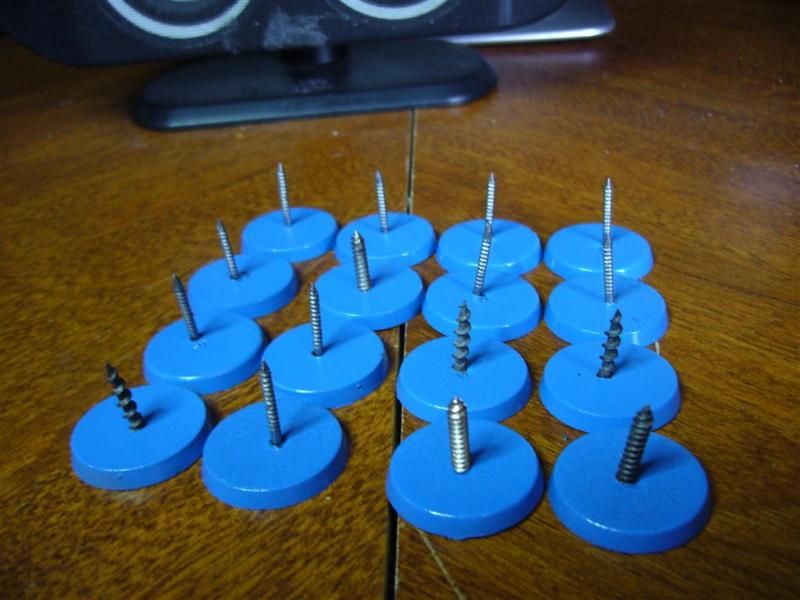 Next time.. bigger bases 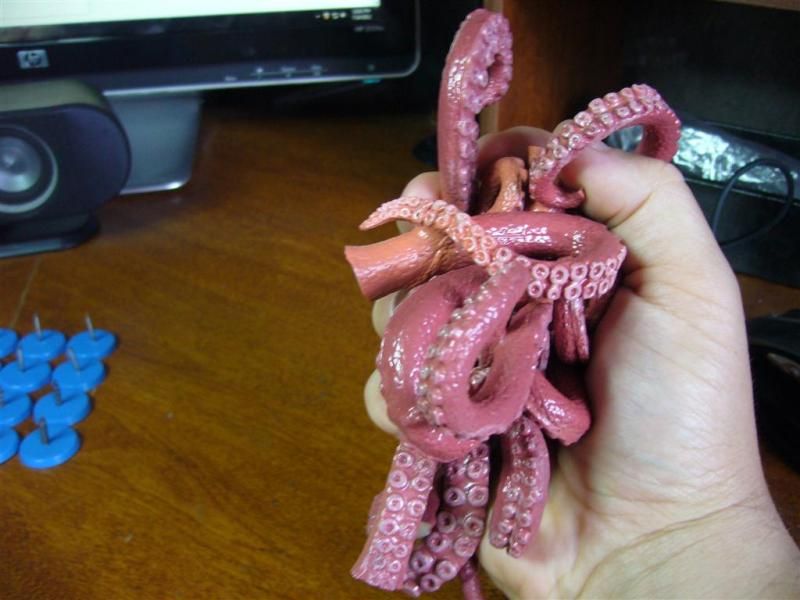 I think I used goop to glue these down but any glue would have worked, I could have used the hot glue gun but since these should see some play and handling they might have just popped off, so regular glue seemed best. 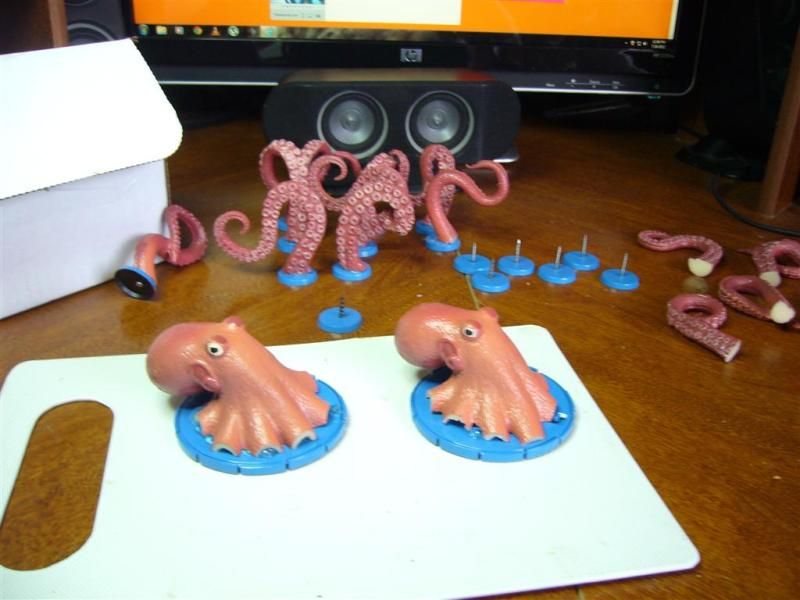 I bought Water effects specificaly for this project. It was really fun to work with and looks great. I have seen similiar results with clear silicone and it might have worked just as well. I dabbed the water effects around the bases, and used a paper clip to pull up and away to create the splash effect. After leaving it 24 hours to dry, it turns clear, but I painted them a dark blue to match the base, then a very heavy drybrush of white for the splash. It was surprisingly easy to do. 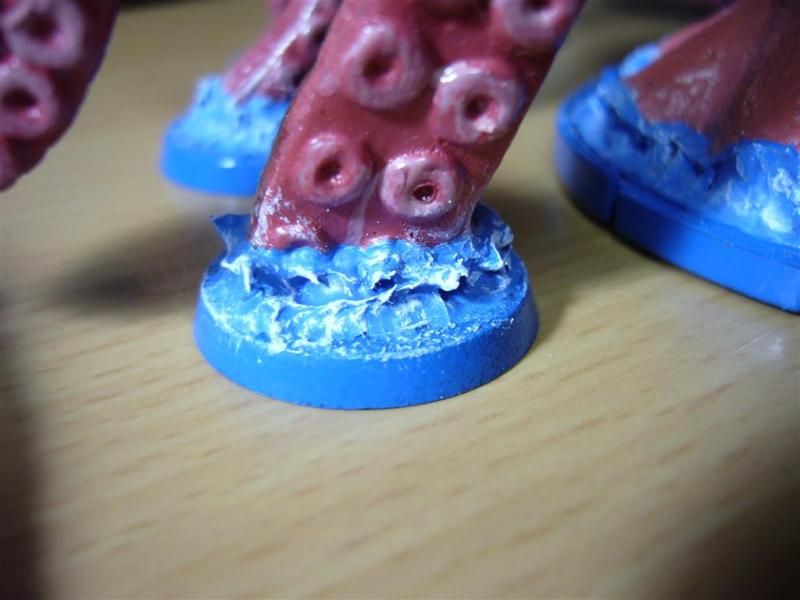 I dont have a card yet and I am not sure how I will be using them but here is the sea monster attacking Griffon's future ship. 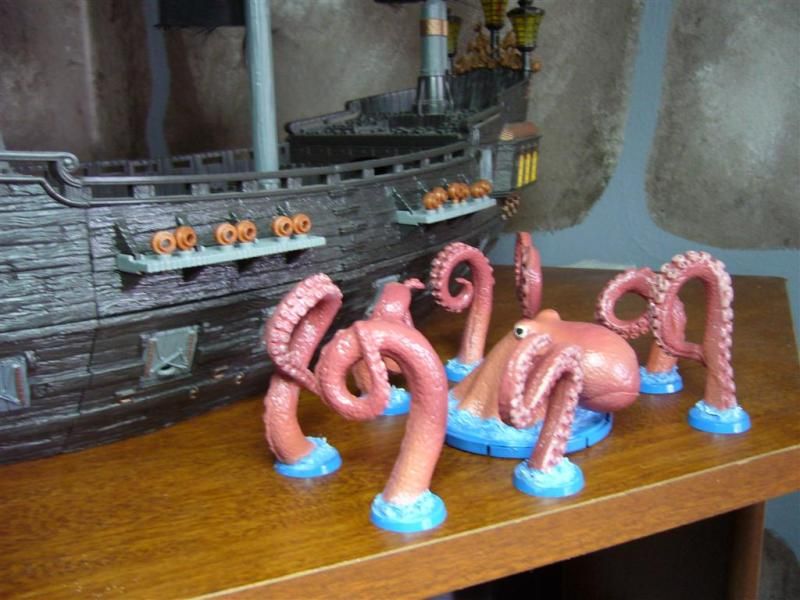 The watereffect is not really needed but helps alot, I am sure clear silicone would have worked just as well, this project can be done under $6 if you order the octopus stateside through amazon. 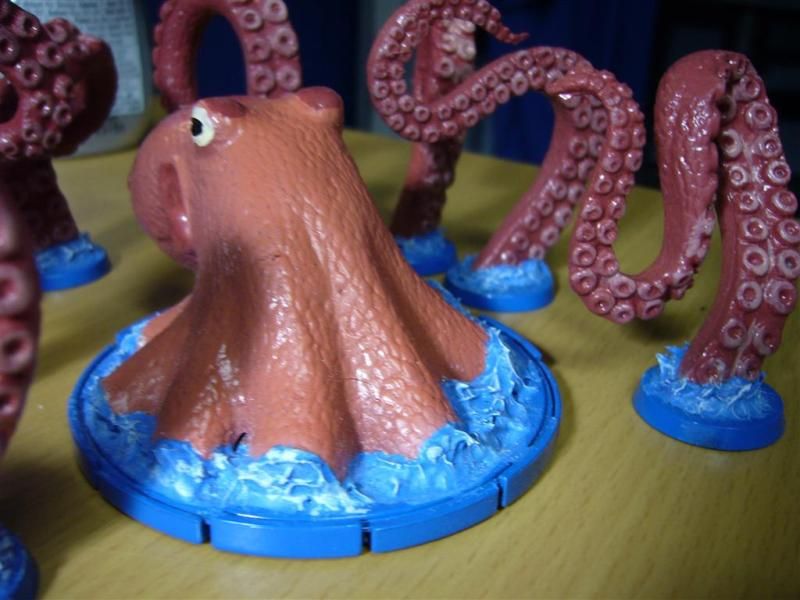 Sails Reference Misc Pictures of my growing fleet
Spoiler Alert!
This is why my wife change my ebay password for a few months... Today 2 more ships arrived !! (March 2012) 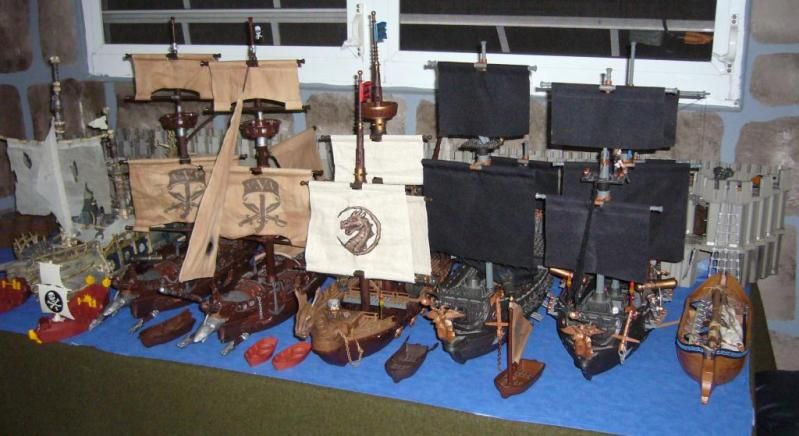 And 6 more on the way.. Island Play set
Spoiler Alert!
(March 2012) I just received as part of a trade this really cool island!! 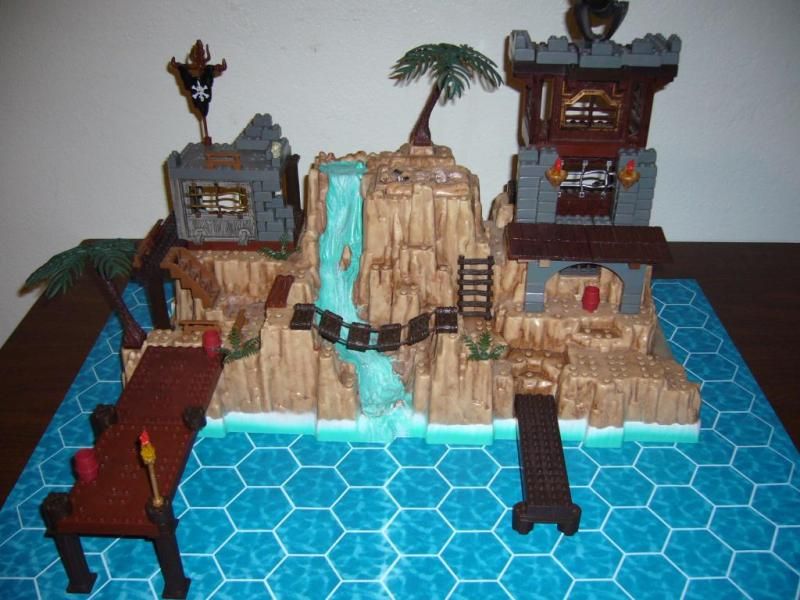 I know I can convert it so that it no longer resembles a mega bloks toy at all. Not much room on it but that can be fixed up with some simple mods. Has ALOT of potential! 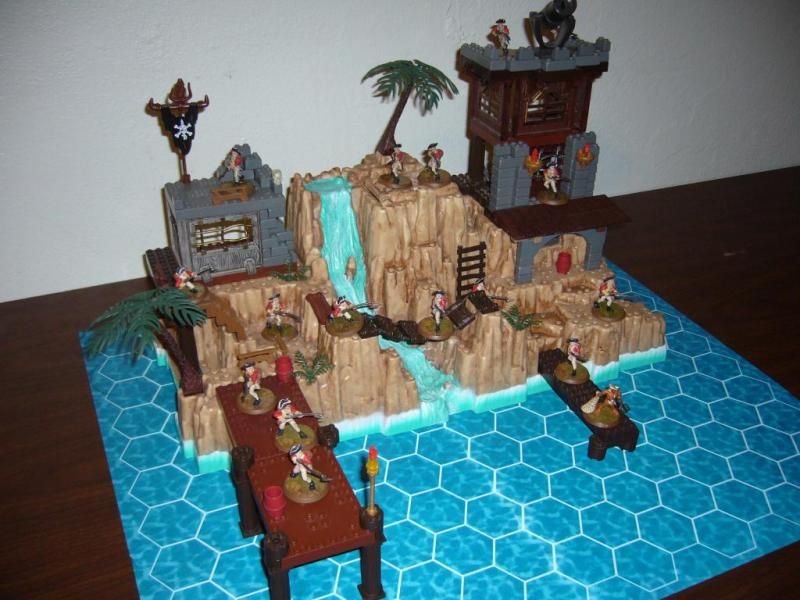 Debating weather to sell it as is, or convert it into heroscape terrain, ( and then either keep it or sell it to try and regain some of the money I spent on this fleet ! ) Also just imagine the battles you can have on this thing ! 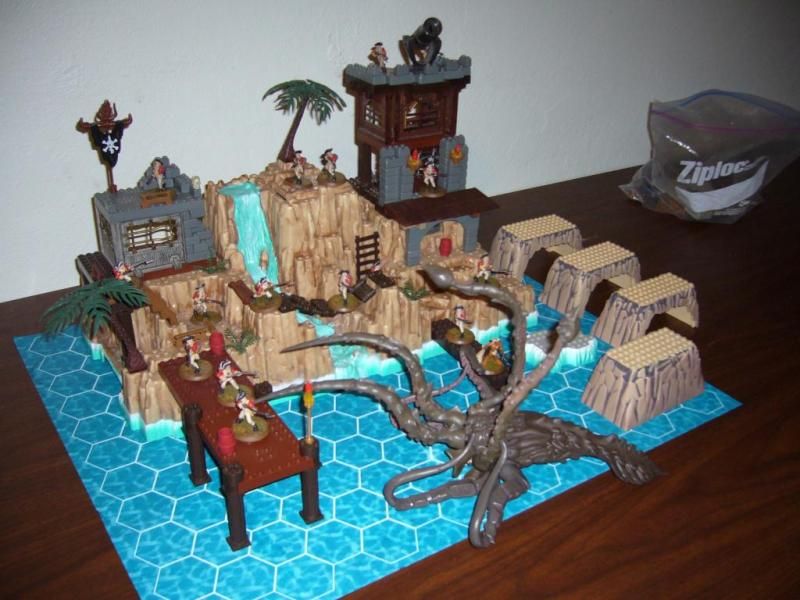 Left Over pieces
Spoiler Alert!
May 2012 Since Ordered a few Mega bloks ships online, I have had a few left over peices I have no intention of using. My fiance suggested I sell them on ebay to try and recoupe some of the money I spent. So I first took these pictures, for the typical, please by my junk on ebay pictures. 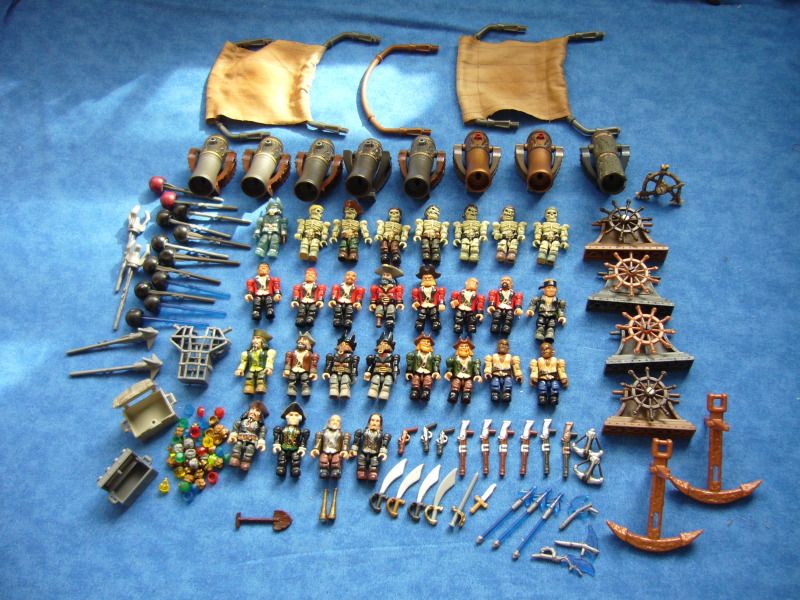 But it looked to borring, so I tried posing them and making them stand up and... 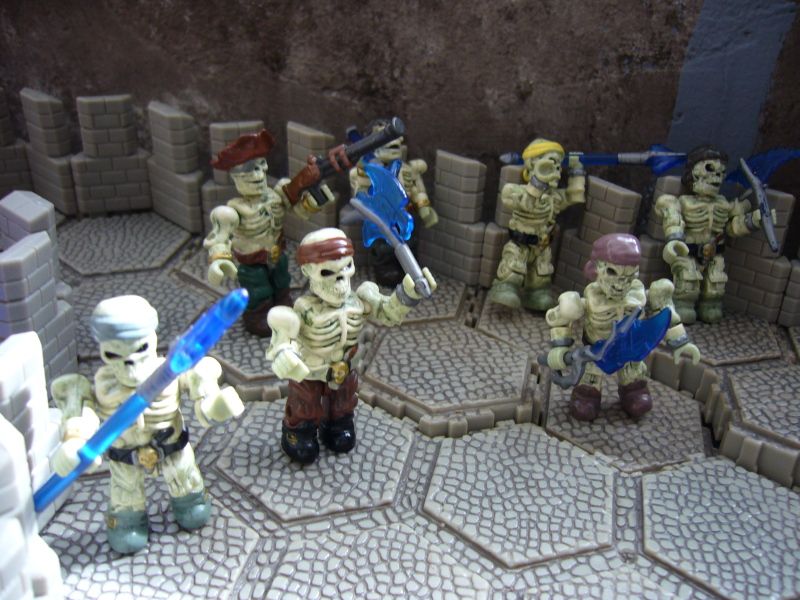 One thing led to another, and then after a 15 minute photo shoot we have !!!! DUN DUN DUN.... 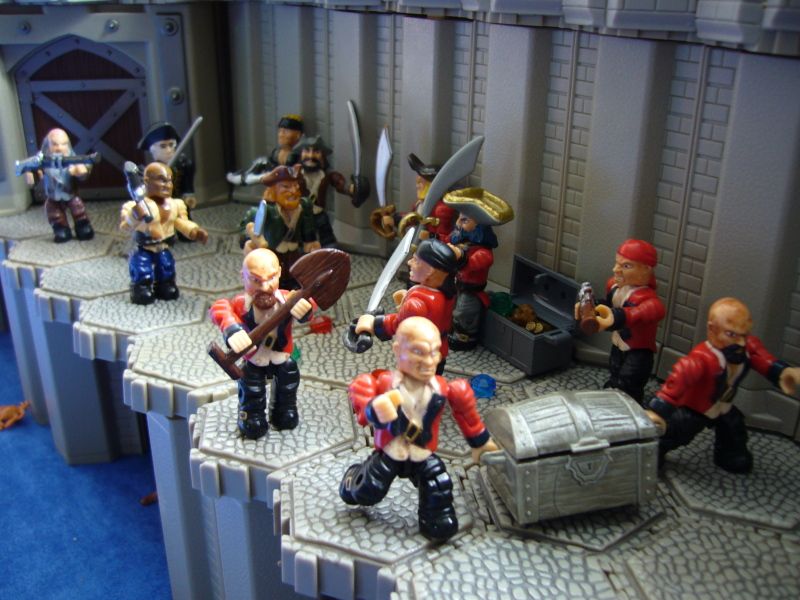 Red eye Willy makes a mad dash with the treasure as Barnacle Bob tries to stop him with his mercenaries from the Isle of Tortuga that he picked up while escaping the traps left behind by EightBall the one eyed formaly-known-as-pirate-but-now-a-respectable-privateer !!!! Needless to say , they never got uploaded to ebay, and are now hidden in a box under the closet labeled "Spare Screws". She will never find them MUAHAHAHAHAH!! Original Post
Spoiler Alert!
Sorry I couldnt think of a better tittle, I swear Ill change it I know we have about 4 other threads talking about boats, but none on how to make one. I was searching for something online and I stumbled on some converted toys into 28mm gaming ships and it like a fun conversion, if not a little pricey at first or time consuming. I think I read some where that you can have 2 out of 3 , Fast-cheap-done correctly, choose 2. I have read a few dozen pages on this and saved most of the links, I made myself my own little tutorial from reading all these other guides, if any one is interested let me know and I will post the information I have found. Any how, here is the reason for this post; This is my first try converting a Mega bloks ship into a 28mm ship. I found inspiration for this project reading some really good threads on several modeling boards. And I was lucky to get some extra advice from some of their members on where to order some of the materials I would need to start. After reading over 30+ pages on what other people had done on their conversions, I made a quick shopping list of what I thought I might need and looked for a cheap ship to start with. I ordered some cannons, wood planking plasticard, ship anchors, ship wheels, windows, and not sure what else. I live in Puerto Rico, so since I was ordering all these items from the UK I knew it would take a while before they showed up. I found on ebay 2 ships really cheap, one was a very cool Mega Bloks Man O War, I got it for $12 + 12 shipping. I couldnt wait for this ship to arrive so I could give it a shot. 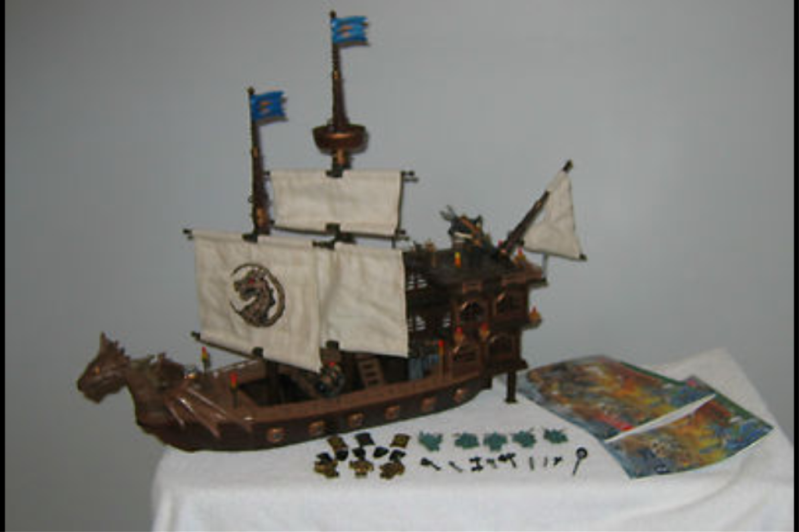 2 weeks later it arrived with a smashed box, and a apology note from the USPS that the box "might" have suffered damage. The entire box was smashed, the ship was missing and there was less then 10 tiny bits left inside. I contacted the seller and will be asking for a refund but still sucks because getting another one of these ships will be over $40 from what I have seen on ebay in the last few weeks. I did manage to buy an incomplete Mega Bloks King Arther Attack Warship from ebay for about $16 total shipped. As you can see I am not very knowledgeable when it comes to ships, just what I have learned from watching pirates of the Caribbean. I still have a lot to do on this almost viking ship, but I am looking forward to some packages arriving to start painting and decorating this ship once I am done finishing the hull. I know it doesn't look like much but it has been fun to work with and as my first ship I hope to be better at it when I try my next few conversions. Any Advice will be more than welcome, and before any one ask, I have no idea how the boat is used in a game or how boat mechanics work, a lot has been discussed on this topic, but I just wanted to make a boat Last edited by Rocktroll; July 9th, 2013 at 11:13 PM. 
|
|
#2
April 15th, 2012, 11:53 PM
|
||||
|
||||
|
Re: Heroscape Navy
Don't the Vikings have 4 and 3 heros? Four man unique squad, Finn, Thorgrim, Elagrost(?), bad spelling...
Good Job though! Last edited by jackryan4; April 15th, 2012 at 11:54 PM. Reason: Forgot congrats
|
|
#3
April 15th, 2012, 11:58 PM
|
||||
|
||||
|
Re: Heroscape Navy
Very cool.
Looks like another Rocktroll masterpiece in the making. C3V Current Broadcast C3V Testimonial from  " Easily the best quality classic customs I have ever seen" " Easily the best quality classic customs I have ever seen"MY MINIATURE COLLECTION -- NEW VALHALLA
|
|
#4
April 16th, 2012, 12:26 AM
|
||||
|
||||
|
Re: Heroscape Navy
Thanks Z!
Thats still a lot of empty seats
|
|
#5
April 16th, 2012, 12:28 AM
|
||||
|
||||
|
Re: Heroscape Navy
Quote:
 I used to have one of those giant ones, when I were a lad. I can imagine how it wold fit well into 'Scape for the Vikings, heck even the Romans. 'Sigh', a shame we never got Phoenicians in 'Scape, there could have been so much potential. However, the British were noted in the 16th-19th centuries as having the single-most powerful navy on earth. C3V/SoV The Pre-Sov Workshop Xorlof's Handy-Dandy Card Creator My Customs: Ullar Cavalry Faction, 4/24/23 HOW I GOT MY TITLE
|
| Son of Arathorn |
| View Public Profile |
| Find all posts by Son of Arathorn |
| View Gallery Uploads |
|
#6
April 16th, 2012, 12:51 AM
|
||||
|
||||
|
Re: Heroscape Navy
Quote:
Customs here Master Set IV/Assault in the Mournlands.  William099 is Lord of Blades... William099 is Lord of Blades...in THE FRACTAL COMPLEX
|
|
#7
April 16th, 2012, 01:51 AM
|
||||
|
||||
|
Re: Heroscape Navy
Rocktroll your customs never cease to amaze me.
The Chronicles of the Heroes of FictionOur Newest Hero: Nimue MY CUSTOMS:CLASSIC Updated 9/19/16/SUPERS/PAINTS/MODS/TERRAIN Updated 10/12/16
|
| JC McMinis |
| View Public Profile |
| Find all posts by JC McMinis |
|
#8
April 16th, 2012, 06:51 AM
|
||||
|
||||
|
Re: Heroscape Navy
Quote:
Great work again Rocktroll!
|
|
#9
April 16th, 2012, 07:27 AM
|
||||
|
||||
|
Re: Heroscape Navy
And, though he's their enemy, technically Valguard is on their side now. 8 isn't bad, it's more than half full now
And Z is right, this is going to be another amazing Rocktroll custom. If you have an idea for a signature, let me know. Until then, this stays here My Trade List My Custom Map Thread
|
| Bloody Bogle |
| View Public Profile |
| Find all posts by Bloody Bogle |
|
#10
April 16th, 2012, 08:19 AM
|
||||
|
||||
|
Re: Heroscape Navy
Any one interested in a write up? List of supplies and where to buy? This viking ship has almost nothing done to it but when you see what people have done to some of the others, its amazing stuff. I can provide the links for that too.
I currently have in route 2 black pearls, 1 dread eye phantoms, 1 man o war, 2 stormstalkers and 1 predator. I am trying to find a flying dutchman too. AND I have no more hobby money for the next 2 months..... or groceries I think
|
|
#11
April 16th, 2012, 08:28 AM
|
||||
|
||||
|
Re: Heroscape Navy
|
|
#12
April 16th, 2012, 08:36 AM
|
||||
|
||||
|
Re: Heroscape Navy
|
|
|
|||||||
| Display Modes |
 Linear Mode Linear Mode |
 Switch to Hybrid Mode Switch to Hybrid Mode |
 Switch to Threaded Mode Switch to Threaded Mode |
|
|
 Similar Threads
|
||||
| Thread | Thread Starter | Forum | Replies | Last Post |
| Navy Blue Angels in Memphis, TN | SilverBlade | General | 1 | October 10th, 2007 02:32 PM |
| The Orc Navy!!! | Ryougabot | Custom Units & Army Cards | 12 | September 28th, 2007 06:11 PM |


