Materials needed for this project are...
Treasure Pile:
7 hex tile (you can use an official one or make your own; I made my own since I don't have any extra)
Aluminum foil
Spray primer (optional)
White glue (Elmer's)
Gold glitter
Treasure chest:
3/8 inch square dowel
3/8 inch round dowel
2 thin strips about 2 inches long cut from cereal box
Black paint
Brown paint
White glue (Elmer's)
Gold glitter
Tools needed:
Hot glue gun and glue sticks
Small hack saw (for treasure chest)
Dremel or other carving tool (for treasure chest)


Take the aluminum foil and crumple it into a shape that roughly resembles a mound. Do 3 or 4 of these of varying sizes. remember, though, that all of them need to fit on your tile.

Once all of the mounds are made, arrange them on your tile to get the best fit.

(Optional) Glue does not adhere well to aluminum foil. You may want to prime yours before going any further to help the process later.


Use hot glue to glue your individual piles together. if you primed your piles make sure the primer is completely dry before proceeding to this step. Once your piles are glued to one another, draw a bead of hot glue along the edges of the piles where they meet on top. This seals them and also makes it look like one big pile once the project is finished.


After you have the piles glued and sealed together use the hot glue to attach the whole thing to your tile. Don't fret if you see a gap along the bottom edge of the pile.


First go around the whole thing firmly pressing the aluminum foil down against the tile. Then, holding the the tile on edge, run your hot glue along the edge all the way around the pile where it meets the tile. This effectively fills the gap while also sealing the pile to the tile.

At this point you are ready to apply the glitter for the gold.

To get the rounded shape of the "gold" take each piece of glitter with a pair of tweezers and carefully snip off each corner to get a semi-rounded appearance.

Or you could do like I did and go to Michaels and buy glitter that is already rounded. It is your choice which method you prefer.
They have several colors. I used the red for rubies, the green for emeralds, the blue for sapphires, and the translucent for diamonds


Drizzle white glue on the surface of your pile and spread it all over. Make sure you get a semi-thick coating over the entire surface. I found it easiest to use my finger for this.

While the glue is fresh, lavishly pour on the glitter. I mean dump it out, don't just sprinkle it on. Do this on a sheet of paper so you can save the excess glitter. Once the glue is dry shake off the excess glitter and pour it back into your container.
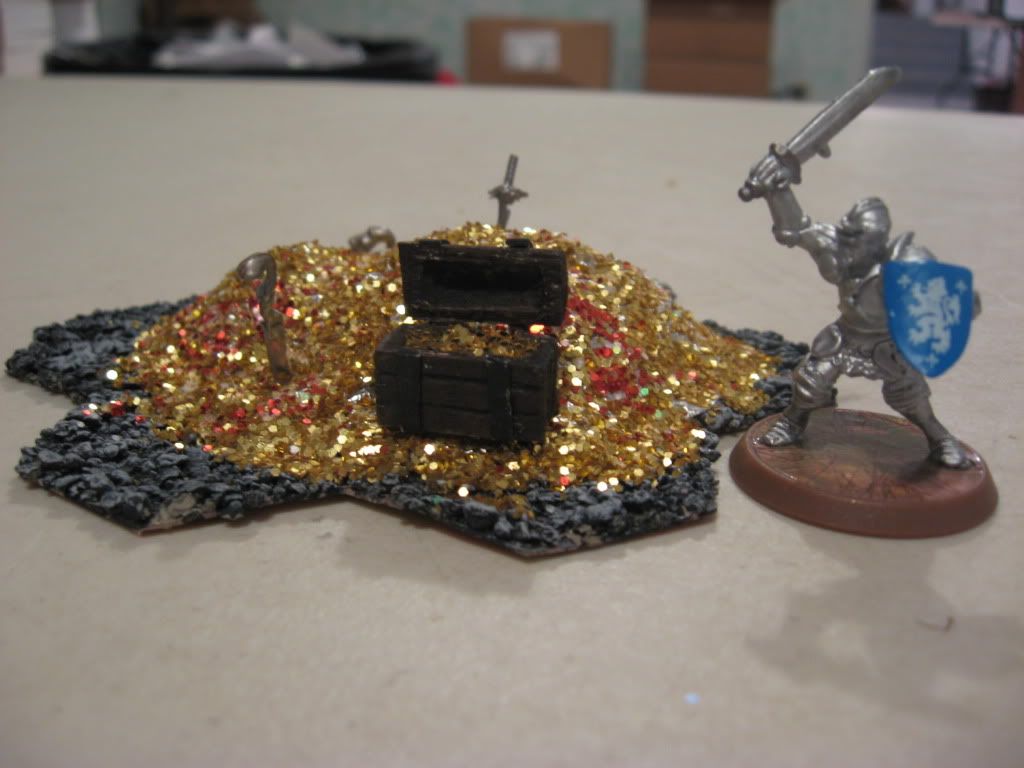
Voila- treasure pile.
You can add any "treasure-y" details that you want. For this tutorial I will add a sword and a treasure chest.


I had a Dreamblade fig called a Bladestrider that had legs that made excellent sword blades. Once the surgical amputation was performed I used a clipped off nail for the handle and hilt of the sword.

A little hot glue and a little paint and I had an ancient and valuable sword for my treasure collection.


For the treasure chest cut 5/8 inch pieces from the round and square dowels. Then, using a small hacksaw, cut the round piece in half for the lid of the chest.
Be very careful not to cut yourself!


Using a Dremel, or whatever carving tool you are using, carve planks into the sides of the chest and the top of the lid.
Again, be extremely careful! In fact, this is a picture of how NOT to do it. Hold the piece being carved with a pair of pliers. Coat both the chest and the lid with black paint. Once it is dry, dry brush brown onto both pieces.


For the "iron" bands paint the strips from the cereal box black. Spread some glue on them then, beginning from the back of the chest stretch the strip up and over the front. Make sure you have the lid on the chest before doing this.
Do not glue the lid onto the chest. Once the glue has dried cut the strip at the red lines. Cutting the top lines will enable you to open the chest. Cut only on the front or your lid will not be attached to your chest.

Fill the chest with white glue and liberally fill it with glitter. Once the glue is dry, shake off the excess and return it to its container. You now have a chest full of gold. You can either hot glue the chest to your treasure pile or leave it separate. I chose to leave mine separate so that I can use it by itself if the need arises.

There are all kinds of little details you can add. Golden urns, priceless books, magical armor, etc. Use your imagination and you may be surprised at the "treasure" of a piece you may be able to create.
I hope that this tutorial was at least a little helpful.
the whole project is actually very simple and can even be completed in one night. Good luck!


 March 25th, 2010, 12:39 AM

 Similar Threads


 or
or  . My apologies in advance for some of the fuzzy photos.


 Linear Mode
