
|
|
|||||||
| Custom Units & Army Cards Fan-created HS army cards for units, glyphs, and equipment |
 |
|
|
Thread Tools | Search this Thread | Display Modes |
|
|
|
#1
 June 20th, 2007, 10:28 AM
|
||||
|
||||
|
whitestuff's advanced gimpshop tutorial
I've been reading justjohn's tutorial and I was inspired to add to the collective knowledge of my fellow customizers by adding my own tutorial for using some of the more trickier parts of the GIMP.
Please note that I usually use Photoshop so there may be better ways to do things in the GIMP but everything I've done in this tutorial will work. If you follow the directions you will have success. I'll rely on justjohn for the links to what you need. Quote:
GreyOwl has some great customization tools here. I've tried to make everything make sense by adding pics along the way so I hope this is OK. I've never made a tutorial for others before so let's do this thing. Part One - Figure Preparation *EDIT* The Bezier tool is not destructive to your original picture, however, it can take longer to do. If you have no desire to use the Bezier Tool to prep your image, that is fine. Just use the eraser tool and work your way around the figure. If this is you, skip down to step 13. *EDIT* 1. Open your pic of the figure you wish to edit. 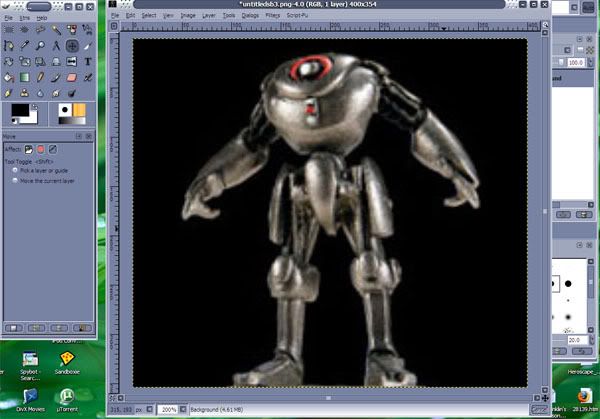 2. zoom in nice and close 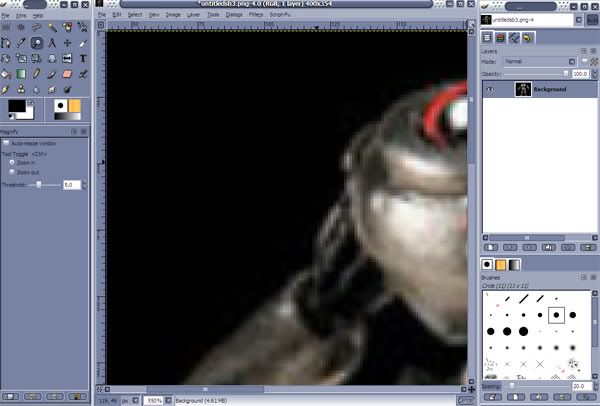 3. Chose the Bezier tool and make sure you select ‘design’  4. Work your way around the outside of your figure clicking and adding points as you go. Hold down the mouse button and you can drag the Bezier handle around to make curved lines. REMEMBER don’t freak out if the curve does not go exactly on the edge of the figure we will fix that later. 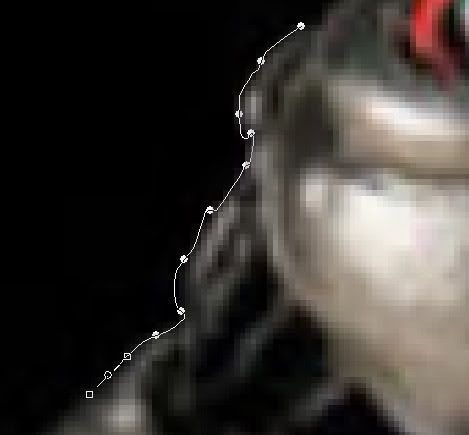 5. If as you are going you end up with a loop, I think it is easier to undo a bit and try again. You can fix loops but it is easier not to have to. 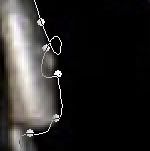 6. Once you have worked your way around to whole picture it is time to edit the Bezier path. 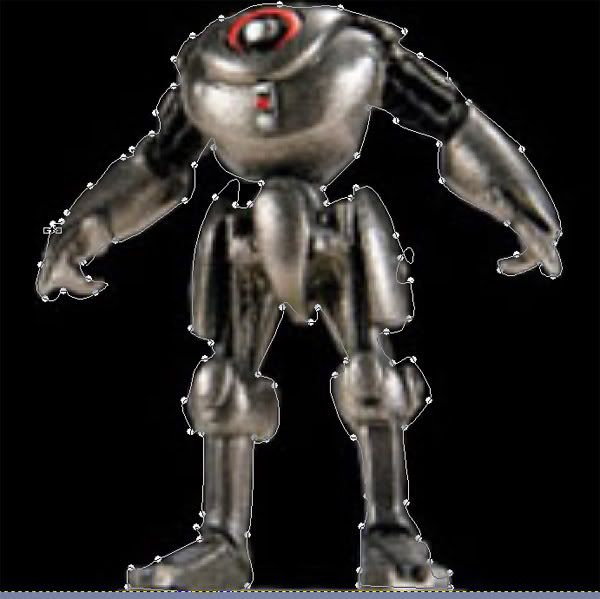 If you stay in ‘design mode’ you can click and hold on each part of the path to move pieces of the path (you can tell if you see the mouse icon change to the 4way arrow symbol as you point the mouse to the path. If you click without the 4way symbol then you will create new path points, which we do not really want). If you click on the points along the path you can see the Bezier handles (points along the path are circles whereas Bezier handles are little squares). Move the handles around to change the path. When your path follows the edge of your figure then you know you've go it right 7. Please note! You can change the Bezier tool into ‘edit mode’ if you want to. This means that when you click on the middle of a path it will create a new point along that path (which sometimes you might need to do). 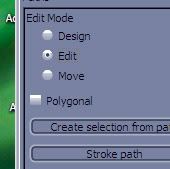 8. Fixing your Bezier path may feel fiddly but it will make you next part easier (and it gives it a better look IMHO because you can do away with halo problems) 9. Once you have edited the path, choose the ‘Create selection from path’ button. You will then see the marching ants around the figure. 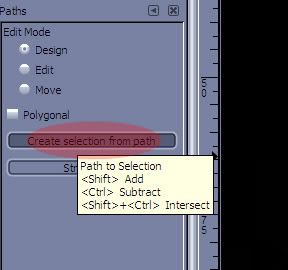 10. Now that you have a selection you want to go to ‘Layer’ along to top menu. Then to ‘Mask’ and then ‘Add Layer Mask’ 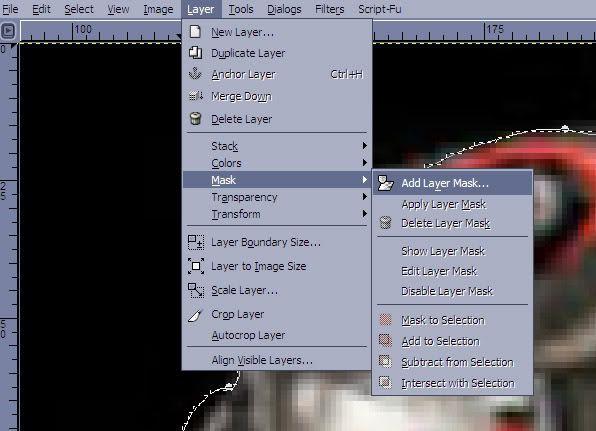 11. A dialog box will appear. In the ‘Initial Layer Mask to’ choose ‘Selection’. Then choose ‘OK’ 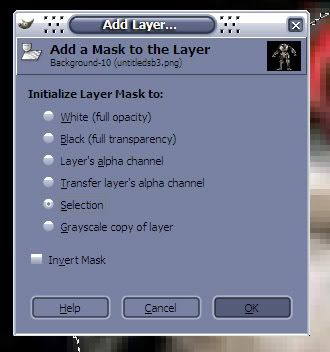 12. There you go. The figure with no more background. (please note that in my figure, I didn’t actually spend any time fixing the path. I normally use PS so I’ve done this process in PS for this figure already. I didn't really feel like redoing it. I redid quickly it in Gimp just to show you how it is done so I didn’t spend a lot of time editing it. Part Two - The Figure Onto The Card 13. Now open your blank Heroscape general card but don’t close your figure yet. 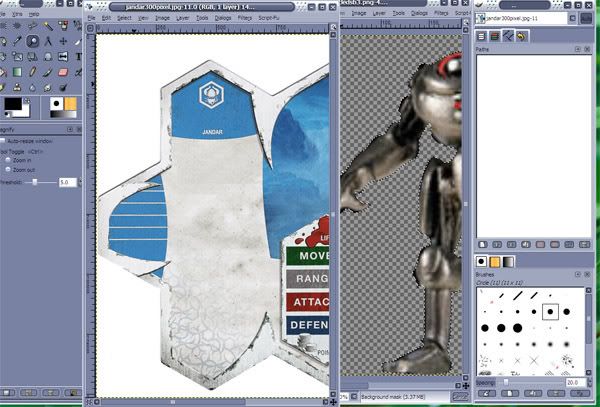 Save the card by choosing ‘File’ above your picture, not above the tools. Choose ‘Save as’ and when the dialog box appears choose a new name for your card. 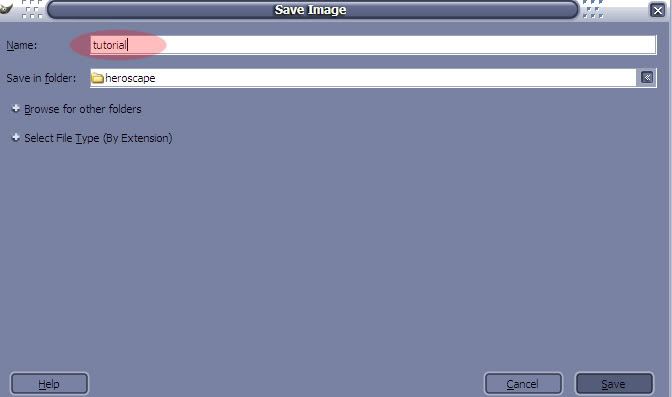 Then click the ‘Select File Type’ plus icon 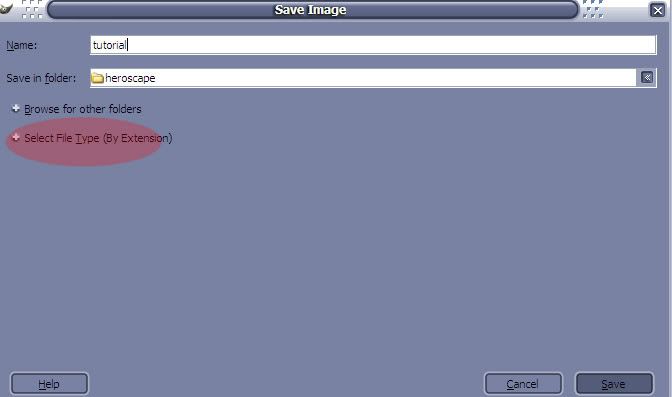 and choose the ‘GIMP XCF Image’ and then click ‘Save’. 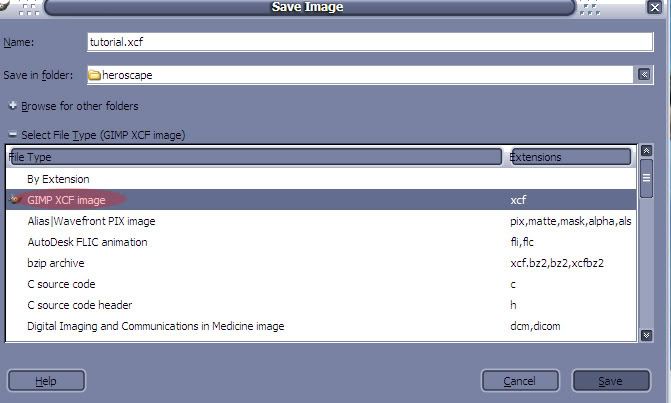 You probably should do this process for your figure image which is still open as well. Saving it in the XCF image format means that it will retain your layer information. 14. Right click on your figure and choose ‘Edit’ then ‘Copy Visible’ 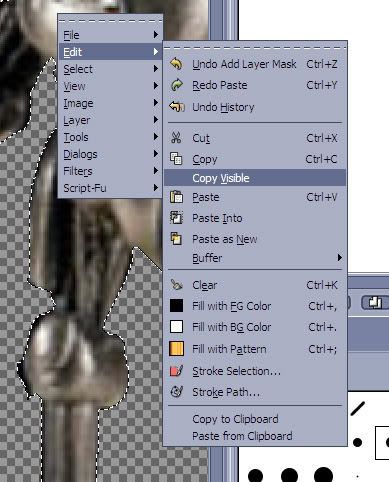 15. Go to your Heroscape card and right click and choose ‘Edit’ then ‘Paste Into’. You will see you figure on the card. 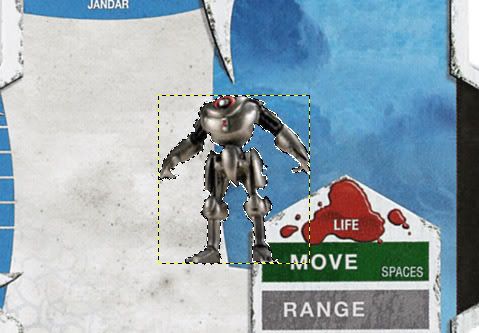 16. You will notice that a new ‘Floating Section’ layer has been added to your image layers (which can be found in the right hand floating window). 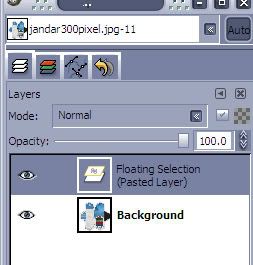 You need to right click on the ‘Floating Section’ and choose ‘New Layer’. 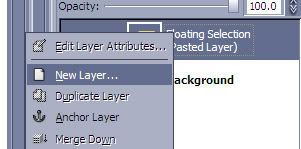 17. The layer name will change to ‘Pasted Layer’ 18. Choose the 4way move tool and you can move the figure around. 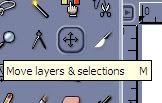 19. If your figure is not the right size (as mine is far too small) right click on the ‘Pasted Layer’ layer and choose ‘Scale Layer’. 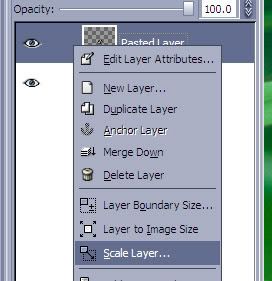 A new dialog box will appear. 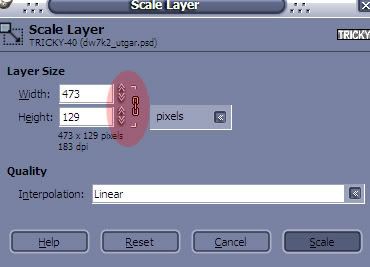 20. Grab an edge of the figurine image and drag it to a size that looks good, then click "Scale" on the dialog box. Alternatively you can increase the size of the image by clicking on the up or down arrows. The Gimp will not let you preview your change before you do it so this will probably take a couple of tries to get absolutely right. (The gimp automatically links the width and the height but you can stop that by clicking on the little chain icon nearby) 21. Once you have you figure the right size and in the right place, you are ready for the next step. 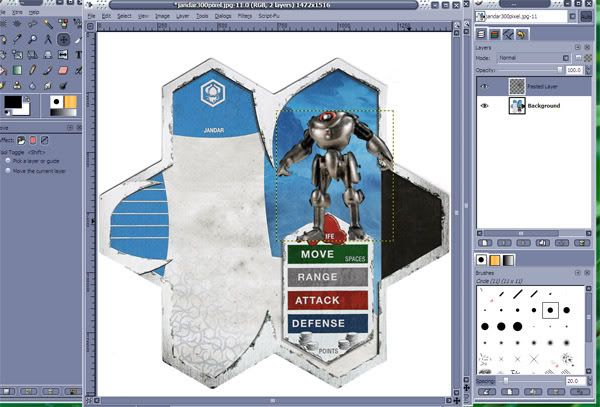 Please note that the figures arm and feet are still hanging over but we will fix this soon Part Three - Fog Me! 22. Now for the fogging effect! 23. Right click on the ‘Pasted Layer’ and choose ‘Add Layer Mask’. This time when the dialog box appears choose ‘White (Full Opacity)’ under the ‘Initialize Layer Mask to’ section and then choose ‘OK’.  24. You will see that a new box has appeared in the ‘Pasted Layer’ layer. It should be black with a white square. 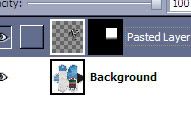 25. Choose the gradient tool on the left hand side. 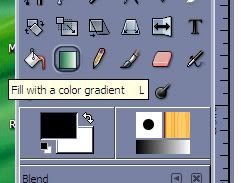 26. Starting down near the figures feet, click and hold the left mouse button as you draw upwards (only for about 1 cm or so) and then let go of the mouse button. 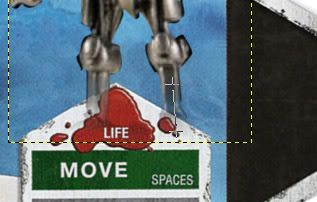 Stupid print screen never shows you mouse pointer but you can still see the faint line on the figure's legs 27. You should see that the figures feet have the fogging effect applied to them. If you don’t like the distance of the fogging, just click and drag upwards again as the mask will reapply each time you do it. If you only drag a short way the fogging effect will happen very quickly. The longer the long you click and drag out, the more gradual the fogging effect. (the picture shows me reapplying the mask for a second time so that you can see the fogging behind it) Part Four - Tidy & Targeting 28. Now that you have the figure where you want it and the fogging just right, it is a simple job to tidy up the figure. 29. Left click on the checker boarded square in the ‘Pasted Layer’ layer. You will know that you have selected it if it has a thin white square around the outside. 30. Then choose the eraser. 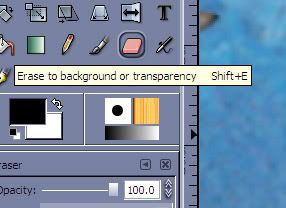 31. Make sure that the ‘Fade Out’ Box is not ticked and then you can erase the parts of the figure that you don’t want to be able to see. 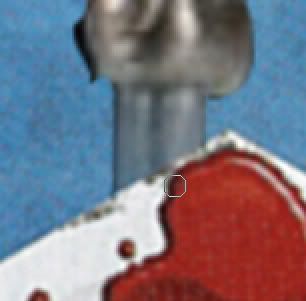 32. A nifty trick for straight lines is to left click once at the start of where you want to erase and then hold down ‘Shift’ and then left click where you want to finish erasing. 33. Don’t forget the right hand side of the figure as well. 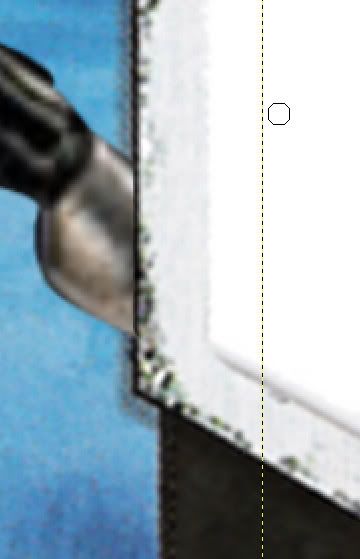 34. Now to make the targeting silhouette. 35. Go back to your original figure and make a new layer. 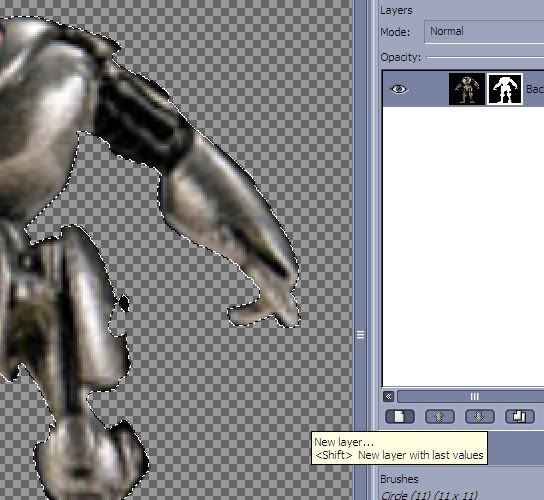 36. In the dialog box that appears you can change the layer name (if you want) but it should default to the right size so you shouldn’t need to change it. Make sure the ‘Layer Fill Type’ is set to ‘Transparency’ and click ‘OK’. 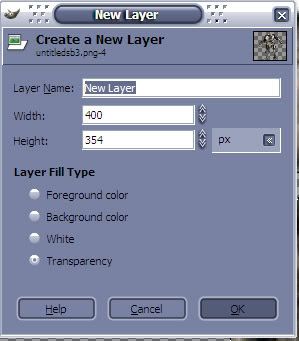 37. Click on the new layer. Above the layer you can see a slider titled ‘Opacity’. Slide that down to about 40 -50. 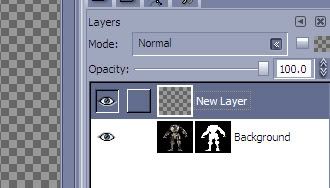 38. Choose the paint brush tool from the left hand side. 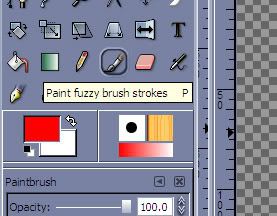 39. Double click on the top rectangle of colour to get the dialog box to change the colour. The red is R255 G0 B0. The green is R0 G255 B0. The grey is R125 G125 B125. 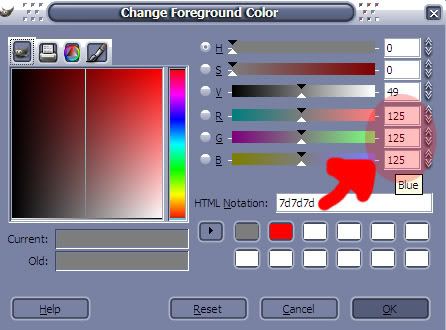 40. Paint over the figure in the new layer. The opacity means that you can see through the layer to make sure you get the colors in the right place. 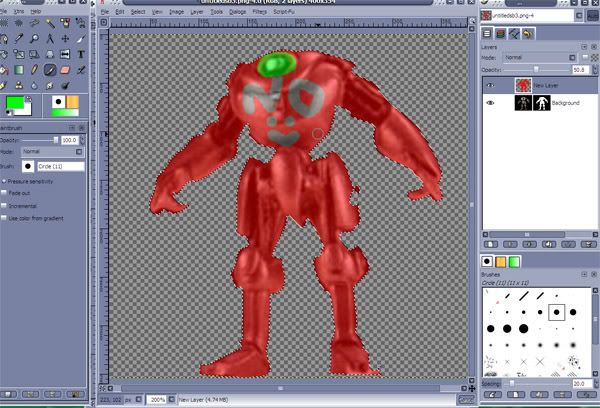 41. When you are happy with the targeting silhouette, slide the opacity back to 100%. 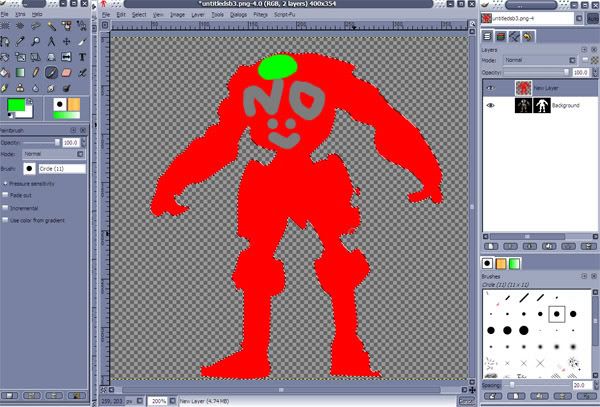 42. Copy the layer into your Heroscape card, changing the size and position. (If you’ve forgotten, follow steps 14 to 20) 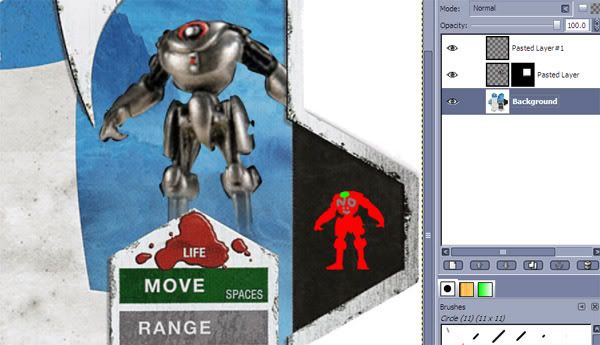 Part Five - Texting 43. Now add a new layer for every piece of text on the card. “Why add so many layers?”, I hear you ask. Well you only need to do this once because every card you make from now on can use this same template. (at least that’s what I do). Use your Arial Narrow Condensed Font *EDIT* The official font is Helvetica Neue LT but this is a font you'd have to buy so purchase it if you've got the cash, if not Arial Narrow Condensed will do in a pinch* and away you go. Another good thing about layers is that you can move them to exactly where you what them. 44. Work your way through the text layers and you’ll be finished lickity-split. 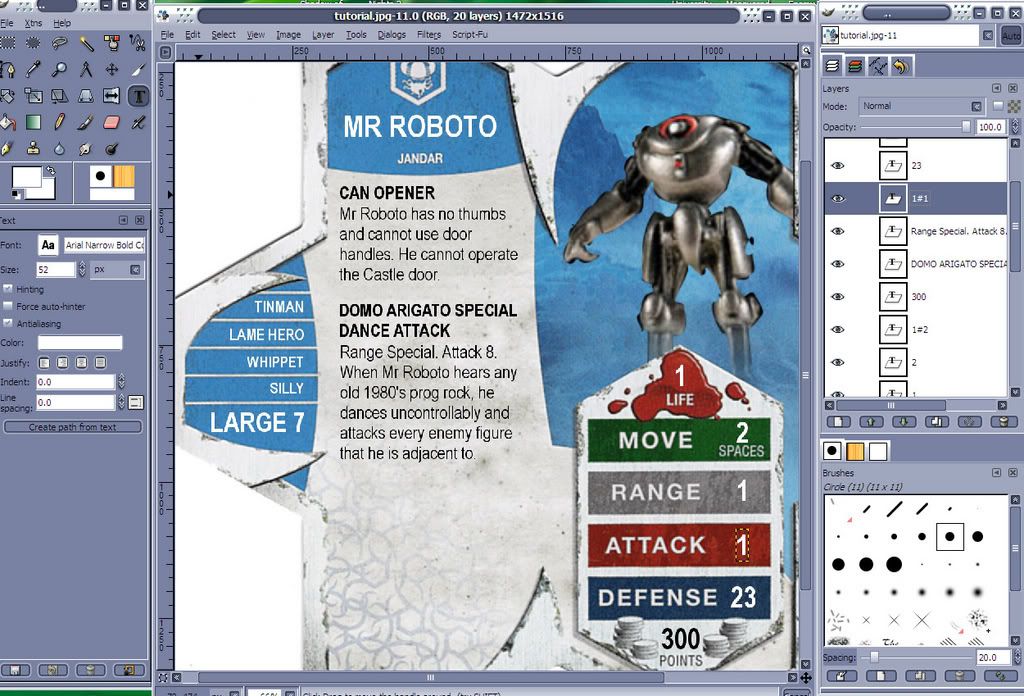 45. SAVE EVERYTHING IN THE XCF FILE FORMAT TO RETAIN ALL OF YOUR WORK IN LAYERS! You need to do this if you think you might ever want to go back and change anything on the card. 46. When you have saved the file as a XCF file, choose ‘File’, ‘Save As’ and then choose ‘JPEG’. 47. When GIMP has a fit about transparences, choose ‘Export’, pick a quality level on the slider and choose ‘OK’. 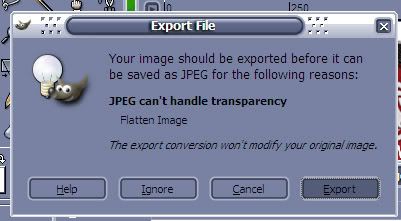 48. I think I am DONE!! When you print your custom cards, use 4.85 inches (123mm) for the width setting and 4.58 inches (116mm) for the height setting There you go. Get rid of HCC. You just don't need it any more. (plus I think that the text always looks a bit funny on cards made in HCC - don't get me wrong though, HCC is good for what it does You just don't need it any more Last note - it was very late over here by the time I finished so if there are any mistakes just let me know and I'll get around to fixing them sometime in the morning **UPDATE** hidicul just gave this little hint... Quote:
Last edited by whitestuff; July 9th, 2010 at 03:50 AM. 
|
|
#2
June 20th, 2007, 11:10 AM
|
||||
|
||||
|
WOW! Great effort Whitestuff. Good on you!
|
|
#3
June 20th, 2007, 11:32 AM
|
||||
|
||||
|
Seriously, what devotion! Now I know how to use a new program when I leave the university computers! (They have photoshop on them), Of course...that would mean buying my OWN computer.....hrrhmmm
|
|
#4
June 20th, 2007, 03:24 PM
|
||||
|
||||
|
Great tutorial! I just went through and made this with it:
 I didn't really want to go around all those nooks and crannies with the bezier tool so I just fuzzy selected the white and clear it. 6 x 9 = 42  
|
|
#5
June 20th, 2007, 05:58 PM
|
||||
|
||||
|
Quote:
I'd agree that using the bezier tool is fiddly, especially for small pictures, but I find it much better when I work with really big images. I guess that I like that the bezier way is nondestructive of the original picture.
|
|
#6
June 22nd, 2007, 02:58 AM
|
||||
|
||||
|
Doh!!! Wish I had seen this before I made my first customs. Now I have an uncontrollable desire to redo them.
|
|
#7
June 22nd, 2007, 08:04 AM
|
||||
|
||||
|
Quote:
|
|
#8
July 23rd, 2007, 09:22 AM
|
||||
|
||||
|
Hey is there ant way to save a card with all its layers? When you save it as a .jpg all the layers are condensed and it becomes a pain in the butt to edit.
Feedback: We could all use a little more
|
|
#9
July 23rd, 2007, 09:27 AM
|
||||
|
||||
|
Quote:
|
|
#10
July 23rd, 2007, 09:30 AM
|
||||
|
||||
|
Quote:
Feedback: We could all use a little more
|
|
#11
July 23rd, 2007, 09:40 AM
|
||||
|
||||
|
Quote:
|
|
#12
October 10th, 2007, 05:21 PM
|
||||
|
||||
|
Giving this topic a well deserved BUMP, and asking a question at the same time!
Now, I have GIMP, but nooe of those other window kinda things, like the mini-layer mabob. So I don't know how to alter opacity, or change layers, or even know which layer is which. Are those in a different version I can download? Is it a PC/Mac thing? Am I just incompetent? Or do you have no idea whatsoever? JOHNNY139'S CLASSIC CUSTOM THREAD! | Visit now!
|
|
|
|||||||
|
|


 Hybrid Mode