
|
|
|||||||
| Maps & Scenarios Battlegrounds and scenarios |
 |
|
|
Thread Tools | Search this Thread | Display Modes |
|
#1
 October 18th, 2007, 10:22 AM
|
||||
|
||||
|
Ugly-Caco's ---> FORTRESSBORGATRON
Click the Virtualscape 3D photo to download map.
Please drop some comments and suggestions. Thanks! --------------------------------------------------------------------------------------------------------------------- Fortressborgatron    Cyberclaw God All enemy figures within 3 spaces from Fortressborgatron are all clawed to death. Put as many wound markers as you can on the cards of the figures that are affected. Don't stop and keep piling the wound markers till the cards are invisible. ------------------------------------------------------------------------------------------------------------------------------------------------------------------- Stump of the Smote Citadel (Click image below to download map)   Map Features: 1. Though all FOTA walls were used, the highest level is level-10 which is 9 levels from level 1. No +2 attack to height advantage. 2. Double-space figure friendly as most of my maps are. ------------------------------------------------------------------------------------------------------------------------------------------------------------------- Hallow Soil Crown (Click image below to download map)   Scenario: Pests and Peasants Team 1: Protect the peasants (Tarn Vikings) and kill all the pests (Deathreavers). Team 2: Protect the pests and kill all peasants. Setup: Shuffle glyphs of Gerda and Astrid and place them symbol side up in designated places (do the same with glyphs of Erland and Kelda). Before placing army figures on starting areas, Team 1 may place 1 squad of Tarn Vikings (peasants) anywhere in the map as Team 2 places 1 squad Deathreavers (Pests) anywhere in the map. Pests and peasants are none playable figures. They are not included in any army (do not count their army points in drafting). ------------------------------------------------------------------------------------------------------------------------------------------------------------------- Ramshackle Castle of Border Colder (Click image below to download map)  Version 2: Ramshackle Castle of the Warm (Click image below to download map)  Strictly 1 ROTV, 1 RTTFF, 1 TT, 1 VW. ------------------------------------------------------------------------------------------------------------------------------------------------------------------- Splitting Rock of Sikovsnow (Click image below to download map)   ------------------------------------------------------------------------------------------------------------------------------------------------------------------- Map Name: Lapaz Bridge (Click image below to download map.)    Scenarios: Activate Brandar Device Victory conditions: If a player occupies all 2 Glyphs of Brandar or destroys all opponent figures, that player wins. Starting areas: Player 1 = Green Player 2 = Yellow Special rules: No flying, and no AE air drop. Brothers Divide Set up: Place Finn and Thorgrim on the sand tiles where the Orange starting points are. Goals: Player 1 or Team 1, protect Finn and kill Thorgrim. Player 2 or Team 2, protect Thorgrim and kill Finn. Victory conditions: If Finn dies, Team 2 wins. If Thorgrim dies, Team 1 wins. If a team destroys all opposing team's figures, that team wins. Starting areas: 4 Players Team 1: Player 1 = Green Player 2 = Red Team 2: Player 3 = Yellow Player 4 = Blue Special rules: No flying, and no AE air drop. Finn and Thorgrim are not playable figures and their auras are negated. ------------------------------------------------------------------------------------------------------------------------------------------------------------------- Map name: Remnant Walls (Click image below to download map.)  Earlier version:  Scenario: Skirmish for the Raiders Opposing forces found themselves in the middle of an abandoned and almost wall-less fortress (except for the remaining east and west walls). Goal: Destroy all enemy units! Glyph of Brandar Mass Teleportation: After stopping on the Glyph of Brandar, make sure that no unit is on the other Glyph of Brandar. If there is none, then roll D20. If you roll 1-10, nothing happens. If you roll 11-19, the unit occupying the glyph and all allied adjacent units will be teleported to the other Glyph of Brandar and to the adjacent water tiles. Adjacent units may not be teleported if the adjacent water tiles on the other side are occupied. Those that cannot be teleported will stay put. If you roll 20, take another turn with the hero or squad after they were teleported.[/quote] ------------------------------------------------------------------------------------------------------------------------------------------------------------------- Map Name: CASOULBORG Arise (Click image below to download map.)   Scenario: Casoulborg Arise With Jandar's castle, Ullar's magical enhancements, and Vydar's technology...CASOULBORG was created! Team 1 starting area: Blue Team 2 starting area: Yellow Team 1 goal: Defend CASOULBORG. Team 2 goal: Destroy CASOULBORG before it is fully operational. CASOULBORG has indestructible armor except for it's abdominal area. Destroy the castle door. Victory conditions: After round X (suggested rounds: 5-7) and the castle door is not destroyed, Team 1 wins--CASOULBORG will be operational and will annihilate Team 2. If the castle door is destroyed before or during round X, Team 2 wins. Special Rules: 1. Team 1 (defending team) may not draft the AE. 2. Glyph of Brandar gives +1 attack against the castle door for all allied units. 3. The castle door is the basis for CASOULBORG's elevation. CASOULBORG Operational (Optional Scenario): After round 5 and the castle door is not destroyed, and Team 1 still has at least 1 figure, CASOULBORG may attack any figure within 24 spaces. Roll 12 attack dice against figures within LOS, and 8 attack dice for figures that aren't within LOS (these are all special attacks). CASOULBORG may attack after every player's turn. From round 6 to exceeding rounds, regardless of Team 1’s remaining figures (many, few or none), as long as CASOULBORG is not destroyed, CASOULBORG may continue to attack until all of Team 2’s figures are destroyed. Victory conditions: Team 1 wins if all of Team 2’s figures are destroyed. Team 2 wins if all of Team 1’s figures are destroyed before the end of round 5. Team 2 wins if Casoulborg is destroyed. 2 Players Player 1: 350 points Player 2: 500 5 rounds 3 Players Player 1: 600 points Attackers- Player 2 and Player 3: 400 points each 5 rounds 4 players: 2 on 2 Team 1: 300 points each Team 2: 400 points each 6-7 rounds ------------------------------------------------------------------------------------------------------------------------------------------------------------------- Map Name: Monkey Infestation (Click image below to download map)  Though Area 1 is small, players will have a hard time killing or sighting other enemy units.  Scenario: Fur Is Murder Goal: Kill 2 Dzu-Tehs and skin their fur off of them by stepping on the Glyphs of Brandar or Glyph of Kelda. Victory Conditions: The player who gets 2 Dzu-Teh furs wins. Or the player who kills all opponent's figures wins. Setup: Put each of the Dzu-Tehs on top of the Glyphs of Brandar and Kelda. Starting Area: Player 1 = Red Player 2 = Yellow Special rules: 1. No flying 2. No grappling guns. 3. The scenario Dzu-Tehs are neutral creeps. They will automatically attack any adjacent attacking figure (after the attacker's turn). The player who didn't attack the attacked Dzu-Teh for the turn, will roll the defense dice then the attack dice for that Dzu Teh. If the Dzu-Teh is engage with 2 or more attackers, the roller chooses which figure to attack. Scenario Dzu-Teh's may not be moved. Dzu-Tehs can't do anything about range attackers except to defend. 4. If a player drafted a Dzu-Teh squad, that player's Dzu-Tehs may not attack the scenario Dzu-Tehs. 5. Slippery ice...light snow. Water portals: All symbol side up glyphs are water portals. The moment a figure steps on them that figure will be teleported to any water portal in Area 1 and Area 2. No figure may move pass it without being teleported. Place teleported figure on any water portal of your choosing. ------------------------------------------------------------------------------------------------------------------------------------------------------------------- Map Name: Idolater's Ruins Click image below to download map.   Ladder engagements...  Note: This map has many map building violations such as stacking a ladder above an ice tile and fastening ladders on walls without a wall walk on top. Consider the walls as custom LOS blockers. This map will make range units cry. Scenarios: Idolater's Ruins Setup: Shuffle the +1 attack and +1 defense glyphs and place them symbols side up to where you can see it in the photos. Special rules: Heavy Snow. Goal: Kill all your opponent's figures. Harvest the Neutral Setup: Put Finn and Throgrim on the blue starting areas. Special rules: Heavy Snow. The Viking heroes: 1. All units are affected by Finn and Thorgrim's auras. 2. Yes you may attack them. 3. The opposing player will roll for defense for Finn and Thorgrim. 4. The player who kills them may put the killed figure on any of his/her cards (read Finn and Thorgrim's cards). Goal: Kill all enemy units. ------------------------------------------------------------------------------------------------------------------------------------------------------------------- Glyphs- I shuffle the glyphs with their counterparts (or almost counterparts) and put them symbols side up on their mirror hexes (if the map is symmetrical or almost symmetrical). Glyph counterparts: +1 attack glyph and +1 defense glyph +4 range glyph and +8 initiative glyph Glyph of Kelda and Glyph of Massive Curse (Special rule: only wounded heroes can stop on these glyphs and flip it to activate). ------------------------------------------------------------------------------------------------------------------------------------------------------------------- Thanks for checking my maps! Please leave some comments and suggestions! 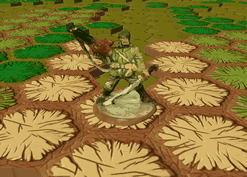 
Last edited by Ugly-Caco; July 2nd, 2008 at 03:32 AM. 
|
|
#2
October 18th, 2007, 10:26 AM
|
||||
|
||||
|
Sweet, though I like those bigger maps, and I only have 1 MS.
Where did you take the pic, nice background for a map with ice.
|
|
#5
October 18th, 2007, 02:57 PM
|
|||
|
|||
|
Quote:
"We are all mad here" ~Cheshire Cat It is the domain of a geek to seek out meaning in that which seems trivial... http://www.youtube.com/watch?v=doWOd...elated&search=
|
|
#6
October 18th, 2007, 04:34 PM
|
||||
|
||||
|
Nice maps, Ugly-Caco. I like the bridge the best. It does appear to be arched and there looks to be enough clearance for medium sized figures to travel beneath. Are the two road tiles at the ends of the bridge part of the starting zones?
|
|
#7
October 19th, 2007, 12:56 PM
|
||||
|
||||
|
Quote:
I shot this on our Patio where we play when the weather is fine. Quote:
|
|
#8
October 19th, 2007, 01:07 PM
|
||||
|
||||
|
Well done with just one set!
Arena of the Valkyire - Help create Heroscape's next Master Set! Trade List C3V Brainstorm never not funny Pepperony - 14/09/13
|
|
#9
October 19th, 2007, 01:39 PM
|
||||
|
||||
|
I seriously like your yard more than your maps. No offense to your map-building skills, but your yard is so cool.
Dan's Mom: "Why you persist in acting like a fifteen year old is beyond me." Dan: "I'm filled with reckless desire."
|
|
#10
October 21st, 2007, 03:55 AM
|
||||
|
||||
|
Quote:
|
|
#11
October 21st, 2007, 10:05 AM
|
||||
|
||||
|
HA! Casoulborg is great!! Is the terrain mobile at all? I'm thinking instead of automatically losing, it would be really funny if the castle had some kind of ridiculous attack(s) and you could actually take control of him.
|| My Maps Review Blog || My Maps Thread || My Marvel Customs || Knights of the Daystorm || [/CENTER]
|
|
#12
October 21st, 2007, 10:11 AM
|
||||
|
||||
|
Velenne, that'd be hillarious! Death on a MASSIVE scale, babies!
And that Casoulborg is amazing! How many tiles did it take to make that? The user formerly known as Bloody the Marro Stinger!
|
|
|
|||||||
|
|


 Linear Mode
