
|
|
|||||||
| Custom Units & Army Cards Fan-created HS army cards for units, glyphs, and equipment |
 |
|
|
Thread Tools | Search this Thread | Display Modes |
|
#349
 May 26th, 2021, 01:42 PM
|
||||
|
||||
|
Re: TAF's Customs - RETURN OF THE KING: SCOURING OF THE SHIR
A few patch notes, based either on feedback or my own thoughts:
Sam: Samwise The Brave power now includes a clause that Sam cannot attack Frodo Baggins, to avoid easy access to wounding and thematic weirdness. Uruk-Hai Scouts: As per Astroking's suggestion, Abduct no longer prevents Small figures from attacking, although affected figures now roll 2 fewer attack dice making it very difficult to kill the Uruks. Soldiers of Gondor: Braced Spear 16 has been replaced with Spear Wall 18, a similar power that requires at least one adjacent Soldier of Gondor and also receives a bonus to the roll the more soldiers are clustered together. This prevents spreading out troops to cover a ton of ground with Braced Spear, which would likely be unfair with such inexpensive units. Andúril: Andúril's bonus now only applies if Aragorn is engaged, to prevent the oddity of the sword making his bow stronger. Feel free to leave any feedback, should any unit feel too strong, too weak, powers need more clarification, etc. ~TAF  TAF was the Storyteller... TAF was the Storyteller... in THE ENEMY'S LAST RETREAT 
|
|
#350
June 6th, 2021, 11:38 PM
|
|||
|
|||
|
Re: TAF's Customs - RETURN OF THE KING: SCOURING OF THE SHIR
I'm impressed by your dedication in making such a comprehensive set of Lord of the Rings customs; I've read the entire trilogy and watched all of Peter Jackson's films, and I didn't remember many of these characters. I'm also interested in learning where you found the sculpts for these units.
Special credit goes to Lord Denethor, as I think that his powers and stats represent such a selfish, traitorous, and self-destructive character in a fun and unique way. If I may raise a thematic issue, though, I don't really know why Steward of Gondor would prevent Gondor's warriors from defending themselves if Denethor were to directly attack them. Thus, I would suggest changing the power's text to say "If Lord Denethor has not attacked a figure your opponent controls during this game, figures your opponent controls who follow Einar cannot target Denethor with any attacks or leaving engagement attacks."
|
|
#351
June 6th, 2021, 11:56 PM
|
||||
|
||||
|
Re: TAF's Customs - RETURN OF THE KING: SCOURING OF THE SHIR
Again, these are just amazing!
Any plans for Hobbit stuff down the road?
|
|
#352
June 7th, 2021, 02:56 PM
|
||||
|
||||
|
Re: TAF's Customs - RETURN OF THE KING: SCOURING OF THE SHIR
Thank you for the feedback!
Quote:
  Quote:
I'd be more likely to make more LotR units that I didn't get around to, like Beregrond or Elrond's sons or Arwen.  ~TAF TAF was the Storyteller... in THE ENEMY'S LAST RETREAT
|
|
#353
August 24th, 2021, 09:26 PM
|
|||
|
|||
|
Re: TAF's Customs - RETURN OF THE KING: SCOURING OF THE SHIR
610 points
Map: ZEPHYR Glyph: Wannok Army 1 (Western Start Zone): Talingul, Avernus, Boreos, Lilja, Phantom Knights x2 Army 2 (Eastern Start Zone): Adeptus Ruststalkers x3, Microcorp Troopers x3 (sat one Trooper), Patrick Ferguson Survivors: 6 Microcorp Troopers Patrick Ferguson Summary:
Spoiler Alert!
Power Usage: TRANSONIC BLADES: not applicable to this matchup. COVERT: never used; Talingul, the only opposing figure with sufficient range to activate the power, did not attack this game. STEALTH VAULT 15: used at every opportunity; the Ruststalkers traversed the hilly/obstacle-rich north with ease, bypassed swamp water near their start zone, and disengaged from Lilja to (unsuccessfully) attack Talingul. Moreover, the power allowed the Ruststalkers to lessen the impact of Boreos's Swirling Vortex. Normal Attack: used on seven turns; dealt five wounds to Talingul, dealt one wound to Avernus, and single-handedly destroyed Boreos, Lilja, and one Phantom Knight. Comments:
Spoiler Alert!
----------------------------------------- 640 points Map: HIGHWAYS AND DIEWAYS Glyphs: Dagmar (north), Wannok (south) Army 1 (Western Start Zone): Wildwood Monarch, Wildwood Sentinel x2, Wildwood Runner x3, Azazel the Kyrie Warrior Army 2 (Eastern Start Zone): Adeptus Ruststalkers x3, Hercules, Krav Maga Agents, Isamu Survivors: 1 Adeptus Ruststalker 2 Krav Maga Agents Isamu Summary:
Spoiler Alert!
Power Usage: TRANSONIC BLADES: not applicable to this game. COVERT: not applicable to this game. STEALTH VAULT 15: used before every movement. The Ruststalkers were able to Vault onto road tiles from their start zone and then enjoy an entire road-boosted movement, giving them an effective Move value of 10. The power also allowed the Ruststalkers to bypass the water moats at the edges of both start zones and pass over a ruin to attack Wildwood Runners. Normal Attack: used on six turns; dealt 4 wounds to Azazel, destroyed 4 Runners. Comments:
Spoiler Alert!
----------------------------------------- 480 points Map: BAD MOON RISING Glyphs: Kelda (North), Dagmar (South) Army 1 (Southwestern Start Zone): Sacred Band x3 (sat one member), 10th Regiment of Foot x3, Marcus Decimus Gallus Army 2 (Northeastern Start Zone): Adeptus Ruststalkers x2, Ashigaru Harquebus x3, Raelin Survivors: MDG 2 Sacred Band soldiers 3 10th Reg. soldiers Summary:
Spoiler Alert!
Power Usage: TRANSONIC BLADES: used on many attacks; ignored the Sacred Band's Disciplined Army Defense Bonus and the 10th Reg.'s Melee Defense 1 powers to great effect. COVERT: forced 10th Regiment to forego Wait Then Fire on two turns, contributing to several Ruststalkers' survival. STEALTH VAULT 15: used whenever possible; leapt over heights and obstacles to continuously attack the MDG/10th Reg. pod and prevent the curtains of squaddies from closing after opening a hole; bypassed battlements and water-related climbing when leaving their start zone. Normal Attack: used on seven turns; destroyed four 10th Reg. soldiers and two Sacred Band soldiers and dealt five wounds to MDG. Comments:
Spoiler Alert!
------------------------ Final Thoughts: The Adeptus Ruststalkers strongly reminded me of the Buccaneers of Tortuga, another dedicated hero-killing squad with an anti-range defense, the ability to slip through screens, and the potential to toss around four attacks of 4 dice against cheerleaders and bonding targets. I would consider the defensive and disengaging benefits of Covert/Elusive and Stealth Vault 15/Disengage fair trades, as they give each unit advantages at different ranges and against different formations; the Ruststalkers are harder to harass as they move in without sacrificing positioning and can clear screens and blockers with ease, but they can't protect themselves once they engage a figure and they can only avoid LEAs at the start of their movement. Therefore, the Ruststalkers' higher price tag10 points more per figurepays for superior mobility, constant access to an Attack value of 4, higher durability, and the powerful Transonic Blades power, which allows them to more effectively fight their way to a protected figure. Moreover, the Ruststalkers proved to be incredibly consistent, mauling their intended targets whenever they hit the board; this is a very valuable quality that justifies their high cost and certainly merits a high power ranking. Nevertheless, this cost ultimately keeps the Ruststalkers from dominating the draft pool. The sweetspot for Ruststalkers seemed to be three squads, but this leads to major sacrifices in army composition at lower point totals; returning to the Buccaneer comparison, I could draft three squads of Bucks and Isamu for the same cost as two squads of Ruststalkers and have a perfectly fine assassin unit with a cleanup figure to boot. This means the Ruststalkers are more of a premium option suited for point totals at which their price tag doesn't hurt one's ability to build a balanced army as significantly. Furthermore, their high price per figure means the Ruststalkers suffer whenever they must expect to trade multiple figures (such as when fighting massed commons), face a unit that can revive itself (such as the Wildwoods), or take out many figures instead of a select Hero or two, and they seem to falter when attacking something with more than 3 Defense, as their blazing offensive is slowed to a more manageable level. Map layout was also important to the Ruststalkers' success. Clever use of obstacles such as ruins or rock outcrops can deny the Ruststalkers their full four attacks per turn, especially when combined with clustered unit placement; the Ruststalkers can Vault over many screens, but they can't bypass a solid mass. Theoretically, this would make dragons good partners, but the combination eats up a great sum of points. Also, I really can't overstate how nice Stealth Vault is on maps with road near the start zones; the power's activation timing allows the Ruststalkers to start their normal move on the road and move 10 spaces while ignoring elevations, a great boon whether securing the first strike or sending in reinforcements. All in all, I did not find the Ruststalkers excessively powerful. I could see them costing about 10 more points per squad if you really want to make a change, and I would happily draft them still at those numbers. However, I should mention that I would also be willing to use the Ruststalkers as a unique squad or as an 80-to-90-point three-man squad, so take that as you may.
|
|
#354
September 24th, 2021, 02:10 PM
|
||||
|
||||
|
Re: TAF's Customs DWARVEN GUNNERS
Hello all. Conversation on a recent thread for making Mok's gunners more viable gave me an idea. Instead of making gunner dwarves who were more inexpensive and efficient, what about going in the complete opposite direction with pricier specialized gunners who give Mok different weapons? As such I've whipped up some dwarven engineers, each giving Mok a special version of his Dwarven Gunners Special Attack.
 Androvil Keghead turns one of Mok's guns into an Explosion Special Attack capable of killing several clustered units at once. Combined with Mok's axe and another Gunner shot, it enables the giant to potentially kill scores of units in a single turn. The tradeoff is that it's only an explosion of 2 Attack dice, which anyone who's played the Airborne Elite can tell you is rather inconsistent.  On Valhalla he leads Axegrinders into battle using this technology, though it can pose harm to both himself and his allies. Marbis Benthammer is the least expensive of the four engineers, only a few points more than a singe Axegrinder. His Ricochet shot is however pretty solid: the same as the normal Gunner shot save for when it injures something it bounces to another target, potentially wounding two foes at once. 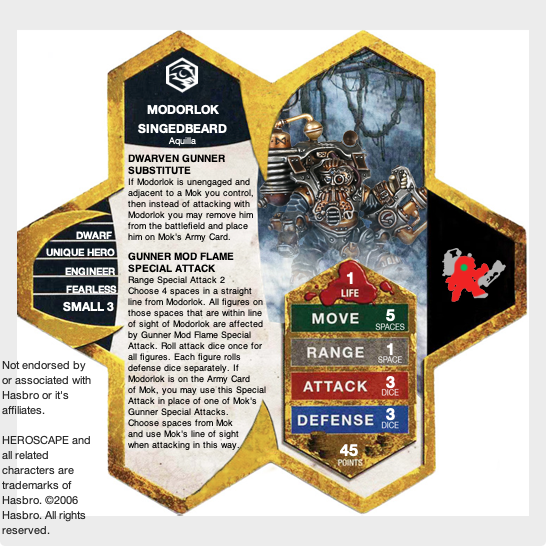 Modorlok Singedbeard turns one of Mok's guns into a four-space flamethrower similar to the Fire Line Special Attack. This makes it capable of hitting up to four units in a single burst. Similar to the explosion it reduces the attack from 3 to 2.  Reyaki Singedbeard turns Mok's gun into a long range Mortar capable of firing over walls and ignoring height advantage. It's only really reliable when the giant is standing still to keep the gun steady, but when that's the case it has impressive range. If Mok is standing still while in the thick of fighting the mortar can easily target far-off cheerleaders and other valuable targets. The mods are powerful but the heroes are still susceptible to Gunner Casualties. It may be best to use one special engineer at a time for Mok, as they and one Axegrinder can load in at once via Dwarven Strategic Bonding. Are they too expensive, too powerful, too complicated, or just right? Should the dwarves be able to use their SAs themselves as well, or would that be too much with Axegrinder bonding (though their 1 Life should keep that in check)? As always let me know what you think. ~TAF (figures used = Warhammer Thundrik's Profiteers) TAF was the Storyteller... in THE ENEMY'S LAST RETREAT Last edited by TheAverageFan; September 27th, 2021 at 11:47 AM.
|
|
#355
September 24th, 2021, 05:23 PM
|
||||
|
||||
|
Re: TAF's Customs DWARVEN GUNNERS
Nice ideas. I’d definitely prefer for them to be able to use the sas themselves. I’d also be interested in seeing a version that simply lets them start on moks card if he’s in your army instead of the current dwarves gunners substitute. If you went this direction you could also give them a power that lets them be placed adj to mok when taken as gunners casualties, since they wouldn’t be able to remount him.
Overall very cool ideas!
|
|
#356
September 26th, 2021, 03:16 AM
|
||||
|
||||
|
Re: TAF's Customs DWARVEN GUNNERS
Quote:
There have been concerns about Dwarves having bonding options with Range or SAs, but I feel that the 1 Life on these guys should keep them in check. As for being able to start the game on Mok, that'd take extra wording on already busy cards and I like the fact that if you want two of these guys on Mok at once you need to take two turns to do so. ~TAF TAF was the Storyteller... in THE ENEMY'S LAST RETREAT
|
|
#357
September 26th, 2021, 05:18 AM
|
|||
|
|||
|
Re: TAF's Customs DWARVEN GUNNERS
For space..."Mok may target and attack nonadjacent figures with...etc". No he can't! But these guys can! So IMHO this sentence could be removed.
Not that that would help with starting them on Mok but it may help with the card dynamics. Good trades with - Porkins / xraine69 / mac122 (x2) / frylock / Ztimster (x2) and probably others I forgotten to mention...sorry. Last edited by AMIS; September 26th, 2021 at 05:18 AM. Reason: Gotta love Dynamics.
|
|
#358
September 26th, 2021, 05:49 PM
|
||||
|
||||
|
Re: TAF's Customs DWARVEN GUNNERS
Quote:
Quote:
~TAF TAF was the Storyteller... in THE ENEMY'S LAST RETREAT
|
|
#359
September 27th, 2021, 05:12 AM
|
||||
|
||||
|
Re: TAF's Customs DWARVEN GUNNERS
I really dig those Dwarvern Gunners. On paper, I'm not sure if its ever worth drafting more than a couple (along with a supply of Axegrinders or perhaps cheaper dwarf squads) of them at a time, one for Mok and another for the Axegrinders Bonding. Maybe a third for filler if points allow.
The specialized engineers feel really nice for Dwarvern theme too. My customs. NE Ohio Tourney - TBA SW Ohio Tourney - NHSD 550 points AotV - Colliding the minis of AotP with the world of HS.
|
|
#360
October 16th, 2021, 01:54 AM
|
||||
|
||||
|
Re: TAF's Customs BATTLE REPORT
TAF’S CUSTOMS HELM’S DEEP BATTLE REPORT
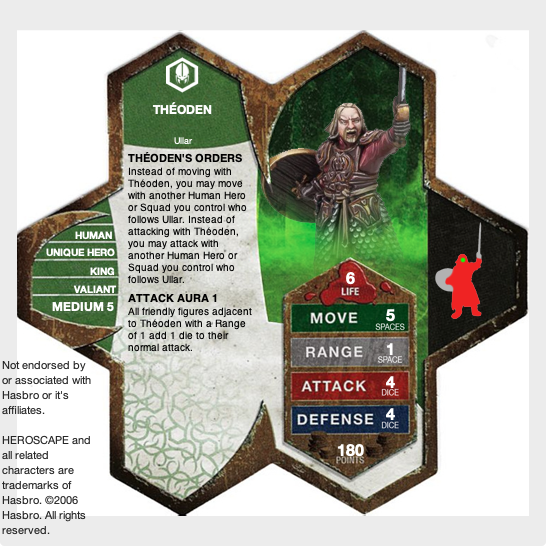
Not too long ago I actually took the time to create a map and scenario for the Battle of the Hornburg on Tabletop Simulator (where every hex is free and you have unlimited copies of every unit), using it as an opportunity to playtest a scenario and try out some of my LotR customs to see how they performed. It took many hours but overall was a fun experience and I thought it was worth sharing here: MAP: 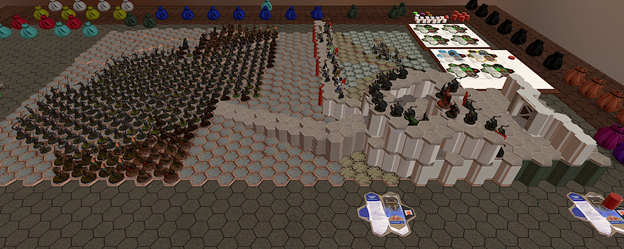 ARMY 1 – DEFENDERS Army 1 is split into two groups: defending army starting in the castle (heroes and elves on wall, rohirrim in castle) and reinforcements starting on the ridge behind the enemy army, spawning in at Round 20. Army 1 has two sets of Order Markers: one must always be placed on a Hero Army Card and the other must be placed on a Squad Army Card. Theoden – 180 Points (played by Thorgrim) Aragorn – 140 Points (played by Tandros) Legolas – 160 Points (played by Brandis) Gimli – 170 Points (played by Mogrimm) Gamling – 80 Points (played by Finn) Haldir – 100 Points Rohan Infantry x6 – 360 Points Lorien Archers x9 – 810 Points Reinforcements (at Round 20) Gandalf the White – 240 Points (played by Ulginesh) Eomer – 130 Points (played by Dupius) Erkenbrand – 130 Points (played by Dupius) Riders of Rohan x5 – 750 Points (played by Templar Cavalry) 3250 Total (2000 before Reinforcement) Army Cards:
Spoiler Alert!
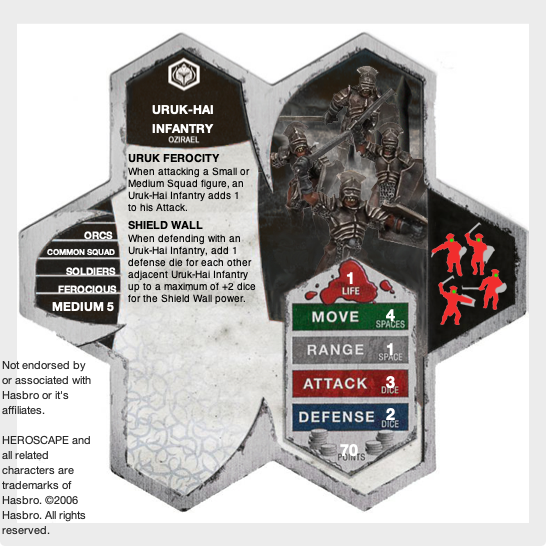
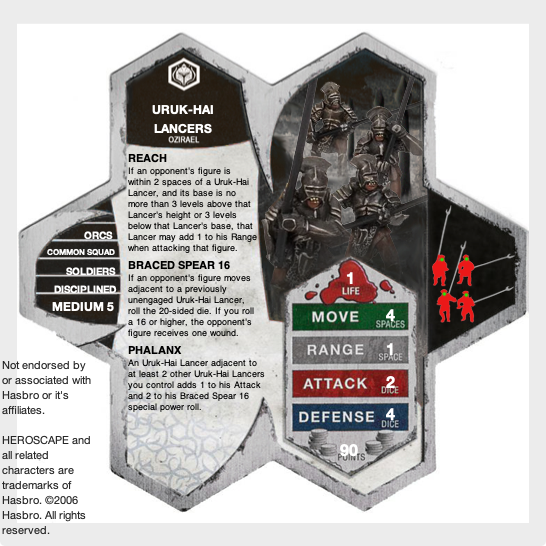
 ARMY 2 – ATTACKERS Army 2 is split into two groups: the Isengard Fighting Uruk-Hai and the accompanying Dunlending Armies. Both start on the open field (Uruks in center, Dunlendings on flanks). The Dunlendings are less diehard and reckless than the Uruks and will flee the battlefield at Round 20 when things begin to turn against the attackers due to the siege taking too long. Army 2 has two sets of Order Markers: one must always be placed on an Ozirael Army Card and the other must be placed on a Ragnar Army Card. Uruk-Hai Commander – 240 Points Uruk-Hai Infantry x27 – 1890 Points Uruk-Hai Lancer x27 – 2430 Points Uruk-Hai Berserker x12 – 360 Points Uruk-Hai Crossbowman x11 – 770 Points Wildmen of Dunland x10 – 300 Points (played by MacDirk Warriors) Dunlending Warriors x10 – 600 Points (played by Tarn Vikings) 6570 Total Army Cards:
Spoiler Alert!
 GAME CONDITIONS - The Defending Army must destroy the enemy army or whittle them down until enemy victory becomes too unfeasible to continue playing. - The Attacking Army must destroy all opponent’s figures, or capture the Glyph of Brandar inside the Hornburg Keep before Round 20. Special Scenario: The Battering Ram Special Scenario is in effect for Army 2, enabling trios of units to combine their attacks into an SA of 6 against Doors.  At Round 6 the Deeping Wall will be breached down the center. Remove a 7-hex tile and accompanying wall pieces from the center. All squad figures on the tile are destroyed. All Hero figures on the tile are pushed back 5 spaces but sustain no falling damage. At Round 20 the new day dawns, Theoden rides forth, and Gandalf and reinforcements arrive. All existing Rohan Infantry are replaced with Riders of Rohan. All Ragnar figures are removed from play. Place the reinforcements into their start zone. Army 1 automatically wins Initiative. PERSONAL BATTLE REPORT First of all, yes I actually played this. Yes, it took forever. Secondly, it actually surprised me how close the battle resembled the battle in the film (with a few exceptions), simply due to the logical deployment of the forces on both sides in the movie battle. First the wall had to be taken, then the gate, then the keep, with Aragorn and Gimli fighting at the breached wall and then the causeway to buy time. Opening Because of the raw power of the Lorien Archers’ Special Attack, attacking the causeway straight out was suicide, so the wall has to be taken first. The attacking army is 90% melee as well—not ideal for castle combat—so the use of the Uruk-Hai Commander’s extra activations is the key to success. 3 squads versus the defender’s 1 squad and 1 hero made overwhelming the wall slow but certain. One thing the defenders could do is position all four heroes on the spaces blocking the ladders. Gimli and Aragorn are especially tough with height and with immunity to Uruk Ferocity. Haldir’s Double Attack is also useful. Although the Special Attack on the Lorien Archers is extremely strong their lackluster defense still made them fall quickly to attackers. They only get 3 Defense in melee and 4 with Extreme Height, or 2 against a Pikeman using Reach. The Uruk Crossbowmen traded easily with them even from ground height. The Wildmen of Dunland also proved their worth—not really worth targeting over the Uruk-Hai and doing so only triggers Scatter to bring up more men anyway. They were able to scale the wall and kill several of the more expensive elves, including Haldir. Before Round 6 Legolas was also killed on the wall, skewered by a lucky roll to a Lancer. Towards the end Army 2 was also able to move Dunlending Warriors up the causeway to get cracking on the door using the Ram Special Scenario. 3 Activations versus 2 made this a relatively free action, and even with Lob Weapons from the Rohan Infantry the Warrior’s 4 Defense made them difficult to deal with. Midpoint By Round 6 only Aragorn, Gimli, and a select few elves remained. Both heroes were knocked down, with Gimli moving to fill the gap in the wall as a blocker. However the hole was too wide and the remaining elves did not last long as 8 Uruks a turn poured in to kill them with either 4 Attack or Reach. Once the Lorien Archers were all killed, ending the threat of their SA being used on the causeway, both armies’ attention was turned to the door. Even with the door gone a large number of Rohirrim boosted by Gamling’s Defense buff stood in the narrow passageway. Unlike the Lorien Archers Rohan Infantry have 6 Defense with Extreme Height, making the Uruk-Hai Crossbowmen have a much harder time trading with them (plus the attackers were starting to run low on them). This part of the siege also poses a unique issue for castle battles: keeping up attackers. Once the Dunlendings were subjected to full-time Lob Weapons they began to dwindle rapidly, with turns wasted moving up more. As such the attackers were forced to waste several turns gathering a large force on and around the causeway—out of range—before resuming their advance. Army 1 was able to use this to bring Aragorn and Gimli up into the keep (castle tiles making this easier). To disrupt the enemy Aragorn and Gimli moved out onto the causeway to harass them, having more Range than the Rohirrim. Gimli was again used as a blocker on the narrow space, to great effect this time. Height Advantage, 3 Defense and Tough, at least two attacks of 5 a turn… many a turn had to be wasted dealing with the two on the causeway. Unlike the films, however, this was a one-way ticket. Both heroes eventually fell to the constant onslaught of fresh units turn after turn. But it bought seriously valuable time. By the time Gimli was killed the clock was really against the attackers. Endgame Much like in the film once the door was open and the causeway abandoned things fell apart surprisingly fast for the defenders. Initiative switch gave the attackers a foothold. The very last of the Rohirrim on the high wall were killed, meaning no more Lob Weapon attacks of 5, with only about five remaining around Gamling. There was too much space opened up for the Uruks inside the castle, enabling easier use of the Shield Wall and Phalanx powers. Although all the Dunlending Warriors were spent at this point, there were still plenty of Wildmen to move up, the attackers still operating at 11 activations a turn. Theoden and two Rohirrim were moved back to the Keep while Gamling and the remaining few fell holding the last chokepoint. Thoeden didn’t stay in the Keep long as the 5-Life door was quickly smashed to bits, risking the capture of the Brandar glyph. He and the remaining squad were brought out to block the entrance. They very nearly died right as Round 20 struck. Gandalf and the others arrived right on time, plowing into the defenders and negating the Lancers’ Braced Spear and making their way to the Commander. He was killed surprisingly quickly, rending the attacking army with only 1 activation a turn to the defenders’ 2. Riders could get bogged down and killed, but never more than one or two a turn. Gandalf sustained some wounds as well, but not enough to die and enable Braced Spear soon enough. And although Trample Charge didn’t always go off to its full extent each time, the Riders were still killing 4-7 Uruks on average each turn. There were still a great number of Uruk-Hai left by the time Player 2 surrendered. The longer the fight with the Riders went on the more obvious defeat became. Continuing would’ve just been a slow death to extra activations with only a slim chance of victory if the dice were especially generous. And the game had gone on long enough at that point.  OVERALL THOUGHTS: This was fun and a close game. Even though it took forever, the timer of 20 rounds kept the game at a good pace. The dice also were never too skewed on either side, save for the odd whiff or surprising block. Each unit performed mostly as expected. Below are the results: Theoden: Theoden’s Orders was highly useful for Order Marker management, and he can break the scenario restriction and let you attack with 8 Rohan Infantry, 4 of which can be Lob Weapons for 5 dice. Aragorn: Even in a battle this massive Surround Takedown still doesn’t activate very often, unless the first attack fails. Tracking plus Castle movement bonus made him extremely mobile, able to move around the battle just as much as he does in the movie. Legolas: Legolas did not perform very well here, his single-attacking at range not terribly useful without any real priority targets for him to fight. He died fairly quickly. Gimli [MVP]: Gimli was worth every point in this battle, so tanky he’s basically not worth attacking for the enemy squads. His Throwing Hatchet SA could also kill Wildmen without triggering Scatter. Only being subjected to constant attacks while defending the causeway finally brought him down. Haldir: Haldir did okay, blocking one of the ladders. He was slowly overwhelmed and killed by Wildmen who Army 1 didn’t have time to deal with. His Inspiration aura didn’t do much in a game of this size. Gamling: Just having Defensive Aura 1 in a chokepoint for 4-Defense squaddies made him worth it. Paired Attack 1 while next to Theoden was useful here or there. Lorien Archers: The high cost and low defense definitely kept them in check. While their SA wasn’t used to great effect much, the threat of it dictated the pace of the battle. Still, over 800 points, sheesh. Rohan Infantry [MVP]: The Infantry really proved themselves to be excellent castle defenders. 4 Defense and Lob Weapons is highly effective. For The King! didn’t really come into play. Gandalf: His disabling the Uruk Lancers is what made the Riders so devastating. Ranged attack also dealt a lot of damage to the enemy Commander. Erkenbrand: He didn’t take a turn the whole battle. Eomer: He took a couple turns once Gandalf became too wounded to go further. Riders of Rohan: Swingy to be sure. At least one managed to kill three foes per turn which really laid waste. Uruk-Hai Commander: Obviously as good as expected. Completely mandatory and probably bordering on an Event Hero like the Balrog should be. Uruk-Hai Infantry: 4 Attack against Squads made short work of most of the elves and rohirrim. Shield Wall was difficult to set up and maintain during the fighting. Uruk-Hai Lancers: As you might expect the threat of Braced Spear was more of a factor than the power itself, preventing melee counterattacks from being feasible. Phalanx was also difficult to set up. Reach proved highly useful in chokepoint fighting where only 1-2 units could normally get attacks in. 4 Defense is highly useful against Extreme Height attackers. Uruk-Hai Crossbowmen [MVP]: Easily the MVP of the match and just as slightly overpowered as I expected. Besieging Shot allowed them to reliably trade with the defenders throughout the game. If they had 3 Defense they’d be better than Stingers which are already a fantastic unit. Uruk-Hai Berserker: 7 Move, 5 Attack, effectively 6 Defense make them strong. Fast and durable enough to climb the wall and get at least one attack in. They just suffer the Common Hero problem and there was no reason to use them once the wall fell. Wildmen of Dunland [MVP]: The fact that they weren’t worth attacking when there were Uruk-Hai to focus on combined with Scatter moving up reinforcements for free made them surprisingly effective. Very good for this scenario. Dunlending Warriors: 4 Defense is highly useful. Wild Onslaught was surprisingly good—even when they’re only swinging for 2—and is part of the reason Gimli went down. They were instrumental in bringing down the first door. TAF was the Storyteller... in THE ENEMY'S LAST RETREAT Last edited by TheAverageFan; October 16th, 2021 at 04:15 AM.
|
|
|
|||||||
|
|
 Similar Threads
|
||||
| Thread | Thread Starter | Forum | Replies | Last Post |
| The Book of Underground Lair - In Progress | Velenne | C3G Maps & Scenarios | 36 | July 14th, 2014 11:42 PM |
| Dungeon 1 The lair Master Set 3 | legolasbaker | Official Rules & FAQ's | 7 | October 7th, 2011 09:47 PM |
| Heroscape Solitaire: Monster Lair | Kaiyu | Other Customization & HS Additions | 7 | September 19th, 2010 12:07 AM |
| Shurrak's Lair by Schulzy | Schulzy | Maps & Scenarios | 2 | August 19th, 2010 04:51 PM |
| NorCal Tourney Jan 20 @ Satyr's Lair | Satyr | Events | 202 | January 24th, 2007 02:53 AM |


 Linear Mode
