
|
|
|||||||
| Custom Units & Army Cards Fan-created HS army cards for units, glyphs, and equipment |
 |
|
|
Thread Tools | Search this Thread | Display Modes |
|
#361
 October 18th, 2021, 10:09 PM
|
||||
|
||||
|
Re: TAF's Customs HORNBURG BATTLE REPORT
Sounds like a ton of fun to reenact this!
Could be done with a lot of proxies! TT is possibly my favorite of the 3 movies. That’s a lot of different units!!! Tag me in something sometime if you need some feedback. So far what I’ve seen looks pretty solid. 
|
|
#362
October 21st, 2021, 01:56 AM
|
||||
|
||||
|
Re: TAF's Customs HORNBURG BATTLE REPORT
Quote:
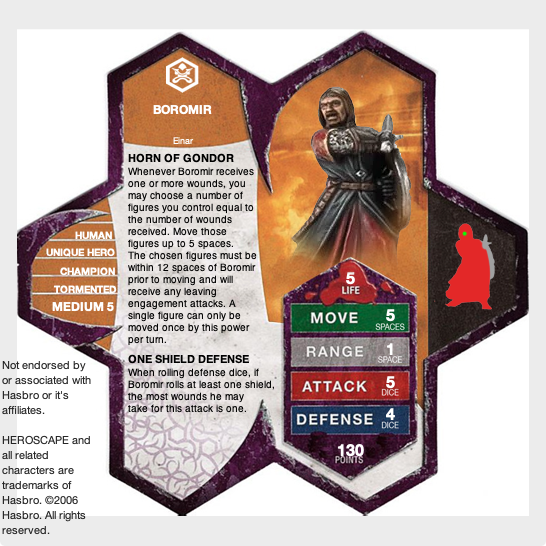
In the meantime I performed a second scenario in my free time, because why not? This time it's the much smaller Amon Hen battle, though by smaller I mean still nearly 1000 points because the Fellowship is an expensive adventuring party. It was still quick enough for 2 games this time (and I made sure to take lots more pictures). AMON HEN BATTLE REPORT    Army 1: The Wounded Fellowship. The Fellowship minus Gandalf (and Sam for this battle) are on the verge of breaking. They have glyphs and more points than the Uruks but are spread out across the map. Aragorn (played by Tandros) – 140 Points, carrying the Blade of Lorien glyph Legolas (played by Brandis) – 160 Points Gimli (played by Mogrimm) – 170 Points Boromir (played by Sacred Band) – 130 Points Frodo Baggins (played by Darrak) – 60 Points, carrying the One Ring and Sting glyphs Merry (played by Axegrinder) – 60 Points Pippin (played by Axegrinder) – 60 Points 780 Points total Army Cards:
Spoiler Alert!
 Army 2 – Uruk Scouting Party. The firstborn of Isengard’s army is led by Lurtz and a large host of Uruk Scouts. They are also joined by Orcs from Moria hunting the Fellowship for vengeance. Lurtz – 140 Points Uruk-Hai Scouts x6 – 360 Points Moria Goblins x3 – 150 Points 650 Points total Army Cards:
Spoiler Alert!
 Win Conditions: Army 1 – Destroy all opponent’s figures, or have Frodo escape the battlefield. Army 2 – Destroy all opponent’s non-Hobbit figures, or Abduct Frodo and escape the battlefield. If Frodo is killed by Army 2, then the game is a draw as both players failed their objective to protect the ringbearer/return alive and unspoiled Special Scenarios: Lost Artifacts: Three Treasure Glyphs are randomly scattered about the battlefield: Ring of Protection, Potion of Healing, Heroic Rune [TRAP = the figure does not get the glyph and their turn immediately ends] Shallow Water: Any water tile that is adjacent to at least one land tile costs 2 spaces instead of stopping movement completely. Figures that can move freely in water may ignore this effect. The One Ring: The Ring is growing stronger. Subtract 1 from your Invisibility Roll. Any non-Hobbit you control who ends their turn within 2 spaces of Frodo must perform the same d20 roll, turning to an opponent’s control if they roll a 1-3. Escape: Army 1 can win by having Frodo escape. If he is in the river at the edge of the map at the end of the Round, he escapes and continues down the Anduin with Sam. Army 2 can win by having the Uruk-Hai leave the battlefield with Frodo in tow. If Frodo is at the edge of the map by the ruins while under the effect of Abduct at the end of the round, he is taken away toward Isengard. Both armies have 2 sets of Order Markers. One works as normal. The other can only be used to move figures: anyone activated using the second set cannot Attack. No figure can be activated more than once during your overall turn.  Game 1 Despite winning initiative, Player 1 did not immediately move with Frodo but instead moved both Aragorn and Gimli up to serve as blockers to the enemy advance. This seemed to pay off as it’d be a long way around the two. Some Scouts engaged the two while others moved around. Legolas was similarly positioned as a blocker on the left flank, as there is only one space for passage there.  Lurtz advanced but stopped to use his Longbow over Find The Halflings, targeting Gimli who’d been injured. As an SA that reduces defense it proved highly effective against the Dwarf, but still cost Player 2 a few turns that could be spent moving up more forces. Frodo picked up the Heroic Rune along the way, forced to take a detour around the river before him. This enabled one Uruk to catch him, though it was quickly killed by Merry’s ranged attack. Just like in the film Merry and Pippin throwing stones were able to fell quite a few Uruks.  Boromir was similarly moved to block, though he was swarmed by Moria Goblins:  With Gimli dead Lurtz was able to advance and make use of Find The Halflings to move up the main bulk of his army. Aragorn moved to the top of the ruin and grabbed a Potion of Healing, using the vantage to shoot a Scout chasing Frodo. Then he threw himself off the ruin into the clustered enemies (just like in the movie), managing to avoid falling damage. Unfortunately his two attacks both mostly whiffed. He also whiffed on both LEAs the Scouts chose to take continuing the pursuit.  Still, Frodo had managed to get a huge lead:  While Frodo slipped off, Legolas was repositioned and engaged Lurtz who’d been shooting at Boromir after escaping Aragorn. With his two attacks he was able to whittle down and kill the captain, though it didn’t save Boromir from the goblins.   Meanwhile the remaining Uruks kept up the chase, slowly catching up to Frodo but it was too late by then:  Merry and Pippin had served as the last blockers Player 1 could use to thwart the Scouts’ advance, and so ironically both had to be forcibly removed via Small Abduct before the game had ended. So Frodo escapes, Boromir died, and Merry and Pippin ended the match in enemy hands. It’s like it was meant to be, except Gimli was the one pumped full of Uruk arrows this time around.  Game 2 Game 2 got off to a worse start due to the Uruks winning initiative, allowing 9 Scouts to rush for Frodo right away, three of them at 7 move. Aragorn blocked their main lane of movement and engaged Lurtz, but still it was only 2 turns in when they got Frodo with Small Abduct. Fortunately Gimli was able to jump in as they dragged him back. Remember that Small Abduct doesn’t work if there’s an adjacent Medium hero, so Frodo took the LEA and slipped off. An initiative switch gave him a clean getaway. From there the main force of Uruk Scouts moved past Gimli and Aragorn and hounded Frodo down across the map. This time they wouldn’t be stopped by just one getting killed:   One and then another caught him, but both times Frodo was saved by a rock from Merry. Halfling Sharpness and height makes him surprisingly deadly. Boromir was also able to jump on one of the roads and act as a blocker, killing two Uruk-Hai in the process. But the sheer number of Scouts meant that more than single-attacking would be needed here. Player 1 began moving Legolas after Frodo, taking pot-shots where possible and picking up the Heroic Rune along the way. Sting made sure that initiative stayed on Player 1’s side throughout most of the game up until this point. Legolas caught up (with some help from Horn of Gondor) and enabled Frodo’s third escape. Despite the occasional swing from a scout he stayed in fighting condition. The attack rune gave him two swings for 5, killing at least one Uruk every turn. With this Frodo managed to reach the shore, with dwindling pursuers after so many turns. He made it two water spaces in.   Then disaster struck: initiative switch giving the enemy time to catch up. Frodo made it to the edge of the map, but there were two turns left before the end of the round. By this point Player 2 was running out of Scouts, so Moria Goblins were moved up as well, managing to kill Boromir again as he stood in the way. His horn was used to move Pippin into a blocking position to take his place. Without Halfling Nimbleness though he didn’t last too long against Mob Attack. Still Legolas remained the real problem, killing one Uruk and then another as they pulled Frodo to shore. At this point the attacking force had completely exhausted itself, and by the time the last orcs caught up Frodo had again waded to the edge of the map, slipping off to victory.  Final Thoughts: I’ve never seen so many LEAs in my Heroscape career. It was an interesting balance of Frodo with 6 Move and the Uruks with 7 if they didn’t attack, but with lots of blockers in their way and worse survivability. Disaster almost struck the good guys a few times, but just like in the story Frodo’s friends bail him out from his pursuers, though in this instance their sacrifice cost Boromir and Gimli/Pippin both. It's definitely currently skewed in the good guys' favor at present, though the Isengarders could steal it quick if they get to Frodo early where it's a short drag back to their zone and a lot more troops in the immediate area. Also one bad roll on The One Ring for nearby allies could essentially end the game right there. Aragorn: While he didn’t do much damage even with Surround Takedown going off, he threw himself into a bunch of Uruks and held the main force back in doing so. His one opportunity to use his throwing knife I forgot to do so, using the bow from height instead. Legolas: Much better. He blocked a one-hex lane and saved Frodo from Abduct without falling to the Ring. He also killed Lurtz with his double attack. In the second game he was fast enough to catch up to Frodo's pursuers and used his double attack to whittle down the attacking force. Gimli: He served as a blocker forcing Uruks to go around. However against Lurtz’ defense-reducing SA he didn’t last one-tenth as long as he did in Helm’s Deep. Frodo: Move 6 was all he needed. Sting’s Initiative boost was immensely useful since initiative-flipping could be disastrous. Four rolls for The One Ring near allies and none succeeded, thankfully. Boromir: He too served as a blocker, but he only killed a couple enemies. His horn helped move friends here or there, being especially useful the second game. Merry: He killed quite a few enemies by throwing rocks with Halfling Sharpness and blocked the main lane to the shore, potentially saving Frodo in the process. Pippin: He blocked one of the roads, forcing the Uruk-Hai to forcibly remove him to clear the way. The second game he blocked another road, forcing Goblins to take the time to kill him. Lurtz: He moved a large number of Uruk-Hai and killed Gimli, though he was unable to square off with Legolas. In the second game his men outran him and so after awhile Find The Halflings had no use. Uruk Scouts: 3/3s aren’t much of a match against the powerhouse heroes of the Fellowship, though they very nearly got Frodo and were able to forcibly remove the other Hobbits. Moria Goblins: Not much space for them in the match, but their Mob Attack did far more damage to Boromir than Lurtz ever could. Not bad considering their other two powers are no use on this map. ~TAF  TAF was the Storyteller... TAF was the Storyteller... in THE ENEMY'S LAST RETREAT Last edited by TheAverageFan; October 21st, 2021 at 02:47 AM.
|
|
|
|||||||
|
|
 Similar Threads
|
||||
| Thread | Thread Starter | Forum | Replies | Last Post |
| The Book of Underground Lair - In Progress | Velenne | C3G Maps & Scenarios | 36 | July 14th, 2014 11:42 PM |
| Dungeon 1 The lair Master Set 3 | legolasbaker | Official Rules & FAQ's | 7 | October 7th, 2011 09:47 PM |
| Heroscape Solitaire: Monster Lair | Kaiyu | Other Customization & HS Additions | 7 | September 19th, 2010 12:07 AM |
| Shurrak's Lair by Schulzy | Schulzy | Maps & Scenarios | 2 | August 19th, 2010 04:51 PM |
| NorCal Tourney Jan 20 @ Satyr's Lair | Satyr | Events | 202 | January 24th, 2007 02:53 AM |


 Linear Mode
