
|
|
|||||||
| Custom Terrain & Obstacles For Custom terrain, buildings, and other misc. obstacles |
 |
|
|
Thread Tools | Search this Thread | Display Modes |
|
#13
 May 26th, 2006, 09:55 AM
|
||||
|
||||
|
Grishnakh’s Customized Terrain - Part II - Stream/River/Lake Edges
  Here’s my next entry in my ongoing customized hex tiles thread. Above is one of my finished stream edge water tiles complete with tall reeds/grass. Here’s a step-by-step on how it’s done: Materials: You will need black, burnt sienna and white acrylic paint, Elmers glue in a squeeze bottle, water, a small paint brush, two colors of rock flocking material, field grass and some Heroscape water hex tiles. The rock flocking material should be stored in large Ziplock bags. You will need brown and light gray. (Sorry I don’t have the numbers for the type I used, I threw away the package a long time ago. The brown should match the burnt sienna paint and the gray is a light gray.) Note: When I refer to “flocking” throughout this tutorial I will mean the hard rock material, not the soft sponge like flocking that I used to create the grass in the previous tutorial.)   You will also need small gravel to represent boulders. I look for gravel that is gray in color, small, and most specifically rocks that have a flat side to them. I’ll glue the flat side down in a later step.  Here’s some reference shots out of a book that sort of shows the look I’m going for:   Step 1: Planning The first thing to do is to plan which edges of the water tile you are going to model. I find that I use two different types, water tiles modeled on two sides and water tiles modeled on three sides. Using these I can put together a wide range of water situations like lakes and streams. The red shaded area in the pictures below show the area(s) that I’ll be working on. Two hex sides:  Three hex sides:  In planning this out you’ve got to leave enough room on the tile so a figure will be able to fit on it. By keeping it to the side and not letting the rock(s) extend too far out onto the tile you should have no problem with this. Note: I personally use Games Workshop bases to base my figures. They come in two different sizes, medium (shown on the human) and large (shown on the orc). And yes, that’s a Heroscape glyph being used as the base of the larger troll figure.  You have to move them around and prop them up sometimes on the rocks but overall it works out OK. Here’s how my figures fit on the finished tiles (by the way, facing is important in Melee, that’s why I have all of my figures based on squares or hexes and not rounds.):  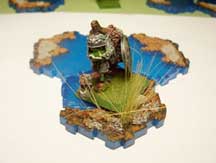  Step 2: Painting The first thing you do is to paint the edge of the tile you are going to model black. You paint the black paint right up to the edge of the tile but make sure you don’t slop the paint over the edge and onto the sides of the tile. This will throw off the tolerance and will make the tile difficult to put together with other tiles. Here are two tiles painted in correctly.  And here are a total of 10 tiles painted. The upper right two tiles are three sided tiles while the rest are two.  The next step is to dab on the burnt sienna. I’ll mix this paint with a little white to help make it more opaque. (Little being the important word here, it doesn’t take much.) Again take it all the way to the edge. The importance of this will be apparent later. Painting the brown:  The finished step:  The painted tiles:  Step 3: Flocking The next step is to add the glue and the flocking. As in my previous tutorial I am using Elmers glue with a squeeze top to “draw” with the glue. Notice how I draw a bead of glue staying slightly away from the edge of the tile. This is to keep any of the flocking from interfering with the tiles ability to lock into another tile. The reason for the paint in the step 2 is to cover the blue tile wherever you don’t glue on the flocking. That way you won’t have water areas showing right next to the shore line.  I then draw in the rest of the glue:  Here’s all of the glue in place:  Next you dip it into the flocking, pull it out, tap it to remove the excess flocking and then lightly push the flocking down into the glue with your finger to make sure in adheres.    Here’s another round of pictures to demonstrate the process:    Next I’ll add in some of the gray rock flocking material to represent a different color of river rock. Simply dab some glue over top of the brown rock (leaving areas for the brown to show through) and dip it into the gray flocking. Here’s several tiles that have been flocked with both colors:  Step 4: Grass Field Grass is available at hobby stores that sell model railroad supplies.  You carefully pull some of it out of the bag trying your best to keep it together as a “clump”.  The basic idea is that you cut off the bottom of the grass so that all of the strands of grass are even and then you glue that into a “blob” of glue. Put the bead of glue on the rocks, not on the grass. Remember that the glue will dry clear so you want enough of a bead that when it dries, it will hold the grass.    Here’s what it looks like:  Another technique is to fold the grass in half and then snip it in the fold with a pair of scissors. You then have two stands of grass/weeds to glue down.     While the grass dries you’ll have to prop it up so that it does not fall over. The Elmers glue is pretty tacky but it can still let the grass droop or fall over. (As you can see form the photo I personally like to pull out my very old and valuable Frank Frazetta books to prop up this gluey mess with.)  The last step with the grass is to trim it so it’s not so tall. Try to do this randomly and at different angles. You don’t want the grass to look unnatural or like it’s been cut off.   Step 5: Boulders Next you test fit some of the gravel onto the tiles until you find a place where a boulder might look good and fit well. Another large blob of glue and your set. Try to vary where you place these rocks. Too many placed in the same spot on all of your tiles will not look good. 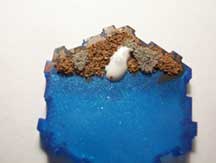   Step 6: Water Ripples The last step is to use a small brush and to place thin lines of white paint around the edges of the shore line. Study pictures that show the way water ripples around rocks. Once you’ve painted this on and it is dry you can easily scrape some of the paint back off with the end of your paint brush to correct any mistakes or to break it up.   Step 7: Sealing The last step is to lightly seal everything. The only spray varnish that I have found to work is Testors #1260 - Dullcote. And even then you don’t want to spray it on too thick and you don’t want too much of it on the sides of your tiles. I generally lock all of my tiles together in one flat spread and spray the varnish on in a wide side to side motion. One problem is that the varnish will dull down the water. My solution was to take a clean cloth after I sprayed it and wiped it off of the water part of the tile. It got a little dull toward to edges of the rocks but that sort of made it look like shallow water so I didn’t mind. That’s it. Next I’ll probably talk about modeling better looking trees and rocks. If anyone has any modeling tips they’ve tried with these tiles I would like to hear from you. Hope you find this useful! _________________________________________________ Here are some shots of my finished water tiles in play: (From a multiplayer Melee/Wizards game, all figures are from my collection and most are old GamesWorkshop figures.) The party, while traveling on an ancient forest road happens across a small lake.  The dwarf, even though everyone else advises against it, has to investigate.  As he moves around the lake he disturbs the resting place of a water troll sleeping in the nearby rocks. 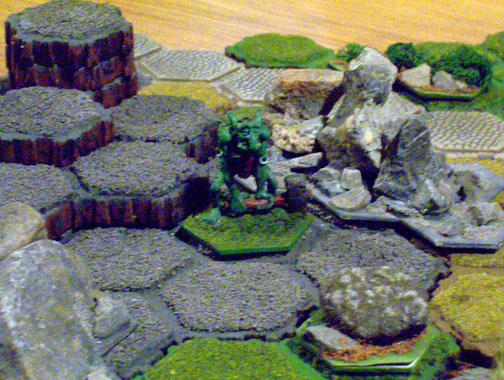 The troll charges and the battle is joined....  The dwarf is upset because he can’t get into the battle. He dares not jump in the lake because it’s too deep.  The wizard ends the fight by throwing a fireball at the troll. (Which is what you have to do of course with trolls. Sorry, I couldn’t resist throwing in a fireball in Photoshop...)  As the party looks at the smoking remains of the troll the dwarf asks if anyone thinks he might have had any treasure lying around.... You gotta love those dwarves huh?  To be continued. Next up: Trees My Custom Terrain Thread: http://www.heroscapers.com/community...read.php?t=448 Last edited by Grishnakh; September 19th, 2012 at 12:30 PM. 
|
|
#14
May 26th, 2006, 11:01 AM
|
||||
|
||||
|
Again, this is just incredible. I have to ask how much time it took to complete everything you have done. It seems like it would take me a month of constant work.
If I had a million bucks, you'd be my first employee.
|
|
#15
May 26th, 2006, 12:01 PM
|
||||
|
||||
|
Quote:
There had been some disscussion back on HQ about my larger rock tile hexes warping very, very slightly. As it turns out I stored all my tiles stacked together flat for a month or so and now my hex tiles lay flat with no warping at all. I can't help you with the lazyness obsticale, sorry. You'll have to work that one out yourself. Quote:
My Custom Terrain Thread: http://www.heroscapers.com/community...read.php?t=448 Last edited by Grishnakh; September 19th, 2012 at 12:30 PM.
|
|
#16
May 26th, 2006, 12:39 PM
|
||||
|
||||
|
Grishnakhs Customized Terrain - more photographs of my custom tiles in play.
I thought some of you would like to see what a complete master set would look like in play so I set up a hypothetical battle and took some shots. And this time around I actually used Heroscape figures in my pictures! Ah, the Romans out on patrol.....  ....little do they know but they are about to be ambushed by a squad of Orcs.  The Orcs charge!   The Romans counter charge!   As the romans are beaten back by the Orcs reinforcements arrive across the lake....  But the orcs have another ally who flies in..... (Note that the base on Charos has been painted and flocked to match my hex tiles.)  The Roman reinforcements are cut of from helping their friends.... 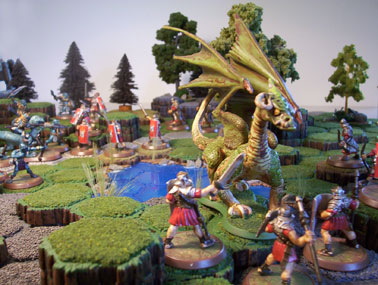 Even more Orcs charge into the fray....  The Orc archers take the high ground and pelt the Romans with blackened arrows....  Various views of the chaos....       .... still more to come. My Custom Terrain Thread: http://www.heroscapers.com/community...read.php?t=448
|
|
#17
May 26th, 2006, 12:46 PM
|
||||
|
||||
|
Great pics and the scenery looks awesome! What material are you using for the Hex bases for trees and statues?
Newb.
|
|
#18
May 26th, 2006, 01:28 PM
|
||||
|
||||
|
I acn't believe i missed this thread on HQ Grishnakh this Terrain is amazing
"The fact is that a man who wants to act virtuously in every way necessarily comes to grief among so many who are not virtuous."- Niccolo Machiavelli
|
|
#19
May 26th, 2006, 01:46 PM
|
||||
|
||||
|
Quote:
My Custom Terrain Thread: http://www.heroscapers.com/community...read.php?t=448
|
|
#20
May 26th, 2006, 02:06 PM
|
|||
|
|||
|
This is truly an amazing effort - elevating Heroscape into an art form, really.
I would think that terrain that evocative of grass, hills, streams, etc would just BEG for more terrain rules than are currently in HS (meaning that the terrain is so beautiful, it would seem strange that no different rules come into play when a fig steps from grass to sand to rock, for instance). Fantastic work, Grish!  This kind of effort should be displayed at whatever Convention you could get to. NY has to have Conventions that could use your Set as an example of what people can do with HS components....
|
|
#22
May 26th, 2006, 02:45 PM
|
||||
|
||||
|
Hey everybody, I made a .pdf out of Grishnakh's first set of instructions and made it available at the bottom of the article on the front page. This should make it easy to print out and have with you for refrence as you work on the project.
|
|
#23
May 26th, 2006, 02:45 PM
|
|||
|
|||
|
HOLY HELL! That looks so freakin realistic! How long does it take you to do that per hex? (sorry if that was answered; i looked at the pics, not the words...i have no where near enough patience to do that.....)
|


 Linear Mode
