
|
|
|||||||
| Custom Terrain & Obstacles For Custom terrain, buildings, and other misc. obstacles |
 |
|
|
Thread Tools | Search this Thread | Display Modes |
|
#109
 July 3rd, 2009, 02:14 PM
|
||||
|
||||
|
Re: Halo-Style Custom Bridge by The Walrus King UPDATE- PART
Well Halo isn't exactly "real" but okay, lol.
I say keep it how it is. If you want a bad roll then good for you, its not like you can use the force to make the dice go to the right number, where ever you end up you end up, keep it the way it is. 

|
|
#110
September 8th, 2009, 08:08 AM
|
||||
|
||||
|
Re: Halo-Style Custom Bridge by The Walrus King UPDATE- PART
I haven't been here in what seems forever.
After rolling to see how far off target you are, roll another 20-sided die. On a roll of 1-4, the figure moves towards the Mancannon. On a roll of 5 or 6, you move diagnoly to the left towards the Mancannon. On a roll of 7-9, the figure moves to the left of the mancannon. On a roll of 10-11, the figure moves left diagnolly away from the Mancannon. On a roll of 12-13 you move diagnoly right away from the mancannon. On a roll of 14-16, you move right. On a roll of 17-18, you move diagnoly right towards the mancannon. On a roll of 19 or higher, you move away from the mancannon. How's this solution? Mods: I needed to save this good thread, it needed some help.  I will worship you, please don't send me away. I will worship you, please don't send me away.
|
|
#111
September 8th, 2009, 02:34 PM
|
||||
|
||||
|
Re: Halo-Style Custom Bridge by The Walrus King UPDATE- PART
What about where you land it controlled by how you move into it? If you come from the left you land right, etc.
|
|
#112
September 8th, 2009, 03:01 PM
|
||||
|
||||
|
Re: Halo-Style Custom Bridge by The Walrus King UPDATE- PART
I think the direction of the misfire should depend on the angle the figure enters the mancannon, but that's just me, and it would probably be a bunch of text.
Awesome custom bridge and card for the fusion coils, btw. Save a Dragon; click my egg:  
|
|
#113
September 8th, 2009, 05:37 PM
|
||||
|
||||
|
Re: Halo-Style Custom Bridge by The Walrus King UPDATE- PART
Quote:
|
|
#114
September 8th, 2009, 05:40 PM
|
||||
|
||||
|
Re: Halo-Style Custom Bridge by The Walrus King UPDATE- PART
Woah, didn't notice that, sorry a ton.
Save a Dragon; click my egg:
|
|
#115
September 8th, 2009, 06:32 PM
|
||||
|
||||
|
Re: Halo-Style Custom Bridge by The Walrus King UPDATE- PART
Quote:
|
|
#116
September 8th, 2009, 06:42 PM
|
||||
|
||||
|
Re: Halo-Style Custom Bridge by The Walrus King UPDATE- PART
LOL at that.
I wonder how the man cannon is going... Save a Dragon; click my egg:
|
|
#117
September 8th, 2009, 08:02 PM
|
||||
|
||||
|
Re: Halo-Style Custom Bridge by The Walrus King UPDATE- PART
Sounds like he has a lot to do, so probably not good.
|
|
#118
October 15th, 2009, 09:39 PM
|
||||
|
||||
|
*poof* I HAVE RETURNED!!!!!! And I bring three--yes THREE (3) BRAND NEW SETS OF HALO TERRAIN!!!!
 Ok well I finally had a free day yesterday after taking the PSATs (we got out early from school), and I was feeling sick so i FINALLY got around to clearing my art desk and uploading the pictures!!! So for your viewing and 'scaping pleasure, I present to you- the long-awaited Man Cannon, new Snow-flocked terrain, and the hugely-anticipated Fusion Coil! WARNING- Lots of pictures ahead! BEWARE! Enjoy! STOP. Before going any further, read my "Quick N' Easy Hex Tutorial (Glyph Size)" tutorial Here. The normal sized hexes made there WILL be used in these projects. ~~~~~~~~~~~~~~~~~~~~~~~~~~~~~~~~~~~~~~~~~~ MANCANNON
 ------------------------------------------- MATERIALS
------------------------------------------- STOP. Before going any further, read my "Quick N' Easy Hex Tutorial (Glyph Size)" tutorial Here. The normal sized hexes made there WILL be used in this project. First we have one of the hexes form my Hex Tutorial (if you didn't read the above statement, read it now)  The Man-Cannon part (the launcher) will sit between those lines. Next i took a random leftover piece of balsa wood from the bridge and gave it a slant...  So it will sit nicely on the base as shown to create a nice ramp effect  Now for a minor detail. I placed the ramp on a piece of the 1/16"-thick piece of basswood. I traced a rectangle the same size as the rectangle traced on the Man Cannon base.  Then i traced a little rectangle hole for the slant to intersect to the base...  ...And cut out the rectangle and the hole.  Next i glued 'em all together.  I then repeated the process. Now I have TWO Man Cannons!!! *applause*. They are shown with Drake for size comparison  Yuck. Too bland. Time to paint!  The color is the same custom-gray i used for the bridge.     Yay painted Man Cannons!!!... Something still doesn't look right though. Hmmm..... AHA!  I decided to draw little arrows with my MICRON 05 because it was a small job. I like the arrows 'cuz they look nice and show how you can only enter the man cannon in one direction. And now the Man Cannons are FINISHED!!! And what's better- TWO MAN CANNONS!!!      Drake is standing there just for more size comparison. AND THAT CONCLUDES THE MAN CANNON! **rules to follow in another post** ~~~~~~~~~~~~~~~~~~~~~~~~~~~~~~~~~~~~~~~~~~ SNOW TERRAIN  ------------------------------------------- MATERIALS
------------------------------------------- NOTICE: I learned how to do this all in Grishnakh's Custom Terrain thread. (it's a sticky) I HIGHLY recommend you check out his thread here. First off I took a basic HS tile and chose a nice snow-y tone to paint it. I chose white  Next I painted around the edge of the tile until i got a nice all-around white tone. It took several coasts.    Next came painting the top. I set it down to paint this part.   This took several coats as well. That would've been it for the terrain... except i decided to flock them to make them cooler  Here's the painted tile alongside the flock i used. I put down a piece of graph paper to work on for 2 reasons-
 ...and spread...    ..using various methods. Flock was applied. CAUTION: FLOCK LIKES TO GO EVERYWHERE. I tipped the tub of flock and tapped the top, allowing only as much flock as needed. Not a lot is needed.  Even using controlled quantities of flock, there was still excess flock. I tipped the tile at an angle and lightly tapped the edge against the table to remove excess flock.  I then used the edge of a knife to remove excess flock that stuck around the tile off the actual raised "grass" part And voila! Snow terrain!   A before/after comparison photo   I repeated the whole process with a 3-hex tile. AND THAT CONCLUDES THE SNOW TERRAIN!!! ...and now for the moment you've all been waiting for. I now present to you... THE FUSION COIL!!! ~~~~~~~~~~~~~~~~~~~~~~~~~~~~~~~~~~~~~~~~~~ FUSION COIL  ------------------------------------------- MATERIALS
------------------------------------------- STOP. Before going any further, read my "Quick N' Easy Hex Tutorial (Glyph Size)" tutorial Here. The normal sized hexes made there WILL be used in this project. After much thought on how i was gonna make the fusion coil, i decided to go with this approach. it doesn't look the best, but it gets the job done. First I grabbed 3 1x1 lego cylinders. 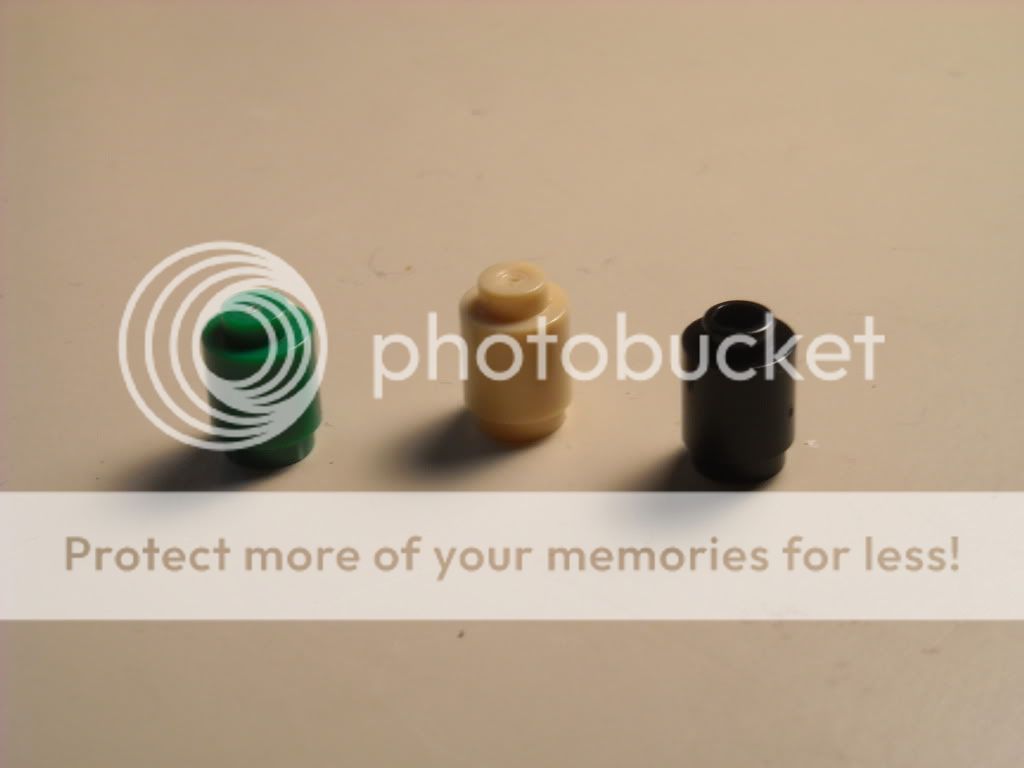  3 seemed like a nice height when stacked next to Agent Carr (sorry Drake went MIA for this project Since I couldn't find 3 yellow legos i had to paint them. I painted them all a solid yellow. It took several coats of paint.What i learned was the darker the lego, the more paint needed. (AKA i hated the black lego  In between coats of paint i took another 3 legos and stacked them so i could work on sizing while the actual center cylinder dried. YAY FOR MULTITASKING! I sized up a piece of basswood for the corner support things.  The ruler just ensured they were sharing the same base level to make measuring more accurate.  Well it looks the same height so I guess I'll keep it I then made 3 more corner support things, bringing the total up to 4 I decided I wanted the size of the base and top to be 2cm x 2cm. It seemed like a nice size to use and relatively in-proportion. I found my 1/16" thick sheet of basswood and measured and cut two 2cm x 2cm squares.  Now with everything cut, I had my assembled and painted central lego cylinder (I <3 Multitasking), 4 corner support thingys, and 2 squares for the base and top of the fusion coil.  I also had my hex created from my Quick and Easy tutorial (not pictured) Now that all the wood is cut, what time is it?..... CORRECT! PAINTING TIIIIME!!!!!!! More color mixing. Same deal as usual   Color looks alright. Time to paint.   Everything painted. Now comes the assembly. Time to go find my trusty Elmer's Wood Glue. *grumblegrumble* I'm hungry. I'm gonna go make myself a sandwich. The pictures below illustrate how i glued the cylinder to the fusion coil base and the fusion coil assembly to the hex base. Be right back!      *BUUUURP* I'm back! Tasty sandwich Next i attached the corner support thingys. This is where the tricky part was. I had to decide between more Halo-realistic and more work OR less Halo-realistic and simpler. I went with less realistic and simpler.  Corner 1 attached  All 4 corners attached I then glued on the final piece- the extra 2cm x 2cm piece of basswood I saved for the top of the Fusion Coil.     AND THERE YOU HAVE IT! THE FUSION COIL!!!! **rules to follow in another post** ~~~~~~~~~~~~~~~~~~~~~~~~~~~~~~~~~~~~~~~ Here's a few pictures of all 3 sets of Halo-themed terrain included in this post.    Enjoy! *falls asleep* --THIS CONCLUDES THE WALRUS KING'S SUPER SPECIAL AWESOME 3 SET SHOWCASE-- LOSE THE GAME RULE 1: You are playing the game. RULE 2: Whenever you think about the game, you lose. RULE 3: Loss must be announced. Congrats. You just lost game. Last edited by The Walrus King; October 15th, 2009 at 09:52 PM.
|
|
#119
October 15th, 2009, 10:23 PM
|
||||
|
||||
|
Re: Halo Terrain by The Walrus King
That's pretty awesome!
And you made me lose the game again. Save a Dragon; click my egg:
|
|
#120
October 15th, 2009, 10:48 PM
|
|||
|
|||
|
Re: Halo Terrain by The Walrus King
Nice Terrain!
Why do I keep losing the game today?!?! I hate your signature.
|
|
|
|||||||
|
|
 Similar Threads
|
||||
| Thread | Thread Starter | Forum | Replies | Last Post |
| Atmospro's Custom Studio - New the Dark Carnival added | atmospro | Custom Units & Army Cards | 67 | June 17th, 2009 01:42 PM |
| Custom Rules for Comic book-style fighting? | crispy66 | Comic Hero Custom Creations | 14 | April 10th, 2008 08:41 AM |
| CH4071C's custom modular bridge (Concept) | CH4071C | HeroScape General Discussion | 21 | December 6th, 2007 08:59 AM |
| Custom Woodland Bridge | Riptide | Custom Terrain & Obstacles | 12 | May 30th, 2007 05:00 PM |
| Custom Human Plank Bridge - done =) | Ch1can0 | Custom Terrain & Obstacles | 48 | March 23rd, 2007 11:47 AM |


 Linear Mode
