The Lost City of Dragoncourt! After Action Report
Posted September 9th, 2014 at 11:30 AM by kolakoski
Well met!
Here is the entirety of the original Codex article, including the full scenario upon which it was based.
Here is the entirety of the original Codex article, including the full scenario upon which it was based.

The Lost City of Dragoncourt!
After Action Report

by
kolakoski
featuring
The New York City
Gang of Four
(chas, kolakoski, Sherman
Davies, and Taeblewalker)

On Wednesday, July 30, 2014, I hosted a gathering of the Gang of Four, at which we played The Lost City of Dragoncourt! scenario, presented in full below.

Spoiler Alert!
Spoiler Alert!


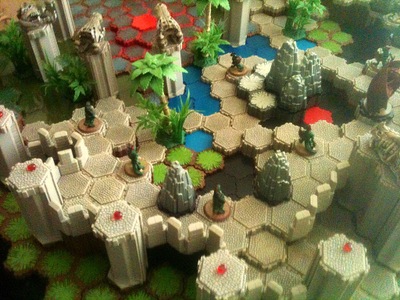


As is usual when hosting these affairs, I had built a map and written a scenario weeks in advance. I agonized over my armies over most of that time. chas started much later, while Taeblewalker and Sherman settled on their armies seemingly at the last minute.
A Note about the scenario. This scenario is notable for allowing C3G, Classic, C3V and SoV (the latter 2, collectively, VC) units to be drafted in the same game, with the latter two, Classic and VC, having their units priced according to the Delta+ system, which was designed to be a fluid pricing system, roughly based on the Power Rankings.
Things to remember. There are 5 Treasure Glyphs, one under each Outcrop. The 3-hex Great Outcrop has 3 Life and 7 Defense, and each single hex Outcrop has 1 Life and 7 Defense. The Victory Conditions:
The team with the most Victory Points (out of 13 total) after 12 rounds wins. VPs are awarded to each team as follows:
2 VP for killing Moltenclaw.
2 VP for destroying the Great Outcrop.
1 VP for destroying each of the 4 Outcrops (other than the Great Outcrop).
1 VP for the each of the 5 Treasure Glyphs carried back onto any Zap Zone hex.
In a nutshell, play consists of destroying Outcrops/Moltenclaw, picking up the Treasure Glyphs lying beneath them, and carrying them to the Zap Zone - and placing occasional OMs on the Dragonfolk to annoy their opponents.
In a nutshell, play consists of destroying Outcrops/Moltenclaw, picking up the Treasure Glyphs lying beneath them, and carrying them to the Zap Zone - and placing occasional OMs on the Dragonfolk to annoy their opponents.

A Note about preparation. Have all the materials for the game, such as Treasure Glyphs, set aside - and segregated - from the rest of your materials before the game, so it is not needlessly delayed and distorted by the discovery that the wrong Treasure Glyphs were initially placed on the map. And create and distribute a "cheat sheet" containing the Victory Conditions and any special rules.

As I did in the original The Lost City of Ashra!, upon which this scenario is based, I decided to field 2 squads of Commons plus Heroes. I started by building a Roman army, the best in terms of variety of Bonded Heroes, balance and fun.

In the first game, I played, choosing Poison Ivy so as to fit in the Azurite Warlord,
Fatal Attraction
165 Poison Ivy
145 Azurite Warlord
110 Romans x 2
110 Marcus
70 Kumiko
600, 12 spaces,

and that's what was for me - fatal.

From Taeblewalker:
In the first game I used
190 Jotun
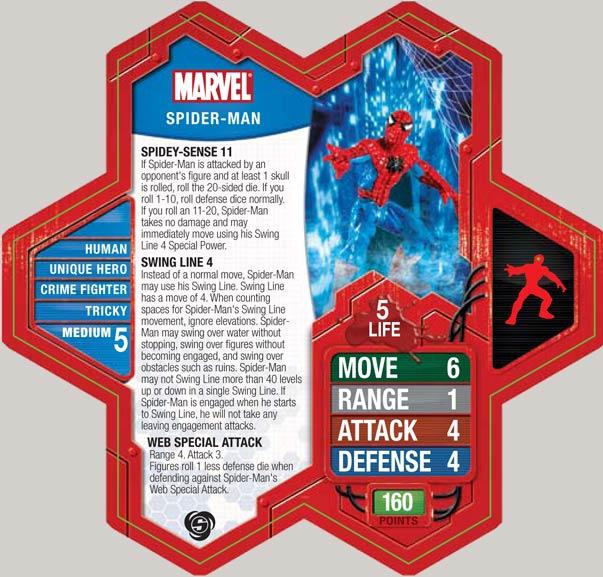
160 Spiderman
95 Heirloom
80 Moriko
70 Shades x 1
595, 8 spaces
I liked the rule about rolling for allies on the third round. We needed to move into position to be able to attack anybody during those first few rounds, so we'd be ready for whatever alliance the dice dictated.

It wasn't so pleasant for me, when I found myself allied with chas - against him. Taeblewalker sums it up:
Jotun had a grand old time throwing heroes into the one lava hex. I forget which two figures he did it to, but I'm pretty sure one of them was a superhero.

Jotun survived the battle with two life left.
The "superhero" was my Poison Ivy. chas remembered he also threw Marcus into the Molten Lava.

She Pheremone Seduced Sherman's Venom, but was sizzled herself before she could either make use of him or send him into the Molten Lava. The Azurite Warlord may or may not have met the same fate as I can't remember what happened to him.
From Sherman:
My army was:
210 Quahon
200 Iron Golem x 2
150 Venom
20 Isamu
580, 8 spaces
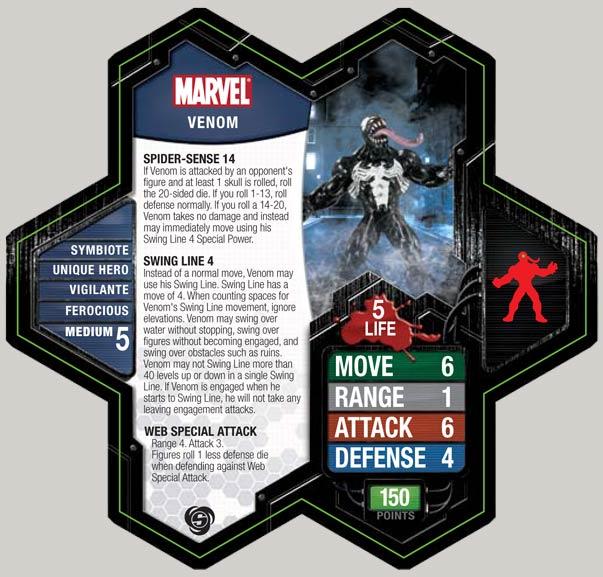
My general gameplan was to use the Iron Golems to destroy the pillars, reveal glyphs and take out Moltenclaw, as they would be virtually immune to the dragon's special attack. Quahon was there to handle squads while Venom provided a potential hero-killer/glyph-grabber.

In actual play the Golems performed pretty much as expected, but Quahon proved too vulnerable without protection to do as well as I would've liked. Venom in both games stayed in the start zone too long and did not contribute much except for drawing fire and threatening opposing heroes.
Quahon, as advertised, had a field day frying Romans. chas and Taeblewalker went at it early on.
From chas (his armies, and how he created them):
The Gypsy Band
180 Gypsy
190 Sgt. Drake II
210 (35 x 6) Pathfinders
20 Isamu
600, 9 spaces
Scouts: Gypsy, Isamu

The brand newest C3V wave just coming out included several cards I wanted to use, most notably the Pathfinders and the Crypt Guardians. Kolakoskis list of medium weight Supers included one in my next tier of just got it want to play it which was Gypsy, for whom I had both a neat figure and card. Although the Crypt Guardians were meant for Sudema and I could hardly wait to use her with them, this particular scenario didnt favor that combo I felt, so I used them in my Team Three, which never got used, as we only played two games. For the Pathfinders I proxied Heroclix Sgt Rocks and US Army WWII soldiers. I could have easily used my many Airborne Elite instead. For although the Pathfinders may have been actually named for that game, a historical Pathfinder was a paratroop scout dropped ahead of the main body to mark their drop zones. But the less used figures were more fun, and would differentiate mine if someone else used the Airborne Elite figures. For the Crypt Guardians I used skeletons by Reaper that I had painted up; they were undead, and with their weapons looked like royal retainers to bond with a Queen and an Undead.
From Taeblewalker (describing the action on his end of the map):
The Shades had less success despite having height advantage on Drake.

Moriko didn't fare any better and Heirloom never made it into the battle before the opposing side conceded. Spiderman was not terribly effective this first game - all the glory went to Jotun.
From chas:
I hate Heat Of Battle starts, but whatcha gonna do? I dont want my opponents to be able to decide who they will be adjacent to of mine before I can set up any kind of screen! At least we had three turns to disengage and open up our tactical options this time.
This was a very weird game, as Kolakoski, my team mate, played far away on the other half of the board. While my own army only took two wounds and slaughtered my enemies satisfactorily in furious combat, I looked up to see my partner devastated. Since the enemies would now have us two order marker sets to one, there was little point to continuing past that point, which was after Round Six. Gypsy did well killing Shades, likewise the Pathfinders hosing down Quahoon (some from height), in a replay of any old Japanese monster movie you choose.

Blam, blam; rat-a-tat-tat! Partner K. was able to finish off the dragon after I got 5 wounds in one round of massive modern small arms fire!
The Pathfinders had moved quickly after Sgt. Drake from the start zone. The Sarge himself had moved a space slower so they could catch up (all but one), and then he helped Gypsy against the Shades and Greenscales on the stairs. None of my Ninjas on either team ever did anything, but Isamu did go up the back way to the parapets with Gypsy as the advanced Scouts. These two of my groups met on the stairway finishing off all the Greenscales and Shades in sight, although Gypsy was unable to knock down a small Outcrop in her first ever round, and was then beset by the flying Shades. Luckily, neither of my two big heroes were taken over by the ghostly enemies!
So we had dealt great damage to our foes, but earned no Victory Points. I hardly felt defeated when our side surrendered however! I liked my team and how it had performed, including my first outing of C3V Pathfinders. Join the Army and See Valhalla!
I feared going in that Poison Ivy might not be the best choice, and she certainly wasn't in my hands. Why do I build armies with Commons to screen, and then not do any screening?

In the second game, I fielded

150 Moon Knight
135 Mogrimm
110 Marcus
110 Romans x 2
95 Major J15
600, 12 spaces.

Major J15 was a last minute replacement for Ne-Gok-Sa (95 points in Delta+), and he more than earned his points pounding away at Sherman's Iron Golems, and the Great Outcrop, softening it up for Mogrimm's later coup de grace.

From Taeblewalker:
In the second game I used
175 Major Q10
160 Spiderman
130 Deathwalker 9000
70 Deathwalker 7000
65 Zetacron
600, 7 spaces
In the second game it was Spiderman who did most of the work, gaining several victory points by himself. Deathwalker 7000 also gained a victory by destroying himself and blowing up a rock outcrop.

Zetacron did minimal damage before he was destroyed and the other Soulborgs didn't do too much - although they did put a few wounds on Quahon. The second game was a closer contest that could have gone either way right up until the end.

From chas:
With Team Two above, Braxas sat outside the castle, as one Crypt Guardian climbed the stairs from behind the castle, and another simultaneously advanced from the start zone.

Then the other two bonded with each other to move to the staircase on the same side of the board. I had suggested to my partner, (Sherman Davies this time around, based on a random roll) that this time we considered combining against one of our enemies, and that happened..Cyprien flew from the start zone far to the side until he was outside the castle also, away from any early melee. When the gang was all together (except for Otonoshi) and one CG adjacent to a Greenscale, Braxes appeared in a space on the ramparts where she could Acid Breath three of the neutral Greenscales, which she did with some help from Cyprien.

He attacked an Outcrop and got a glyph. Other glyphs were being uncovered as more outcrops were falling. Cyprien got the Belt of Giant Strength glyph, but failed in his attack on K.s Moon Knight!

The vampire had, attacked from height and used up the glyph for naught. So Cyprien few back to the Zap Zone to deliver one used glyph, and we had our first VP.
Queen Braxas finally took a shot at Moon Knight with her Acid Breath and took him out.

Braxas attacked the large Outcrop as did some enemy figures, but none of us could put the final wound on it! For the first time I put some order markers on Greenscales, and my Moltenclaw took down Jandars big shooting robot, and the GS womped on other enemies. But the opposing team had gotten far ahead in VPs, and when their Spiderman got one, I saw no way clear. However, Cyprien waded in at my team mates suggestion and did hurt him.

Later on were able to finish off Moltenclaw for another 2 VPs. Once again my team had taken little damage, but been outstrategized and outpointed. This time we put up a much longer fight, but were defeated in the end. But I gotten the opportunity to play yet another C3V newbie, the Crypt Guardians, which was lots of fun. I felt pretty good about my team building, which used a fun Super and two new C3V cards!
The second game was essentially won when Moon Knight used Crescent Darts to take out 2 or 3 Outcrops, and inflict numerous Wounds on Braxas and others (and on the Great Outcrop, I believe), before finally succumbing to Acid Breath.

Lessons learned. In hindsight, I'd be more patient in general, setting up a screen, especially for Poison Ivy, and keeping my army cohesive. Moon Knight was phenomenal, with his Crescent Darts piercing defenses seemingly at will.. And Major J15 is just the cheap, tough Large unit to counter Braxas and her ilk in a myriad of armies. Also, for some reason, I completely ignored the Dragonfolk with my Order Markers.

I liked the map, with its overhang area and stepped road area. ~ Sherman Davies
Overall, it was a fun scenario that would be enjoyable to repeat. ~ Taeblewalker
From chas:
The map and the scenario by K. were great, although we kept rediscovering some of the scenario rules during the gamesthis with a cheat sheet Id made up for myself. I suggested conceding Game Two when it looked very bad for us so we could get in a third game, but the others wanted to play the second one out, and so we didit was exciting, although we had little chance and did lose. Im not one for throwing in the towel early in general, unless it seems close to hopeless, which it was. Its not an emotional thing for mejust a question of whether or not we can still win at all. So poor Sudema, for whom the Crypt Guardians were designed --both Sherman Davies and Tablewalker are part of the Inner Sanctum or their dependents, but you probably figured that out on your ownso Im looking forward to getting her on the table in the future with them!
Comments 0
Total Comments 0
Comments
Recent Blog Entries by kolakoski
- Heroscape is Back? From Where? (March 10th, 2024)
- Custom Evolution (March 3rd, 2024)
- Jedidiah mulroney (January 14th, 2024)
- Captain Xue Playtest - 1/17/24 (January 12th, 2024)
- Holiday Greetings from Sunny Negril! (December 23rd, 2023)